...
Prerequisites
First follow the the Drivers Installation Procedure and ensure that you have correctly connected and powered up your Anubis, and have selected and launched the Music Mission.
Connect your microphones to the XLR combo inputs 1-2 located at the back of the Anubis, your Guitar or Bass can be directly connected to the Hi-Z instrument input at the front Input 3.
Stereo inputs 1-2 or 3-4 can be used.
Note: Using Input 4 will override the built-in Talkback microphone as both share the same circuitry.
...
Proceed with a UNITE or ANEMAN to connect your DAW/AUXES Software Playback and any other I/O you will need.
More details on UNITE and connectivity can be found on this page.Connect your performer microphone or instrument to an Anubis input (or a peered device input)
Monitor your Anubis Mixer DAW, AUX and mix with it the mic or instrument input direct from the inputs.
It is recommended that you send back to your artist a foldback mix minus their input return to avoid phasing and latency issues.Select the Cue 1, go to the Bus Routing and patch this to the Headphones or Output channels pair that your performer will monitor from.
Make a Mix balance for your performer while you are in CUE 1
Example you can add Reverb on your direct inputs or EQ or compression.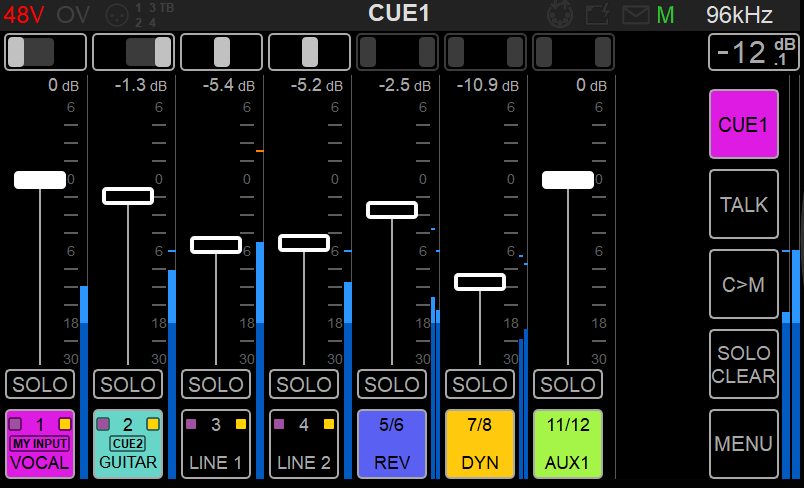
Record the performance in your DAW, while your performer will listen to the CUE Mix as an engineer you will monitor the Main Mixer.
To inject the recorded take back to your artist, use the M>C feature, to listen and prepare a Cue you can use the C>M feature.
...