Quick Start Guide.
Register your Anubis
Register your Anubis from our website :
https://www.merging.com/anubis/register

Anubis DC power supply connection
- First connect the included Power Supply to an AC outlet.
Note: The DC power source can also be coming from a 12V battery. - Connect the locking power supply to the rear panel of your Anubis.
In order to do so align the two tabs on the power cable's connector to the notches on the Anubis input male connector. - Then rotate the barrel clockwise until latched, this will secure the connection and prevent accidental disconnection or a bad electrical contact.
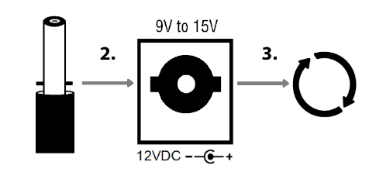
The DC power input accepts voltages from 9V to 15V, with a maximum power consumption of 18W. Do not exceed the maximum DC input voltage or the unit may be damaged.
Merging highly recommends using the 12V power supply provided with Anubis.
Check that the power cable has the correct plug for the power outlet to which it will be connected. If the wrong Mains cable has been supplied, do not attempt to modify it but contact your Merging Technologies dealer for a replacement.
Power-over-Ethernet (PoE) source connection
Anubis can alternatively be powered from PoE (Power over Ethernet) or in parallel to the DC Power, if redundancy is required.
Requirements: A suitable PoE equipped switch and/or external midspan PoE injector compliant with IEEE 802.3at class 0 Power-over-Ethernet standard
Connecting Anubis to your system
For users with prior experience with Merging RAVENNA/AES67 devices connecting your Anubis is very simple. Connect the CAT-6 network cable to your computer's network Gigabit interface. You can also connect the interface to a network switch if you have multiple RAVENNA/AES67 devices.
For first time users, first install the required driver onto your computer, see below for drivers and downloads.
An Ethernet Adapter (USB-A/B/C or Thunderbolt) might be required to connect the Anubis RJ-45 cable to your system.
Switching ON your MERGING+ANUBIS
- Press the switch on the unit’s rear panel next to the DC input, as shown on the Back-Panel figure.
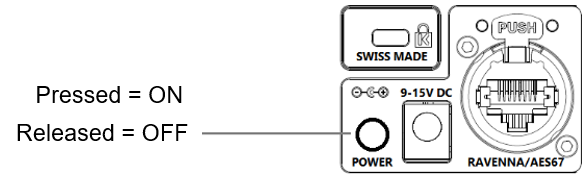
The Anubis Soft buttons will light up orange when the unit initiates the boot-up sequence, the TFT display will follow soon after.
During this time the unit will perform a series of self-test and initialization routines.When the Anubis TFT display shows the Main home screen, the unit is ready for use.
To turn OFF Anubis, press on the POWER button to the Released state.
MERGING+ANUBIS Mission selection
The first time you start your Anubis, you have to select its mission :
- Music Mission :
If your mission is to record the band or rehearse for the next gig, you will be in the Music Mission, controlling the extraordinarily powerful ultra-low-latency mixer and feeding individual cue mixes to each musician. - Monitoring Mission :
If your mission of the day is to create a great mix, you need to be in complete control of your monitoring: reference monitors, nearfields, headphones, sources, surround mix, downmix, etc., so you will be in the Monitor Mission.
At any time, you can switch to another mission in the Anubis Home > Missions page.
Drivers and Firmware Updates
RAVENNA/AES67 drivers are available for; PC/ASIO, Mac/CoreAudio and Linux/ALSA on the Merging Anubis website section.
It is recommended to update to the latest Anubis firmware.
Installation procedures are available on this page.
Downloads: Drivers, Firmware, Procedures & User Manual:
https://www.merging.com/anubis/download