MASTERING ANUBIS & DAW SETUP.
SetUp
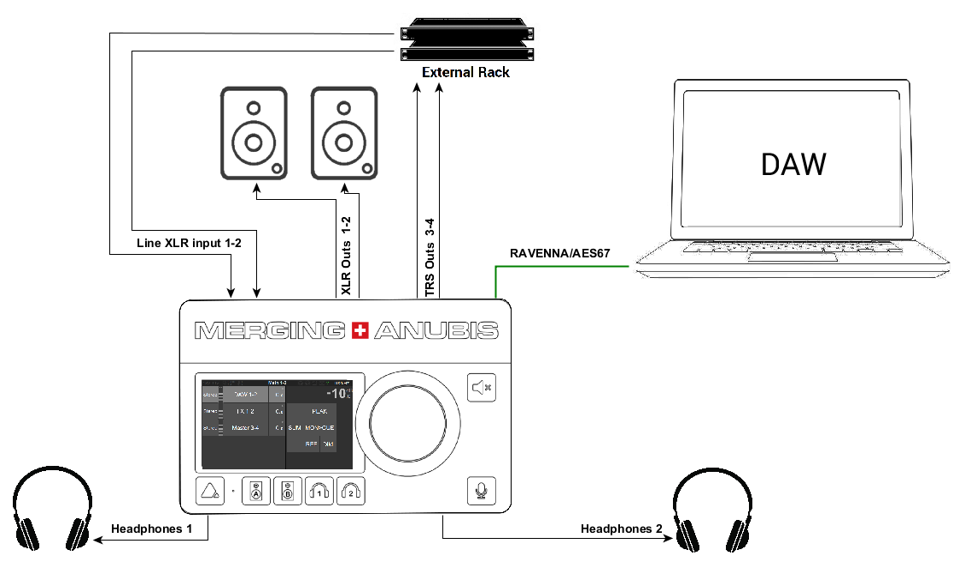
In this setup example Anubis is used for both Monitoring and Mastering with the use of an external analog processing chain.
- The DAW will playback the Final Mixed tracks that will be Monitored with Anubis, using a DAW (1-2) Source.
- The Anubis will monitor the DAW with a pair of referenced speaker set, that are connected to the balanced outputs XLR 1-2. Headphones can be used as well for monitoring.
- The Anubis will send the DAW mix through an external analog processing chain using the TRS outputs 3-4 and returns to Combo 1-2.
- The DAW will record back the Mastering that you can monitoring with Anubis, by using either FX 1-2 source (Pre-VST/VS3 Effects) or by using the Master Source (Post-VST/VS3 effects).
Prerequisites
DAW with installed Merging Audio Device driver (previously Merging RAVENNA ASIO driver) (Windows) or RAVENNA Virtual Audio Driver (Mac).
Follow the Get Started with Anubis pages for details.
Procedure
- We recommend to created and use the 3 sources below.
Long Press the Anubis home button to enter the Anubis Settings>Sources page. Where you will create or edit the source as per details below.
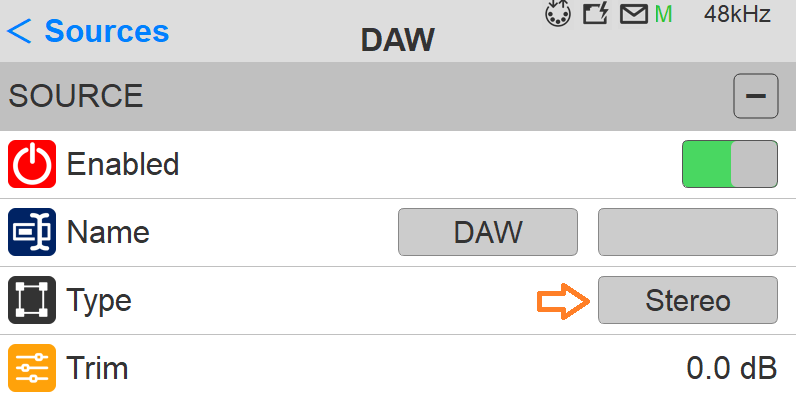
- DAW 1-2: This source will be used for the Mix (pre-master) monitoring. A stereo source type is recommended for stereo mastering.
- FX-1-2: This source will be used for the Effect return (External effect analog chain) monitoring, it should be stereo as per example here. Use the predefined name listing.
This source should be patched in order to receive the channels Combo 1 and Combo 2 (Or Line 3-4), depending on how your External effect chain is connected to the returns.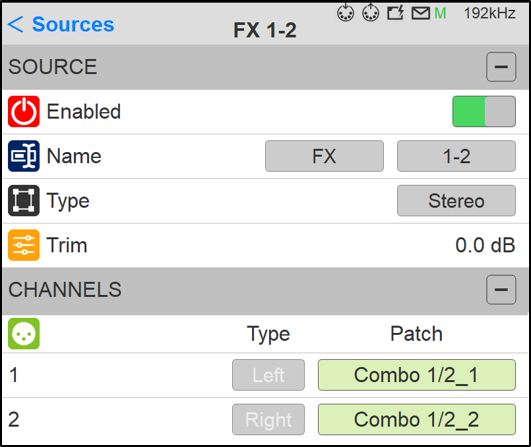
- Master 3-4: This source will be used for the Final Master monitoring, post the External Effect chain and post the DAW VST/VS3 effect if in use. Create a stereo souce type in this example.
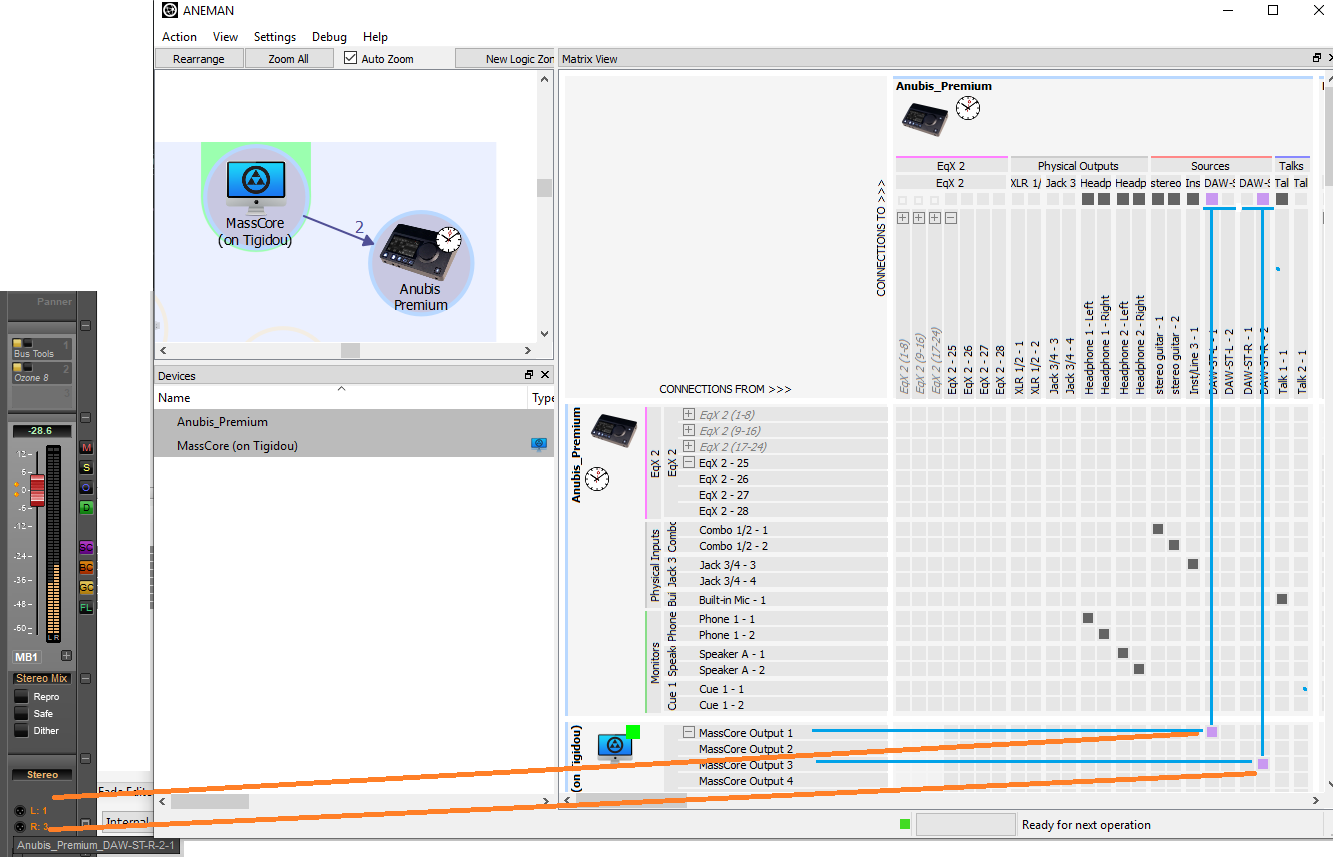
Once you have created those sources launch ANEMAN and connect the Sources and PreAmps as per image below. In the example here we are connecting those while running in MassCore, the same will apply if using the Merging Audio Device / ASIO driver or the RAVENNA VAD for mac.
- The DAW source should be connected to the MassCore outputs 1-2 (or ASIO or VAD)
- The Master source should be connected to the MassCore outputs 3-4 (or ASIO or VAD)
- The Anubis inputs Combo 1 & 2 should be connected to the MassCore Inputs 1-2 (or ASIO or VAD)
Note: the source FX 1-2 shows here the internal routing connection to the Anubis inputs 1 & 2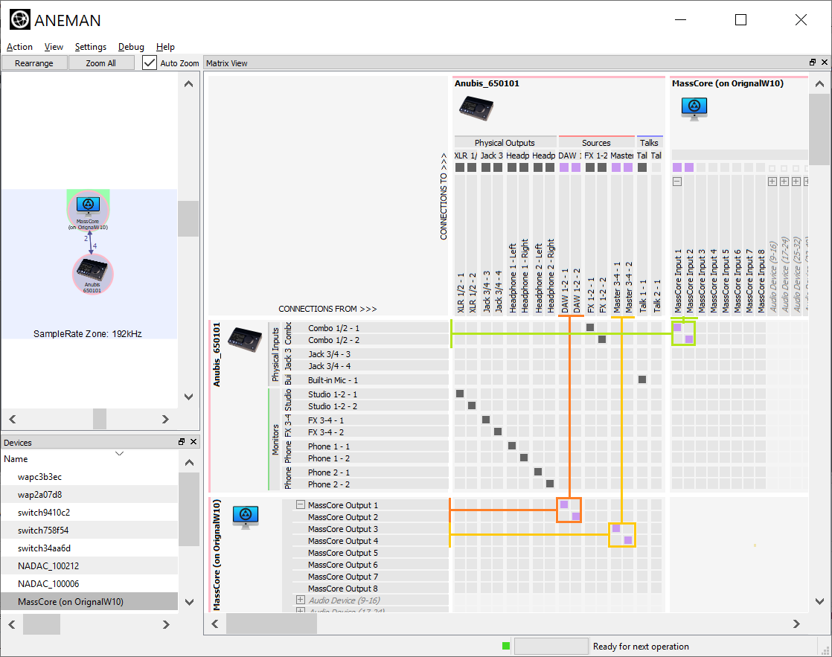
Now go to the Anubis Settings>Monitor where the Monitoring sets should be created or configured.
- The Main 1-2 Monitor should be left as default and connected to the XLR 1-2 Anubis outputs. Otherwise recreate a Main 1-2 Speaker Set Monitor (Stereo) and patch it to the Anubis 1-2 XLR outputs.
- Create of edit the Line 3-4 monitor (you can rename it as FX 3-4).
This monitoring be assigned to the Speaker B button and configured in Cue mode.
In the Channel section patch this monitor set to the Anubis TRS outputs 3-4 that will be sent to your External analog effect chain. Refer to image below.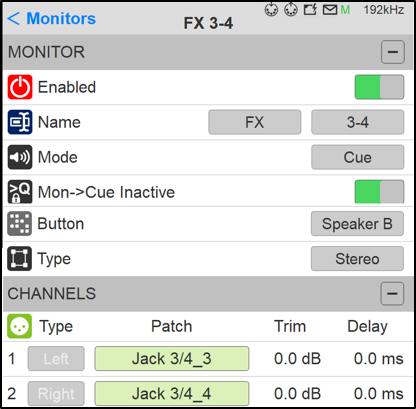
Note: We’ve as well disabled the Mon->Cue as a protection to avoid any feedback or confusion.
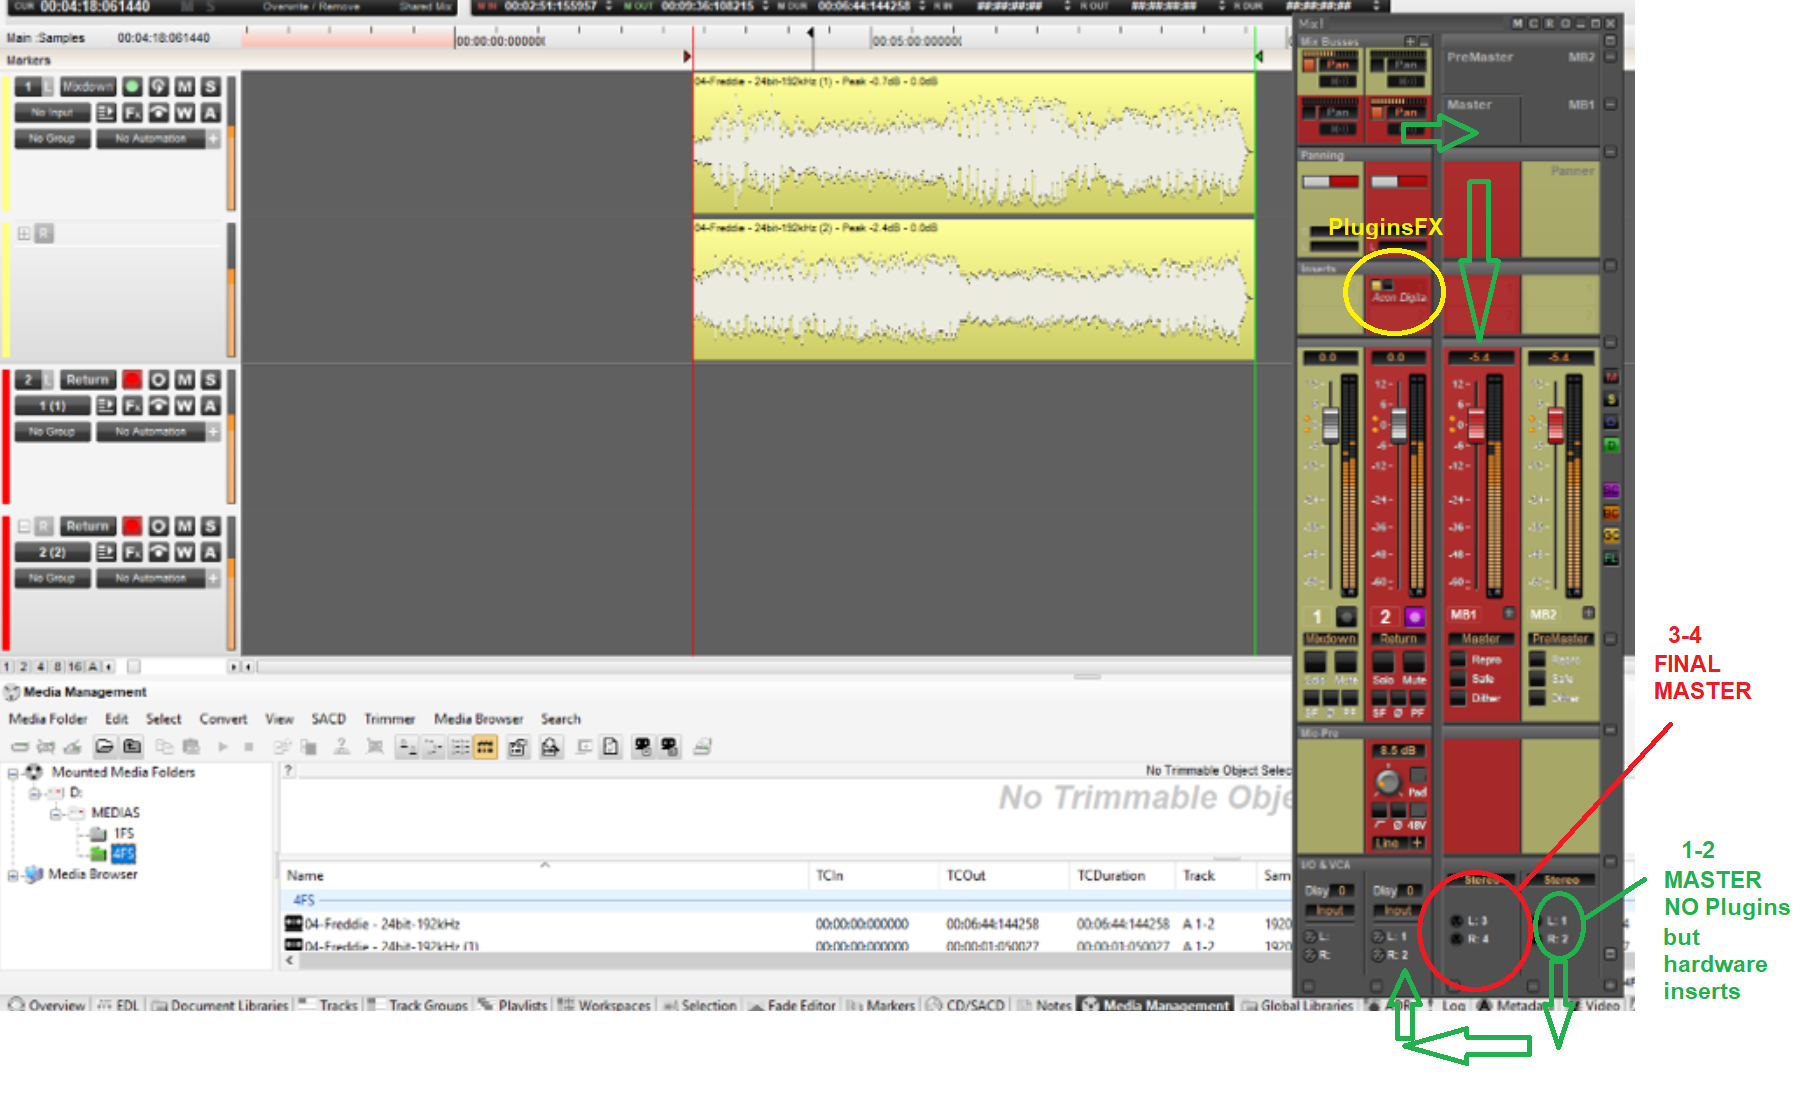
- Configure your DAW and Mixer as per example below.
Pyramix users can use the template available here.
Anubis_Mastering Project.pmxIn this example we are using 2 stereo strips and 2 stereo buses.
- The top two strips (1 & 2) will playback the final mixed track (pre-master), routed to the pre-Master Bus (MB2) that is connected to the Anubis DAW 1-2 Source
- The strips 3-4 will be used to record back the final mastering and should be connected to the Anubis inputs 1 and 2. This Return strip will be routed to the Master Bus (MB1) for final Master monitoring and connected to the Anubis Master 3-4 source.
Note:406px Since this example uses plugins processing (VST/VS3) it will be important to configure the strip #2 in Record Post Effects mode, in order to have the plugin processing applied in the Record.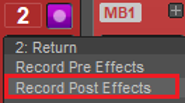
Warning: After recording back the Master, it is recommended to disable the Strips #2 effects in order to monitor the final Master from the DAW 1-2 bus without repassing through the external effect chain and plugins.
Return to the Anubis and select the B button in order to configure FX 3-4 monitor set source selection.
In source page the FX 3-4 Cue monitor set, select the DAW 1-2 source, this is in order for the DAW Final Mix to be sent to the External effect chain at all times. WE do not recommend to change that selection once it has been made, leave it at all times enabled.
Note: Do not change the level of this Monitor set once the output calibration has been done.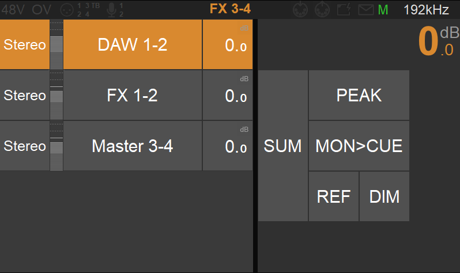
Long press the Anubis Home button in order to access the Anubis PreAmps, where you will be able to adjust the External effect returns using the Anubis PreAmps 1-2- Gain.
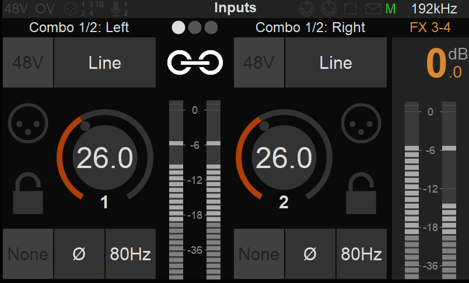
Note: users can link and lock the PreAmps once the calibration has been performed.
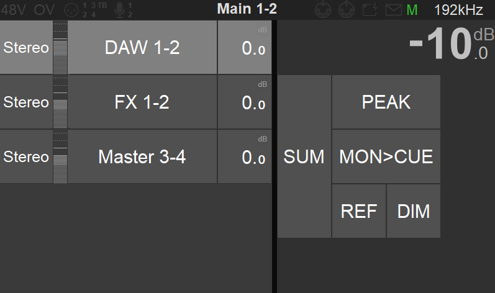
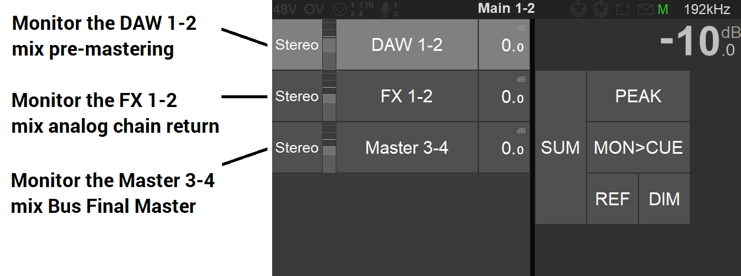
In order to monitor your Mastering session select A speaker set button, this will allow you to monitor the source of your choice using your Reference speakers set or headphones, by simply selecting the Source you want to monitor.
- DAW 1-2: Final Mix Pre-Mastering
- FX 1-2: External Effect chain Monitoring (for some the final Master)
- Master 3-4: The Final Master (the external effect chain with the post-software VST/VS3 effect processing).
You can now monitor the audio at the different stages of the Mastering process.
-----------------------------------
For Mid/Side and Mono check.
Today with Anubis if you enable the MONO downmix in Anubis and do L and R solo channel check, this will mute the Speaker rather than mute or solo the Source L or R.
To have better Mastering control over your Mid and Side channels in the current Monitoring Mission sources you will need to create 2 Sources and rather enable or disable those in order to perform Mastering Source verification or Side phase check in Mono.
Procedure:
- Create two DAW Stereo Sources in Anubis
- Let’s say DAW-ST-L and DAW-ST-R (you can rename those from the Web Access Brower)
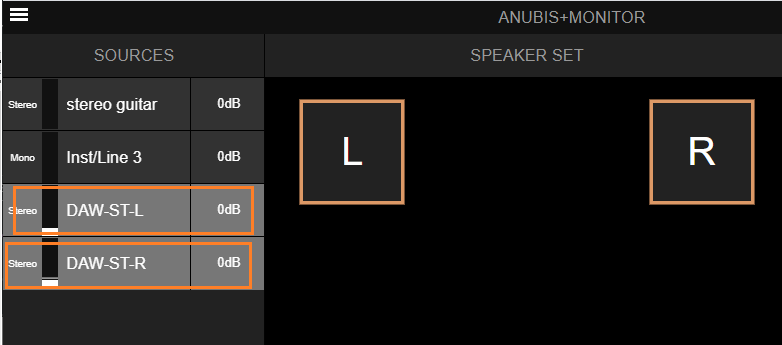
- In ANEMAN only one channel on each Source as per image here, and connect the LR at the output of your DAW Bus
- Sum those two and enable the Mono when needing Phase and Side or Mid verifications.
Then when doing your Source verification, you would need to unselect one of the DAW-ST Source in on the Anubis TFT or from the Web Access page. This way both speakers will remain active in MONO and only the Left or Right Channels can be isolated.