Windows 10 Update from October 2018 to May 2019 Update.
When updating Windows 10 to a new major release, some settings may get reset to their default values.
Here are the settings to check after updating to Windows 10 May 2019 Update (1903).
Pyramix V12.0.5 / Ovation 8.0.5/ VCube 8.0.5, or above, and MassCore RTX3.7.0 are required to run Windows 10 May 2019 Update.
Previous Pyramix / MassCore versions will not work.
Usually such Windows update performs correctly, but there are still a few cases that the updates goes wrong.
Unfortunately the System restore / Windows recovery is wiped out during this update, and cannot be used to restore the system.
To be safe, Merging recommends you do a backup of your system.
UNINSTALL MASSCORE
Before the update, first uninstall MassCore:
Go in MT Securty Settings > MassCore tab.
Click on Uninstall MassCore, and press OK. Your computer will reboot.
As you will install a MassCore Engine version using the same authorization code, you will not need to re-authorize the MassCore RTX License.
You are now ready to update to Spring Creator 1903.
UPDATE WINDOWS TO MAY 2019 UPDATE
To update to May 2019 Update (1903), install the feature update with Windows updates.
Your computer will have to restart several times, this can take a while.
WINDOWS CONTROL PANEL
To access Windows 10 1903 Control Panel, type "control panel" in Windows Search box.
You can right click on the control panel icon from the search result and pin it to the Start menu or Taskbar.
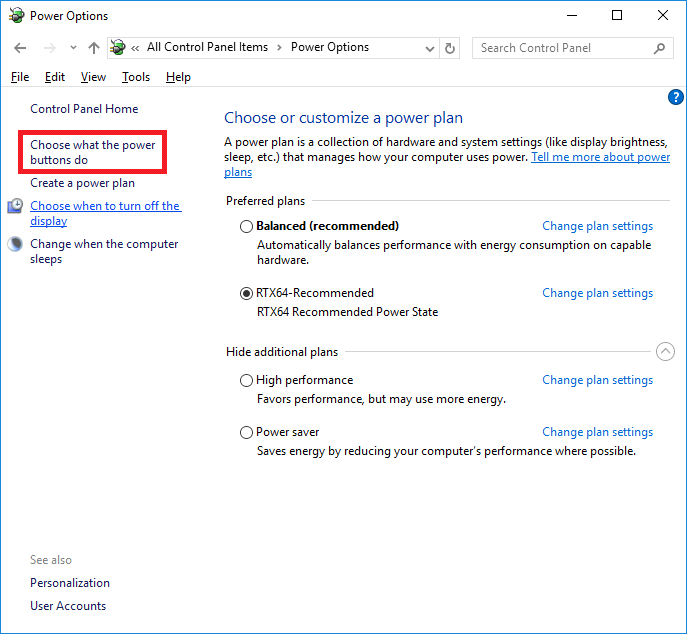
Power Options
The "Fast Boot feature" must be disabled again, which indeed puts the computer to sleep when you select shut down.
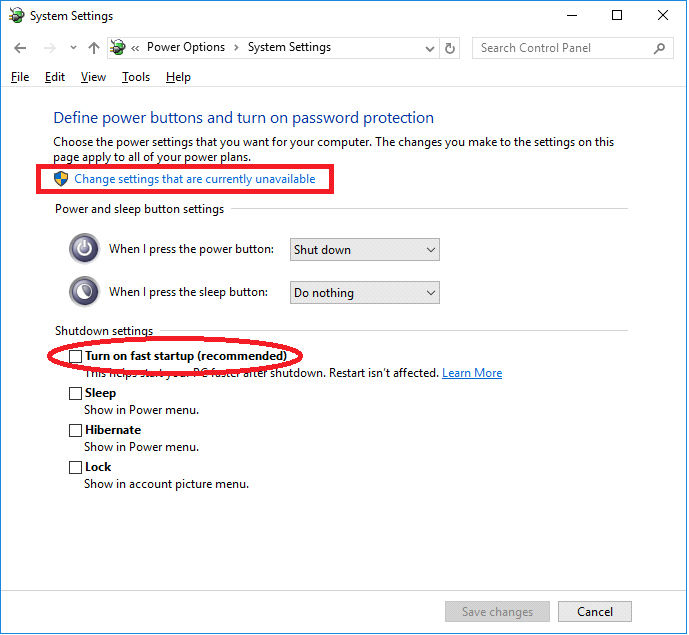
Click on "Choose what the power buttons do” on the left hand side of Power options page.
Then click on "Change Settings that are currently unavailable" and uncheck the "Turn on fast startup" option. Click on Save Changes. Note also that hibernate / sleep is not supported by MassCore engine.
This is also not supported by the Ovation / Pyramix ADR keyboard.
Native users : Users can switch to the Ultimate Performance power plan.
This power plan is not available on systems powered by batteries (such as laptops) and only available on Windows 10 Pro.
In the main Power options page, expand the option which says “Unhide Additional plans.” to see it.
If you don't see it, in Windows Search field, type CMD, and right click to open a Command Prompt as administrator.
In the command prompt, copy the following command, and hit Enter.
powercfg -duplicatescheme e9a42b02-d5df-448d-aa00-03f14749eb61
The "Ultimate Performance" plan should now be available.
System > Advanced System Settings
System Protection tab
In the Control Panel > System window > Advanced System Settings, switch to System Protection tab:
Make sure protection is turned on for your system drive.
Select the system drive and click on Configure.
Select Turn on system protection, and set a value for Disk Space Usage (usually 10% max).
Disable the system protection on the Media drive(s), as this feature only works on system files and programs.
Hardware tab
Back in the main System windows, switch to Hardware tab:
Click on Device Installation Settings and select the “No, let me choose what to do" option.
This will prevent Windows update service to automatically change the system drivers.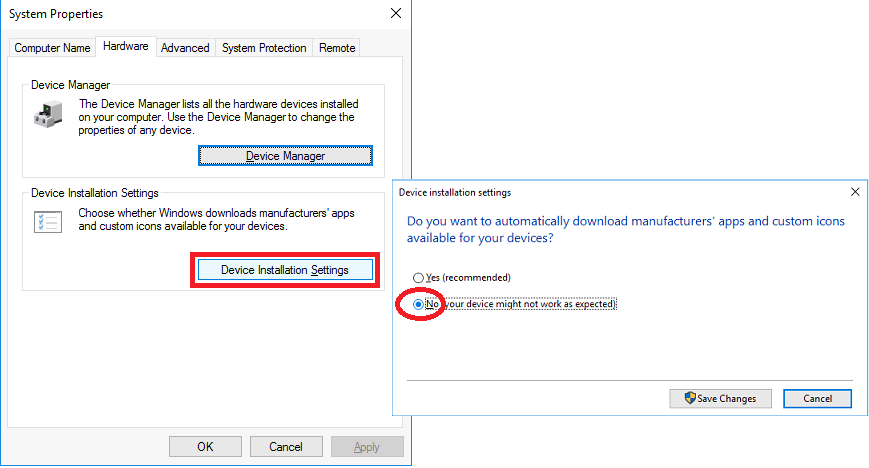
Device Manager
Ports (COM & LPT)
If you use 9pin-RS422 connection:
Communication Port (COM x) > Properties
Ports Settings tab > Advanced > set both Receive and Transmit buffer to Low (4)
Universal Serial Bus controllers
Check each USB Root Hub / Host Controller and disable power management if any, by right clicking on it and accessing its properties.(Power Management tab)
WINDOWS SETTINGS
Settings page can be accessed through Windows Start > Settings icon (and  + i)
+ i)
Privacy
In File System, "Allow Apps to access your file system" has to be turned on (default).
Search
Since 1903, you may configure Search to search your entire PC (disabled by default). Please note that this search mode will increase the CPU consumption.
This can be set in Search > Searching Windows : Enhanced mode.
OneDrive configuration / uninstall
OneDrive has to be reconfigured if it was not previously configured:
If you use OneDrive, you should configure it to not interfere in the network traffic.
Right click on the OneDrive icon ![]() in the notification area and select Settings.
in the notification area and select Settings.
Remove "Start OneDrive Automatically when I sign to Windows" and "Display notifications when people share with me or edit my shared files".
In the Network tab, set both Upload and Download rates to Limit to : 125 KB/s (or lower).
If you don't use OneDrive, you may uninstall it in Windows Settings > System > Apps and features.
Task Scheduler
WinSAT Task should be disabled.
In Windows 10, Windows System Assessment Tool (WinSAT) is scheduled to run too often compared to previous Windows version, and this tool is not very useful. Its main purpose is to calculate the system rating displayed in Windows Control panel > System page, but it can also re-activate some setting without noticing the user.
Therefore Merging recommends you disable it.
Go in Windows Control Panel > Administrative Tools > Task Scheduler.
Browse the Task scheduler library to Microsoft > Windows > Maintenance.
Right click on the WinSAT task and select Disable.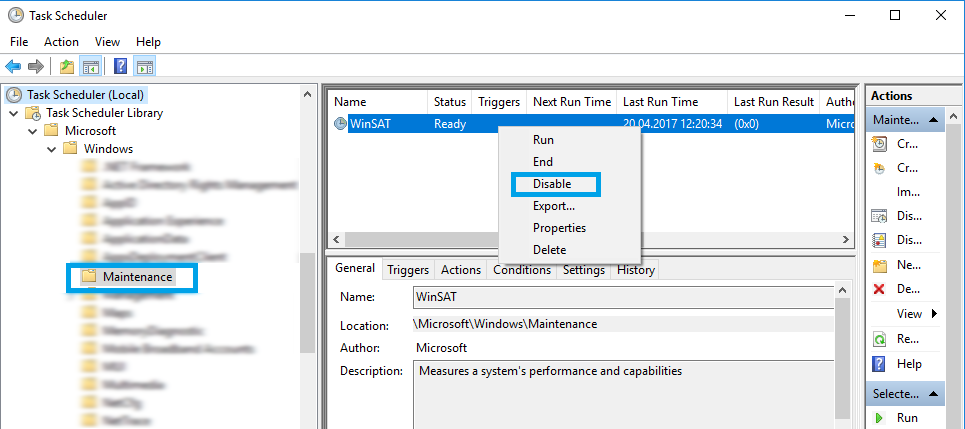
Browse now to Microsoft > Windows > Windows Defender.
Right click on the Windows Defender Scheduled tasks and select Properties.
in the Conditions tab, set it to Start only if the computer is idle, and Stop if the computer ceases to be idle
RAVENNA ASIO
The update enables Windows Network Throttling, that can cause issues on the network bandwidth.
Please open Merging RAVENNA ASIO control panel, the setting will be automatically modified, and the application will give you a confirmation message.
Reboot the computer after the change has been made.