2 x TALKBACK NETWORK SETUP.
SetUp
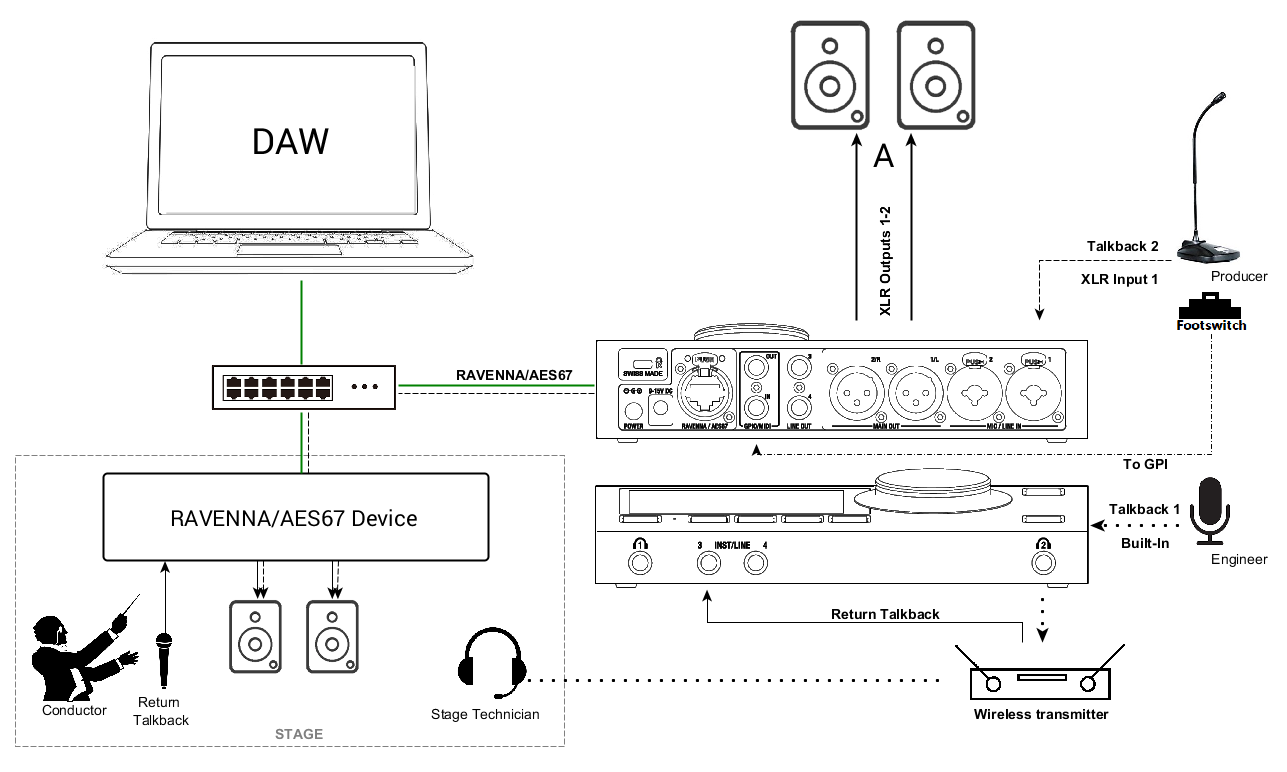
Two talkback configurations using a RAVENNA/AES67 device such as Horus or Hapi as a stagebox. Anubis is used as the Monitoring control with integrated talkback.
Here the sound engineer uses the Anubis built-in Talkback #1 to communicate with a stage technician.
The producer communicates with the conductor using a second talkback #2 using an external microphone connected to one of the Anubis input.
Prerequisites
Make sure you have first followed the Drivers Installation pages and have correctly connected and powered up your Anubis.
Follow as well the Recording use case to connect Microphones.
Procedure
- Your Anubis should be configured with some Monitor sets (e.g. Speakers Set & Headphones).
Refer to the Basic or Surround Monitoring use cases. - Configure the talkback that you will be using from the Settings>Talks page (a maximum of two talkbacks is currently possible).
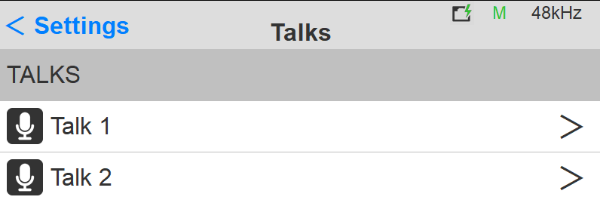
- Enter the Talk 1 settings configuration
- Within the Talk 1 settings, select a predefined name and tag to identify your Talkback.
- Select the input source of the Talkback 1.
This input can either be the built-in Anubis Talkback microphone, or a microphone connected to one of the Anubis inputs, or an input coming from another RAVENNA/AES67 device available over your network.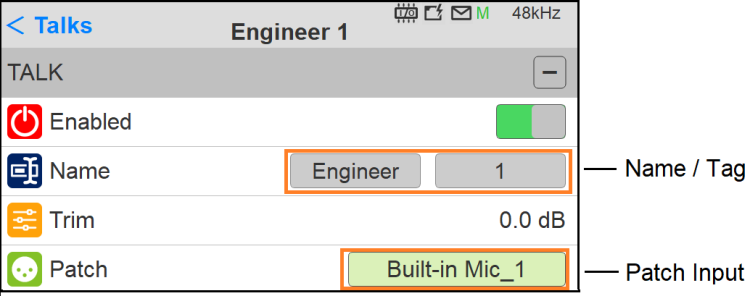
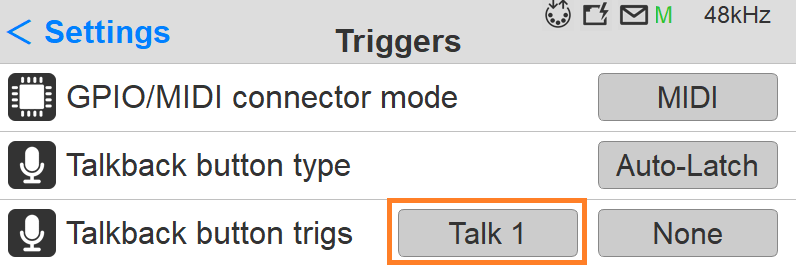
- Configure how the Talkback will be triggered and activated.
The talkback can be triggered by either the Anubis Talkback button or from the Web Access Monitoring page.
In the example here we are configuring the Trigger of the Talkback 1 to be the Anubis Talk Button.
- Under the Settings>I/O>Triggers under Talkback button trigs select the Talk1, this way the Talk1 will be triggered by the Anubis physical Talkback button.
- Your Talkback 1 is now configured and can be injected into the Monitor set of your choice (follow from step 9 Monitors configuration if using only 1 talkback).
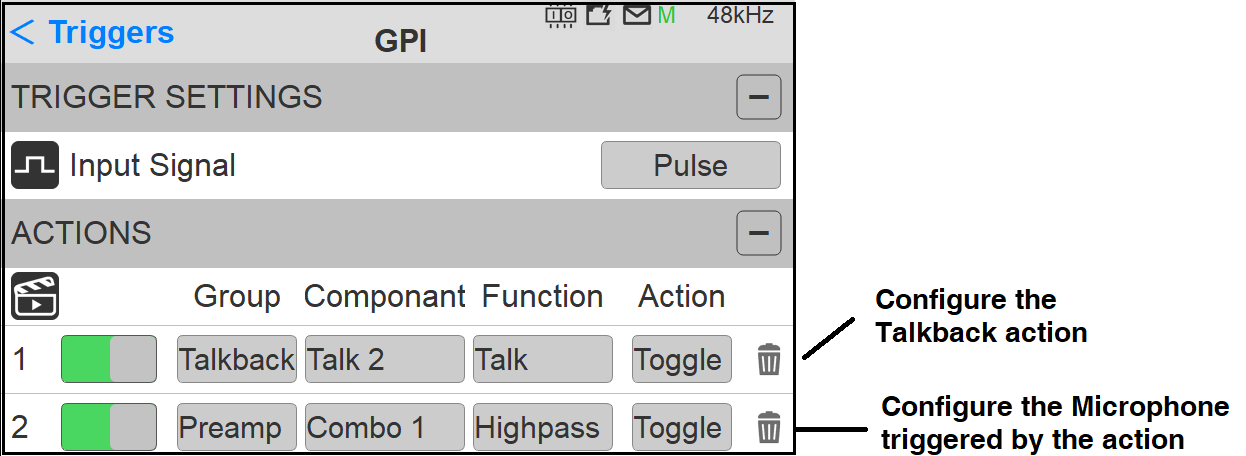
If you wish to use a second Talkback go back to the Settings>Talks page and select the Talk 2. - A second Talkback could be configured from the Anubis>Settings>I/O>Triggers in order to use the Microphone connected into Anubis XLR/Combo input 1 located at the back of the Anubis and have it triggered from a GPI (footswitch).
First make sure that under the Anubis>Settings>I/O>Triggers you have enabled the GPIO and configure the Action to use Talk2
Note: GPIO is available as of Anubis Firmware v1.0.13 and higher.
In the example below a footswitch is connected to the GPI input located at the back of the Anubis.Two actions will be necessary to trigger the second talkback.
- The first Action is the Talkback configured as the Talk 2 in toggle mode (On/Off)
- The second action will enable a specific Microphone (Combo 1) and open this one when the footswitch is engaged.
- Each Monitor can be configured to receive a Talkback or not. Configure your Monitor by going to Settings>Monitors and select the Monitor you wish the talker to communicate with.
- In the example here the engineer uses the Talkback built-in microphone to communicate with a Musician or Technician that would be monitoring the Headphones 2.
So, let’s open the Phone 2 Monitor settings.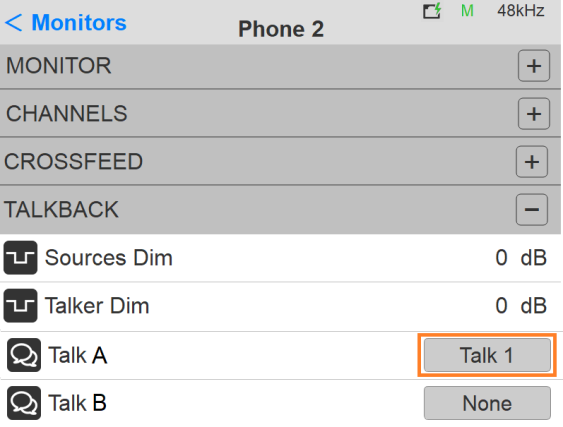
- At the bottom of the Monitor settings (Phone 2) find the Talk A and B settings. Select which one of the Talkbacks will communicate to this Monitor.
If a Talk is set to None it will prevent a Talkback from communicating to the monitor.
For details on the Sources Dim and Talker Dim refer to the User Manual Talkback settings description.
Note: You can enable up to 2 talkbacks for a chosen Monitor set. - Configure your second Monitor set to use the Talkback using Talk B. If you wish to use a second RAVENNA/AES67 device, first make the connection in ANEMAN, and then patch Talk 2.
In the example here the Producer talkback 2 will be injected into the Conductor monitor set.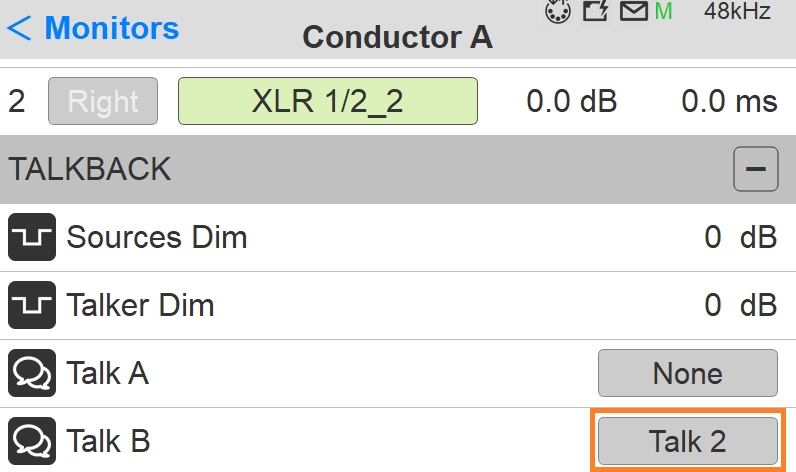
You are now ready to communicate using the Anubis configured with two Talkback