Windows has been designed for a wide variety of applications. Unfortunately that means that, out-of-the-box, it works correctly for office or entertainment applications, but for DAW applications, several settings and features have to be fine-tuned.
1.BIOS
If you can access your computer BIOS, it is recommended to disable all power management features of your CPU, as this implies changes in the CPU speed and that is far from optimal for any audio application.Same applies to overclocking.Please have a look at your motherboard manual to locate those settings, may vary depending of the manufacturer.
Intel Turbo Boost Technology: Disabled
CPU Enhanced Halt (C1E): Disabled
C-State Support (C3, C6, C7, C8 State): all Disabled
CPU EIST Function: Disabled (also called Intel Enhanced SpeedStep, that should always be disabled)
CPU power saving mode: Disabled
2.WINDOWS CONFIGURATION
DEVICE DRIVERS
Merging recommends to install WHQL (Driver certified by Microsoft) or if not available, the latest drivers from the manufacturer website.
Install the drivers ONLY, do not install the utilities it can cause much trouble.
Do not install Intel® Control Center that is included in Intel® Rapid Storage Technology installer or Intel® Management Engine installer.
Do not install the RealTek Ethernet Diagnostic utility.
WINDOWS CONTROL PANEL
To access Windows 10 Control Panel, right click on Windows Start and select Control Panel.
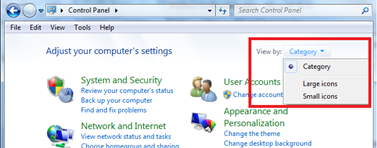
For ease of use, it is recommended to set the Control Panel to Small Icons.
Disable Windows User Account Control (UAC)
User Accounts > Change User Account Control settings > set it to Never notify. > OK.
View hidden files, folders and drives and show file extensions in Windows Explorer
File Explorer Options > View tab :
Hidden files and folders : set it to Show hidden files, folders or drives
Hide empty drives : disable
Hide extensions for known file types : disable
Leave Hide protected operating system files (recommended) active
Power Options
Set the power scheme to High Performance (Native users) or RTX – recommended (MassCore users) .
Then Change plan settings
Screen Saver (Turn off the display) is usually set to Never. If you are recording, you surely don’t want the display to turn off after several minutes!
Put the computer to sleep must be set to Never
Access Change advanced power settings and make sure that:
Hard Disk > Turn off Hard disk after: Never
Desktop background settings > Slide show: Paused
Sleep > Sleep after: Never / Allow hybrid sleep: off / Hibernate after: Never / Allow wake timers: Disable.
USB Settings > USB selective suspend setting: Disabled
Intel(R) Graphics Settings : Maximum Performance
PCI Express > Link State Power Management: Off
Processor power management > System Cooling policy : Active
Minimum and Maximum processor state: 100%
Sound
Windows can notify the user of some vents by playing a sound.
If your ASIO device is also used by Windows to play its sounds, it may cause audio drops as it will access the device.
In that case it is recommended to access the Sounds tab and set the Sound Scheme to No Sounds.
System > Advanced System Settings
Advanced tab > Performance
Click on the Settings button in the Performance section.
Visual Effects tab
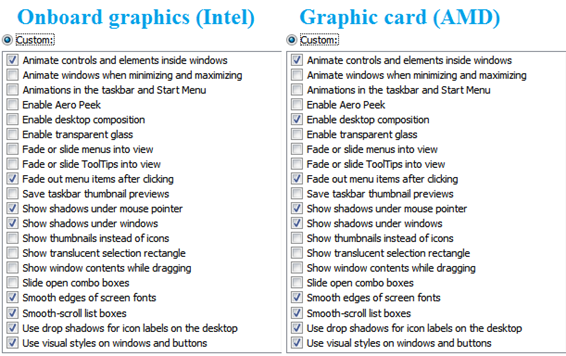
Those settings have to be disabled to prevent system peaks:
Animate Windows when minimizing and maximizing : disable
Animations in the taskbar and Start Menu : disable
Enable Peek : disable
Fade or slide menus / ToolTips into view : disable
Save taskbar thumbnail previews : disable
Show translucent selection rectangle: disable
Show window content while dragging: disable
Slide open Combo boxes: disable
Enable Desktop Composition should be enabled if you use a separate graphic card, and disabled if you use onboard graphics (Intel)
Advanced tab
Processor Scheduling should be set to Background Services for Native ASIO users.
Data Execution Prevention tab
Turn on DEP for essential Windows programs and services only.
System Protection tab
Back in the main System windows, switch to System Protection tab:
Make sure protection is turned on for your system drive.
Select the system drive and click on Configure.
Select Turn on system protection, and set a value for Disk Space Usage (usually 10% max).
Disable the system protection on the Media drive(s), as this feature only works on system files and programs.
Hardware tab
Back in the main System windows, switch to Hardware tab:
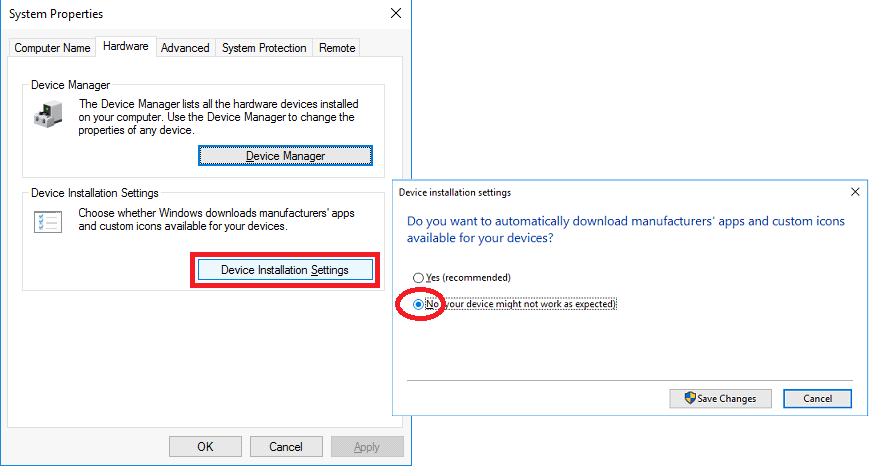
Click on Device Installation Settings and select the “No, let me choose what to do" option.
This will prevent Windows update service to automatically change the system drivers.
Windows Firewall
By default since v10.2, Merging applications are authorized to communicate through the Windows Firewall.
In case of issue, RAVENNA Users can disable the Windows Firewall (for Public Networks).
If you use another firewall, authorize the required applications or disable it on your RAVENNA network.
Windows Defender and antivirus
Tools page > Options: adjust Automatically scan my computer to your needs.
Full Virus Scanning should NEVER run at the same time as Merging software.
If you plan to install an Antivirus software, Windows Defender will be disabled.
You should also disable scanning of the Pyramix files (pmx, pmf, pml, pad, pmw) but also media files (wav, aif, flac, mp3,...), because each time the DAW have to access such file, your antivirus may scan it.
AVAST has already caused a lot of problems with several Merging programs, it is therefore not recommended.
See this page for help on configuring your antivirus exceptions.
WINDOWS DEVICE MANAGER
Ports (COM & LPT)
If you use 9pin-RS422 connection:
Communication Port (COM x) > Properties
Ports Settings tab > Advanced > set both Receive and Transmit buffer to Low (4)
Universal Serial Bus controllers
Check each USB Root Hub and disable power management if any, by right clicking on it and accessing its properties.(Power Management tab)
Network Adapters
Right click on your network adapter and access its properties to disable the power management features:
Disable Energy Efficient Ethernet and Green Ethernet, and all Power Saver / Power management features.
RAVENNA ASIO users have to set WOL & Shutdown Link Speed to Not Speed Down.
For better performance, RAVENNA ASIO users should use a dedicated RAVENNA network adapter.
Find more details on this page.
MEDIA DRIVES
By default; Windows will index the content of all drives, which allows Windows Search to work faster.
But this indexing task takes CPU power and can result in performance issue when recording.
To disable the Windows indexing, open My Computer, right click on the Media Drive(s) and select Properties: disable Allow files on this drive to have contents indexed in addition to file properties checkbox.
NEVER USE “Compress this drive to save disk space”.
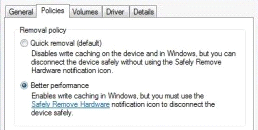
External drives: access your external drive properties through Windows Device Manager and set it to optimize for performance.
Format block size: if you only use audio files, the best size is 64 Kb when formatting the drive.
But if you also need to use video files, 64Kb is not the optimal size, in that case keep the Default Allocation size (128Kb).
The best way is to use separate drives for video and audio, if possible.
SYSTEM CONFIGURATION (MSCONFIG)
Many installed programs have associated background services, which usually can then start faster, or get updates automatically. But this uses memory and CPU power, so you should only run useful programs.
!!!Be careful, if you remove an essential program or service, Windows may not start anymore !!!
Windows Control Panel > Administrative Tools > System Configuration:
The boot menu timeout can be changed in the Boot tab (min 3 seconds).
Services Tab
Check the box Hide all Microsoft services, those are critical for Windows.
Service Bonjour is critical for RAVENNA networks and Virtual Transport.
Do not disable your graphic card and ASIO card driver or service.
Common services that can be disabled are: printer services, Skype, QuickTime updaters ...
Startup
Do not disable Microsoft Windows Operating System or any other critical driver – program for your system.
Common programs that can be disabled are Adobe Reader, Java updater, Skype, QuickTime...
Those programs will be still be installed and accessible, but will not be loaded during Windows startup.
WINDOWS UPDATE
You should install Important updates, recommended updates are optional.
You may create a System Restore point before installing Windows updates.
Win 7 users: click on Change Settings: Check for updates but let me choose whether to download and install them.
DPC LATENCY CHECK
To handle real time application, the CPU gets a defined amount of time to perform the required tasks.
If those tasks are delayed, the result is usually drop-outs in the signal.
A common tool to verify if your computer is able to handle real-time audio is DPC Latency Checker.
If you experience DPC latency issues, disable each device one by one to see if there is any improvement in DPC latencies.
Remember that some devices cannot be disabled.
Wi-Fi, LAN, specific USB devices, on-board audio, PCI / PCIe devices are the common culprits.
See http://www.thesycon.de/deu/latency_check.shtml for further details.
!!! The DPC latency utility runs on Windows 8 or 10 but does not show correct values.


