TimeCode Setup with Merging RAVENNA / AES67 devices.
Prequisites
- Merging RAVENNA ASIO / Merging Audio Driver installed and configured (Windows)
Merging Virtual Audio Device driver installed and configured (MacOS)
A Merging device (Horus, Hapi, Anubis,...) connected to your computer and configured. - Horus / Hapi : Sync cable (DB15) connected to your device (refer to the Horus - Hapi User Manual for details)
Anubis : 1/4" jack - MIDI connected to your device (refer to the User Manual Appendices section for details on the MIDI cable pinout.) - Windows users : RTP MIDI installed on your computer.
https://www.tobias-erichsen.de/software/rtpmidi.html - MassCore users : please refer to the Pyramix MassCore - TimeCode page or Ovation MassCore - TimeCode page
Networked MIDI Configuration
Windows - RTP MIDI
- Launch RTP MIDI
- First create a new MIDI Port, by clicking on the + icon under "My Sessions" section.
- For ease of use, change its Local name and Bonjour name (NETMIDI in our example)
- The Directory section shows the available streams.
For MTC, select the Anubis/Horus/Hapi_serialnumber_midi_din
For LTC, select the Horus/Hapi_serialnumber_LTC_in and/or LTC_out (not available on Anubis) - Click on Connect.
Your selection has been added into the Participants
Note: Once configured correctly, it is not necessary to launch rtpMIDI, it will run as a service automatically at Windows start up.
Note: Any changes in rtp MIDI configuration may require a restart of the audio application.
Note: If you already have a RTP MIDI port for Mic Preamps remote control, please create another port .
MacOS - Audio MIDI Setup
If you plan to use MTC - MIDI din connector, you can directly go to the DAW Configuration section.
This step is only required for Horus/Hapi LTC
- Open the Audio MIDI Setup - MIDI Studio
Click on the Configure Network Driver button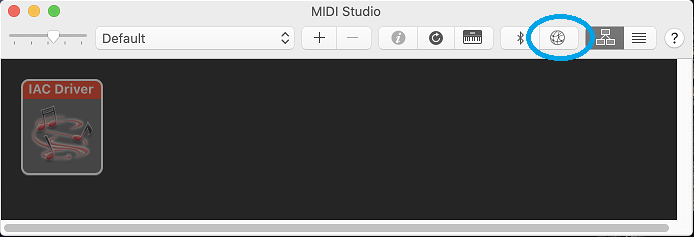
- First create a new MIDI Port, by clicking on the + icon under "My Sessions" section.
- For ease of use, change its Local name and Bonjour name (MBPMIDI in our example)
- The Directory section shows the available streams.
Select the Horus/Hapi_serialnumber_LTC_in and/or LTC_out (not available on Anubis) - Click on Connect.
Your selection has been added into the Participants.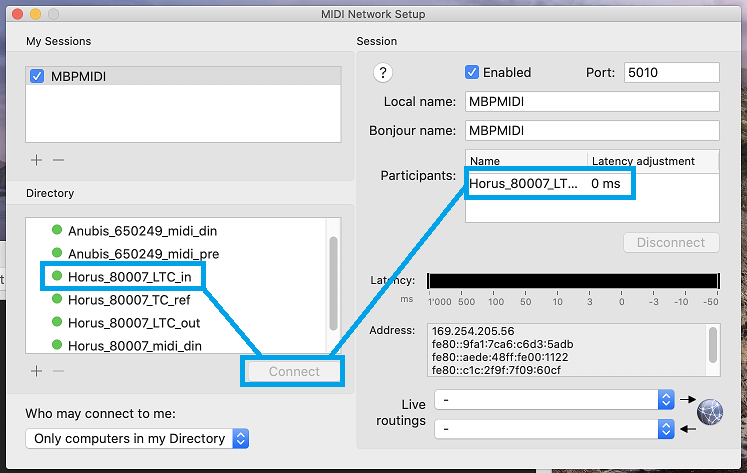
Important! After a system restart you will need to reconnect the Participants.
DAW Configuration
Pyramix
In Pyramix you don't need the RTP MIDI
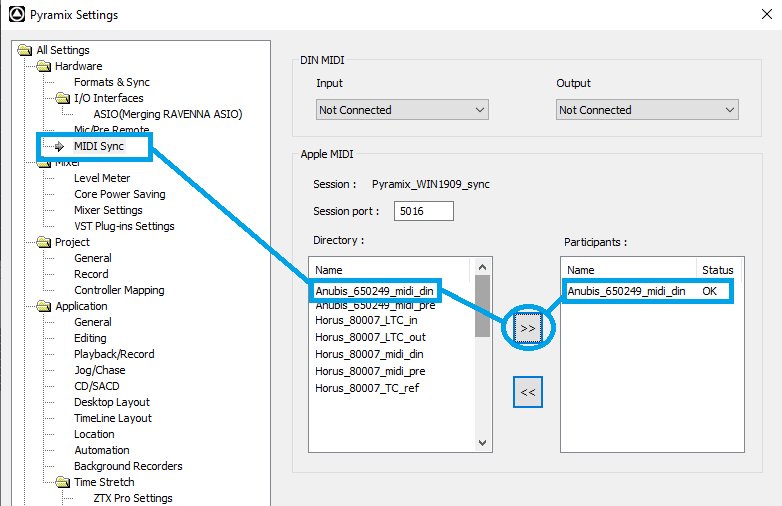
- Go in Pyramix Settings > MIDI Sync
- Select the Anubis/Horus/Hapi_serialnumber_midi_din
- Press the >> icon to place the selected component in the Participants.
- If you need to chase incoming MTC, please open the Pyramix Transport window and set the Master entry to MTC Master.
Activate the Chase button when required.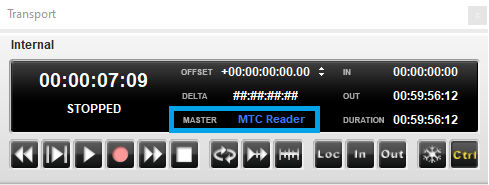
Ovation
- Go in Ovation Settings
- To receive the MTC from the device in Ovation, go in Controller Units > MIDI
Select the MIDI port created in RTP MIDI (NETMIDI in our example)
Enable it and assign an Ovation Virtual MIDI Port, then set it as Midi TimeCode (MTC)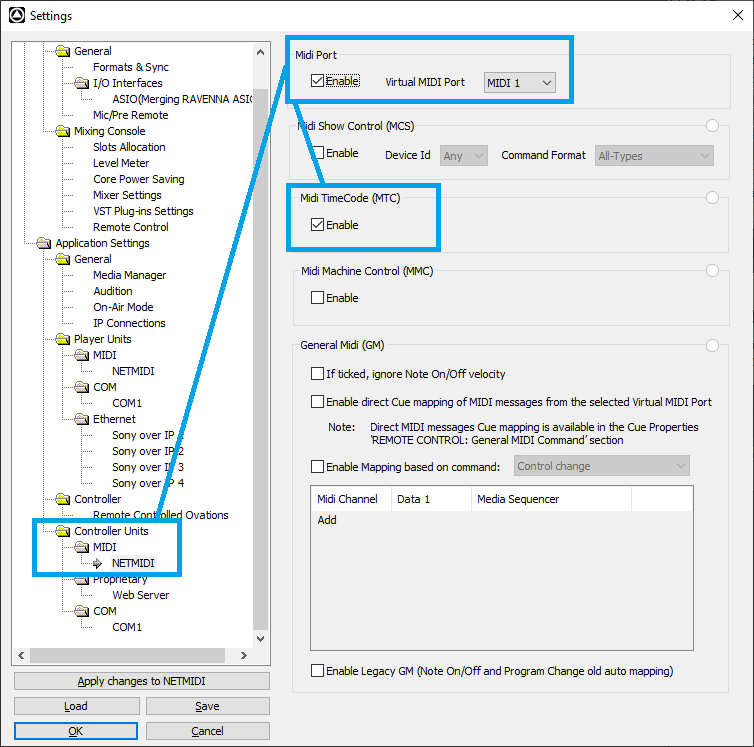
- To send MTC from Ovation to the device, go in Player Units > MIDI
Select the MIDI port created in RTP MIDI (NETMIDI in our example)
Enable it and assign an Ovation Virtual MIDI Port.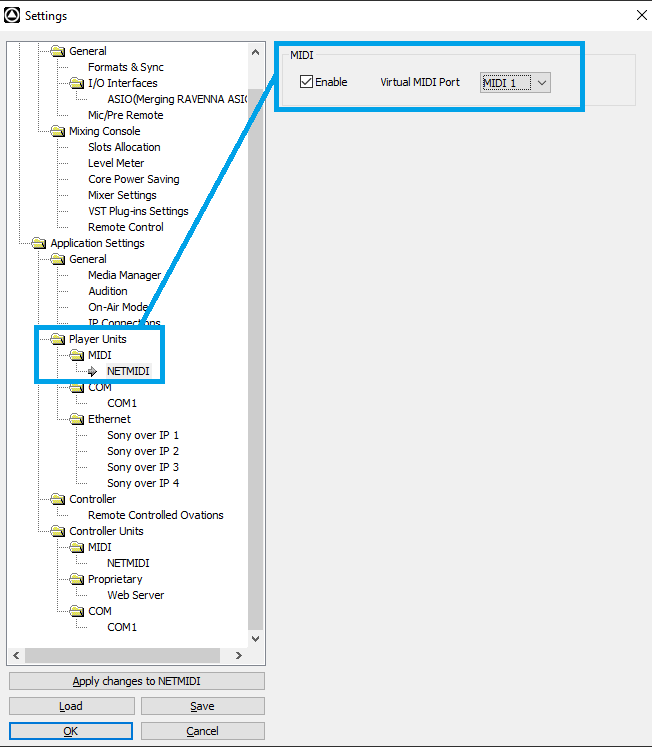
Windows - Third-party DAW
The RTP MIDI Port can be used now as any standard physical MTC input or output port, so most DAW capable of using MTC should be able to use the TimeCode connection.
- First ensure that the Project Frame Rate is set to match the incoming Timecode.
- Open the Device Setup dialog Devices > Device Setup
Activate the RTP MIDI Port as MIDI In and MIDI Out.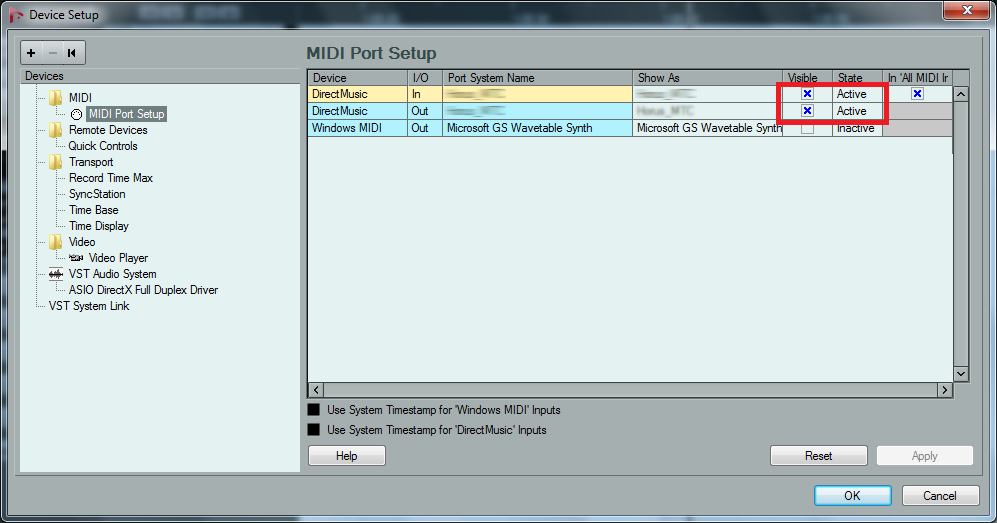
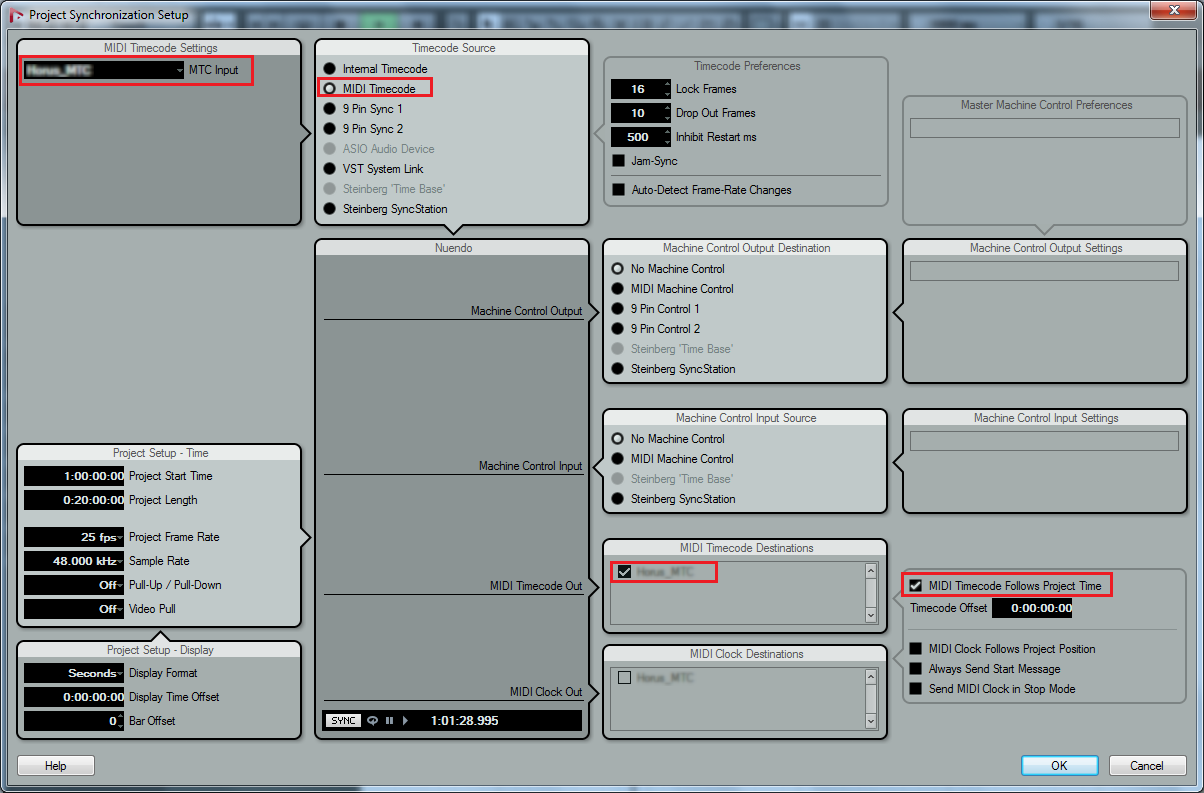
- Open Transport > Project Synchronization Setup
Set MIDI Timecode under Timecode Source and select the RTP MIDI Port under MIDI Timecode Settings. - If Nuendo TimeCode is required on the RTP MIDI Port output, activate the RTP MIDI Port under MIDI Timecode Destinations and check MIDI Timecode Follows Project Time.
- Ensure that the Project Frame Rate is set to match the incoming Timecode in the Project Settings page.
- To receive the MTC from the device in Reaper
Open Preferences > Audio > MIDI Devices
Double click the RTP MIDI Port (NETMIDI in our example) in the MIDI inputs to make available... section
Check the Enable input from this device box in the Configure MIDI Input window.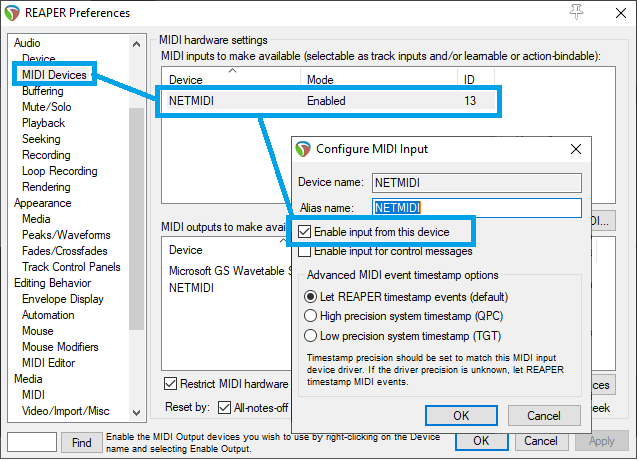
- Right-click on the Transport window and select External Timecode Synchronization > Synchronization settings.
In the Use Input field select the RTP MIDI Port (NETMIDI in our example)
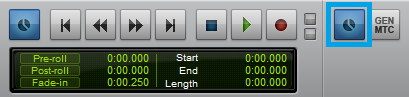
The Enable Synchronization to Timecode check box or [ALT + Right-click] on the Play button toggles external synchronization.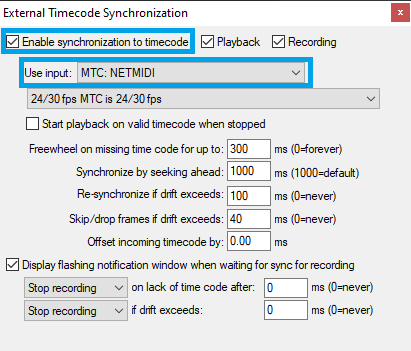
- To send the MTC from Reaper to the device
Go in Preferences > Audio > MIDI Devices and double click the RTP MIDI Port (NETMIDI in our example) in the MIDI outputs to make available... section
Check the Enable output to this device box in the Configure MIDI output window.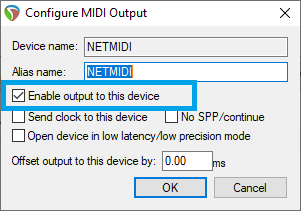
- Insert a SMPTE LTC/MTC TimeCode Generator in your project.
Access its Properties, then click on the Properties button.
Set it to Send MIDI (MTC) and select the required Frame Rate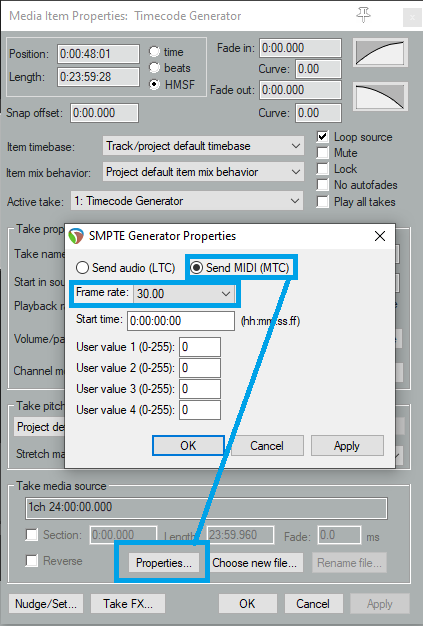
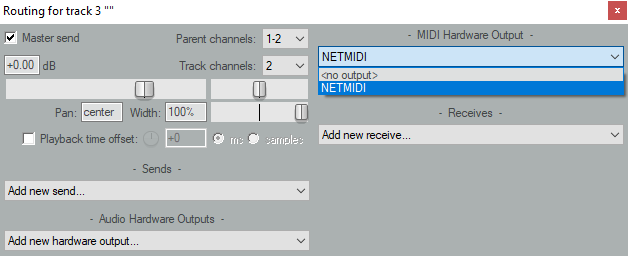
- Access the TC Generator track routing, and add a MIDI Hardware output on the RTP MIDI Port (NETMIDI in our example)
- Open the Session Setup dialog
Ensure that the Project Frame Rate is set to match the incoming Timecode in the Session Setup window.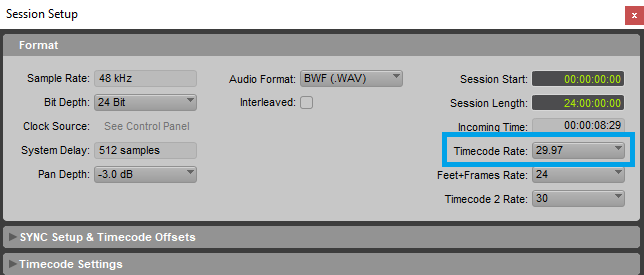
- Open the Setup > Peripherals dialog.
In the Synchronization tab set both MTC Reader & Generator Ports to the RTP MIDI Port (NETMIDI in our example)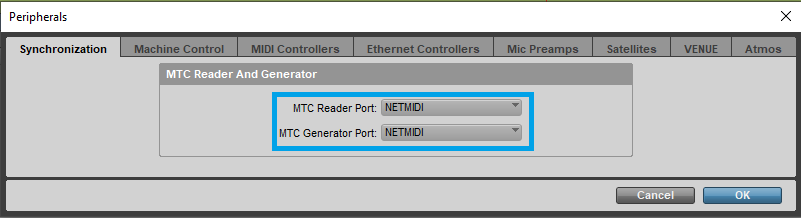
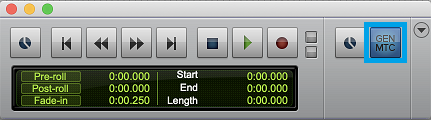
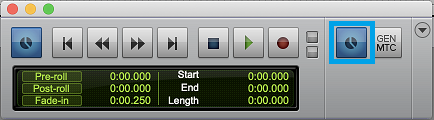
- In the Transport window, activate the Chase button to chase the incoming TimeCode.
If you need to generate TimeCode from Pro Tools, activate the GenTC button.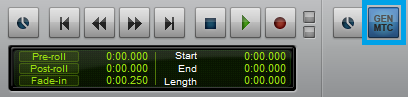
MacOS - Third-party DAW
The Apple MIDI Port can be used now as any standard physical MTC input or output port, so most DAW capable of using MTC should be able to use the TimeCode connection.
- Ensure that the Project Frame Rate is set to match the incoming Timecode in the Project Settings page.
- To receive the TimeCode from the device in Reaper
Open Preferences > Audio > MIDI Devices
For MTC, double click on the devicename_midi_din in the MIDI inputs to make available... section
For Horus/Hapi LTC, double click the Apple MIDI Port (MBPMIDI in our example) in the MIDI inputs to make available... section
Check the Enable input from this device box in the Configure MIDI Input window.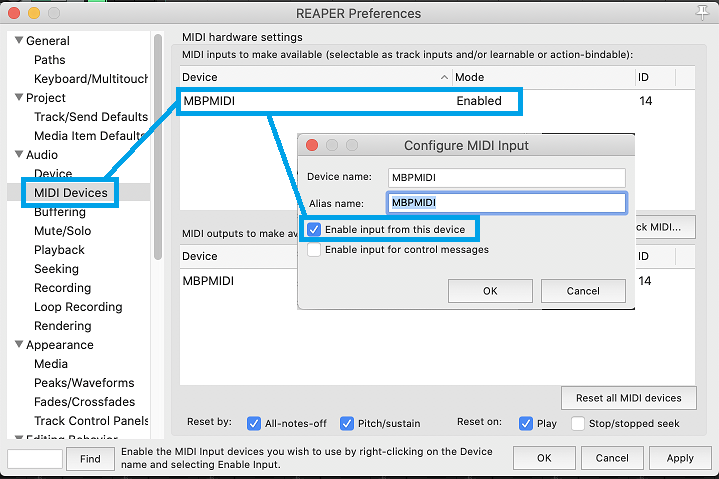
- Go in Options > External Timecode Synchronization > Synchronization settings.
In the Use Input field select the required MIDI Port
The Enable Synchronization to Timecode check box or [ALT + Right-click] on the Play button toggles external synchronization. - To send the TimeCode from Reaper to the device
Go in Preferences > Audio > MIDI Devices
For MTC, double click on the devicename_midi_din in the MIDI outputs to make available... section
For Horus/Hapi LTC, double click the Apple MIDI Port (MBPMIDI in our example) in the MIDI outputs to make available... section
Check the Enable output to this device box in the Configure MIDI output window.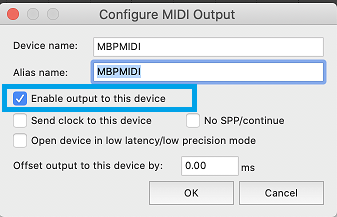
- Insert a SMPTE LTC/MTC TimeCode Generator in your project.
Access its Properties, then click on the Properties button.
Set it to Send MIDI (MTC) and select the required Frame Rate - Access the TC Generator track routing, and add a MIDI Hardware output on the required MIDI Port
- Open the Session Setup dialog
Ensure that the Project Frame Rate is set to match the incoming Timecode in the Session Setup window.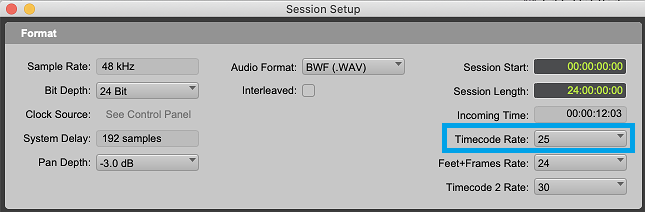
- Open the Setup > Peripherals dialog.
In the Synchronization tab set both MTC Reader & Generator Ports to devicename_midi_din (MTC) or Apple MIDIPort created in MIDI Studio (LTC)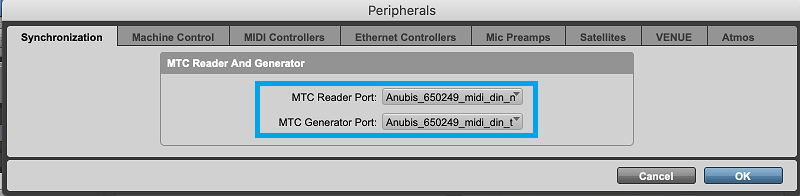
Tip: if you don't see the required MIDI ports, please make sure it is enabled in Setup>MIDI>Input Devices - In the Transport window, activate the Chase button to chase the incoming TimeCode.
- If you need to generate TimeCode from Pro Tools, activate the GenTC button.