Connecting Pyramix Native - MAD to Dolby Atmos® Renderer.
Prerequisites
- Pyramix 14.0 (or above) must be installed and authorized with Premium key for Dolby Atmos features.
- Merging Audio Device 2.1 (or above) must be installed and configured.
- Dolby Atmos Renderer version 3.7 (or above) must be installed and authorized on a separate MacOs or Windows computer.
- Dolby Atmos Renderer running on a Windows computer : Merging Audio Device 2.1 (or above) must be installed and configured.
- Dolby Atmos Renderer running on a MacOs computer : Virtual Audio Device 3.2 (or above) must be installed and configured.
Depending on your configuration and requirements, VAD Premium might be required (Standard version being AES67 only and 64 IO Max - Merging Hapi MKII
Highly recommended over Horus and Hapi 1st generation due to the MkII ZMAN and AoIP stream flexibility. - Merging Anubis running the Monitoring mission (optional)
- A properly configured managed network switch. See this page for details and configuration guides.
Scope
In this configuration, up to 128 channels can be sent from Pyramix Native in the Dolby Atmos Renderer, hosted on a separate computer (MacOS or Windows)
- Timecode is required for real-time Loudness measurement in the Dolby Atmos Renderer, and will use 1 audio channel.
- The Dolby Atmos authoring process can be quite CPU intensive, depending on the size of your project.
Therefore, Merging recommends running Pyramix Native on i7 CPU (or more) with 16 Gb of RAM (or more). Dolby Atmos Renderer on Windows: the Dolby Atmos Renderer requires MAD to be configured with a buffer size of 512 samples. Therefore, it cannot be used in AES67 mode since AES67 requires MAD to be set with buffers sizes which are multiples of 48 (48, 96, 192 or 384 samples).
If the Dolby Atmos Renderer is hosted on a Mac computer, there is no such limitation.- Recording back Live Re-renders on the Pyramix computer is possible. The number of channels may vary depending on your computer and project configuration.
Exporting Re-renders offline from the Dolby Atmos Renderer application is possible when opening the Dolby Atmos ADM Master file (Export Audio > Re-Renders). - MacMini 10Gb Ethernet port : currently not suitable for RAVENNA/AES67 network. Please use a dedicated USB-C to Ethernet, USB3 to Ethernet, or Thunderbolt to Gigabit Ethernet (Sonnettech) adapter.
- Currently Pyramix can only export 48kHz Dolby Atmos ADM Master files.
Configure the AES67/RAVENNA Network
- Pyramix - Merging Audio Device
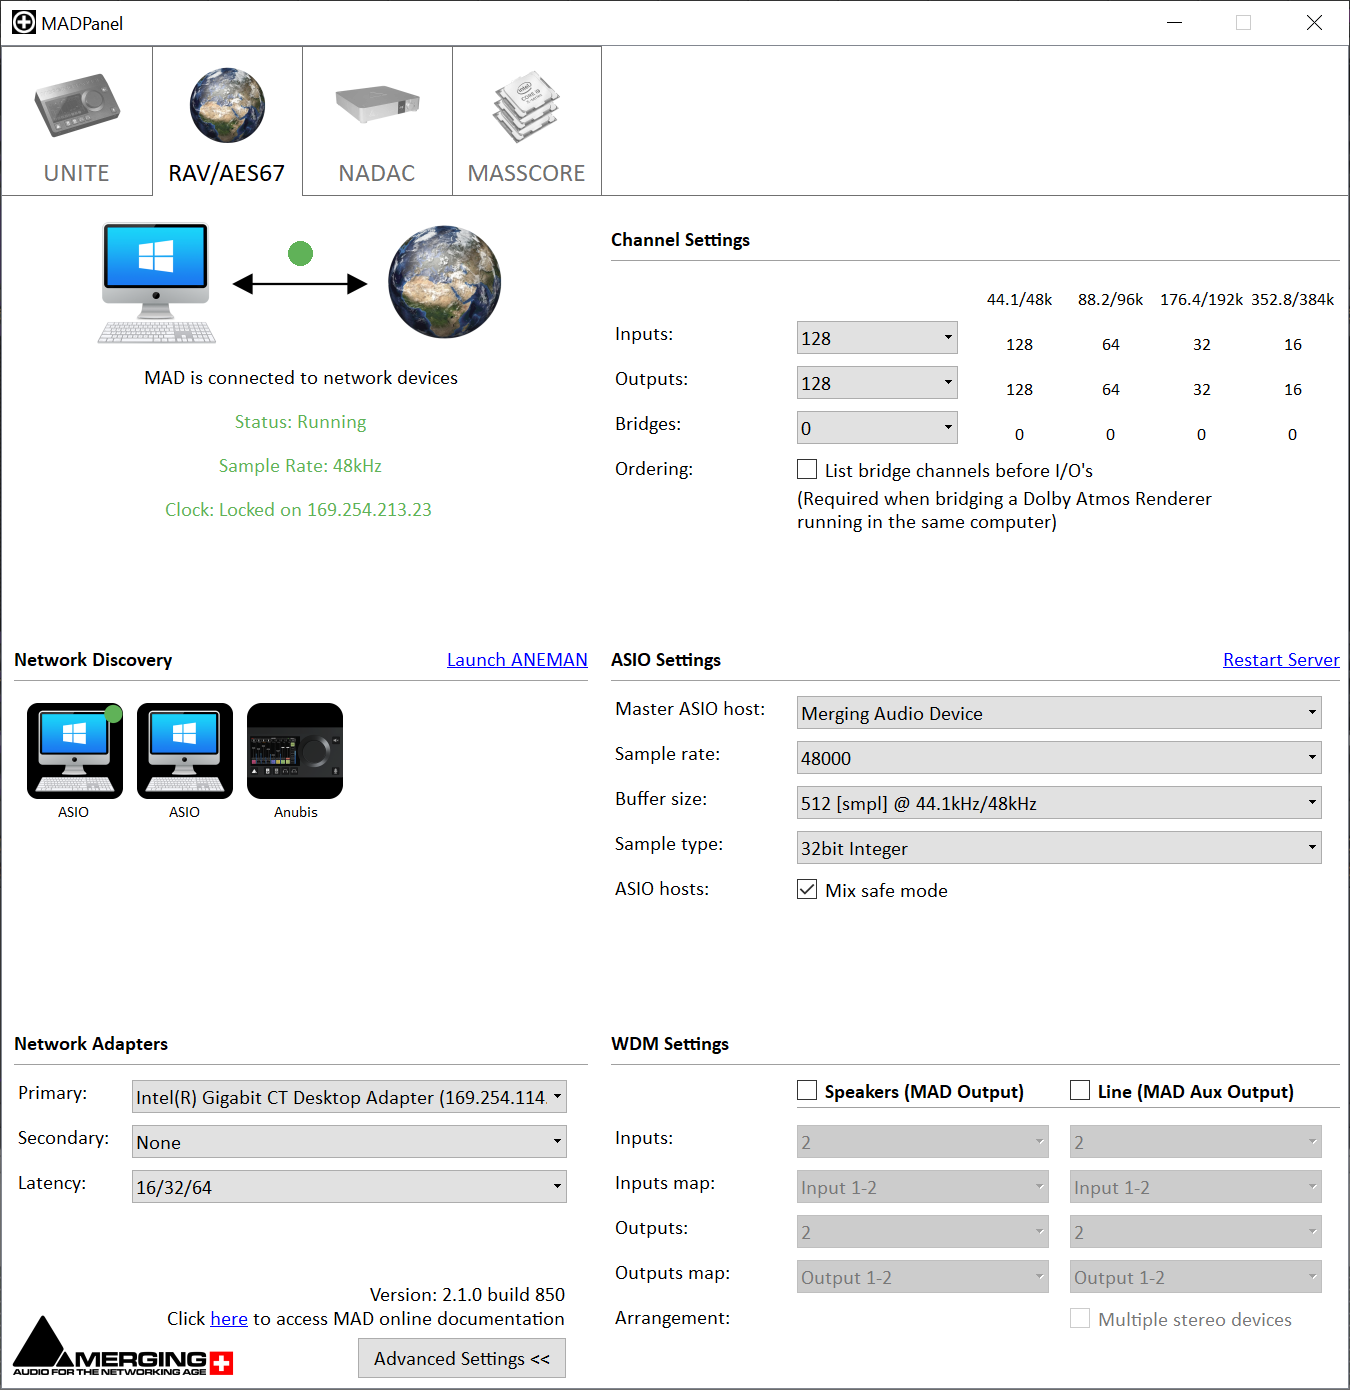
Please open the MAD Panel, and click on Advanced settings :
Set MAD in RAV/AES67 mode
Set Merging Audio Device as Master ASIO Host
Set the sampling rate to 48000
Set the Buffer size to 512
Set the Sample type to 32bit integer
Set the required Number of Inputs and outputs:
Up to 128 Inputs and outputs, but unused channels will still use some power processing.
Therefore Merging recommends you rather set the number of channels you need ; e.g. if you don't plan to use Live Re-renders, 8 inputs are sufficient.
Merging recommends you disable the MAD - WDM, or do not set the WDM outputs to any Bridge channels, to avoid having the WDM channels routed into the Dolby Atmos Renderer.
Set the Latency to 16/32/64 (RAVENNA).
Click on Apply
- Hapi MKII
Browse to Setup > System, and set the Latency to Low 64 smp (RAVENNA). - Anubis
Browse to Home (Merging logo button) > Settings > General, and set the Latency to Low-64 (RAVENNA).
Configure the Dolby Atmos Renderer audio driver
MacOs - Virtual Audio Device driver
Important Note : The MacMini 10Gb Ethernet port (embedded) is not suitable for RAVENNA/AES67 network.
Please use a dedicated Thunderbolt to Gigabit Ethernet (Sonnettech) adapter.
The Dolby Atmos Renderer requires specific settings to communicate with Merging RAVENNA/AES67 devices.
Please go in the System Preferences - Merging RAVENNA / AES67 Settings :
- Switch to RAV/AES67 mode
- Set the Latency to 10 ms (480)
- Tick the Safe Mode option.
- Set the sampling rate to 48000
- Set the required Number of Inputs and outputs:
Up to 128 Inputs and outputs, but unused channels will still use some power processing.
Therefore Merging recommends you rather set the number of channels you need ; e.g. if you don't plan to use Live Re-renders, 16 (up to 9.1.4 + Binaural) or 24 outputs are sufficient.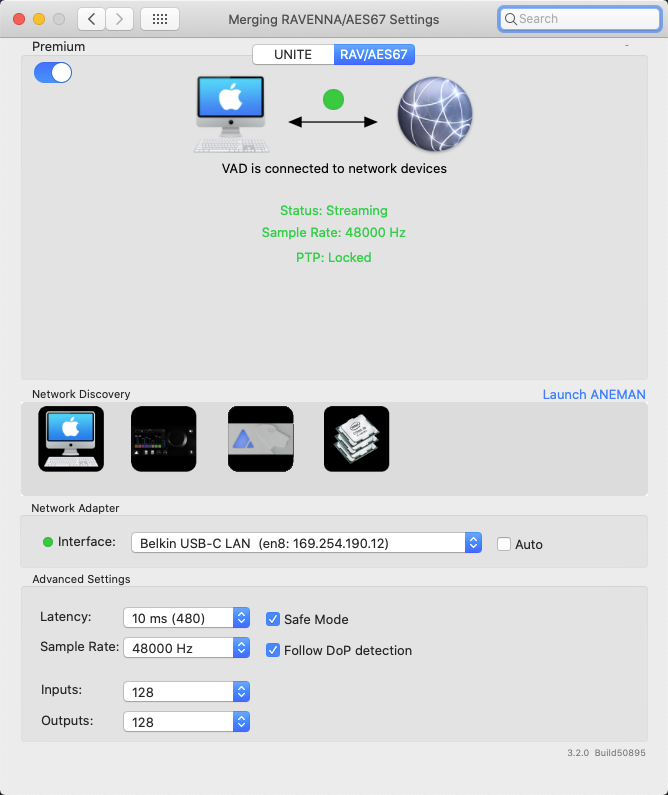
Windows - Merging Audio Device driver
The Dolby Atmos Renderer requires specific settings to communicate with Merging RAVENNA/AES67 devices.
Please open the MAD Panel, and click on Advanced settings :
- Set MAD in RAV/AES67 mode
- Set the Latency to 16/32/64
- Set Merging Audio Device as Master ASIO Host
- Set the sampling rate to 48000
- Set the Buffer size to 512
- Set the Sample type to 32bit integer
Set the required Number of Inputs and outputs:
Up to 128 Inputs and outputs, but unused channels will still use some power processing.
Therefore Merging recommends you rather set the number of channels you need ; e.g. if you don't plan to use Live Re-renders, 16 (up to 9.1.4 + Binaural) or 24 outputs are sufficient.- Merging recommends you disable the MAD - WDM, or do not set the WDM outputs to any Bridge channels, to avoid having the WDM channels routed into the Dolby Atmos Renderer.
- Click on Apply
Configure the Dolby Atmos Renderer application.
Start the Dolby Atmos Renderer.
- Go in Preferences (Mac) or File > Settings (Windows)
- Mac : In the Driver Settings, set Audio Driver to Core Audio, then both Audio input and output device to Merging RAVENNA/AES67.
Windows : In the Driver Settings, set Audio Driver to ASIO, then both Audio input and output device to Merging Audio Device. - Set the External sync source to LTC over Audio
Set the LTC input channel to 128 (or adapt to the number of inputs you have set in the driver).
Set the required Frame rate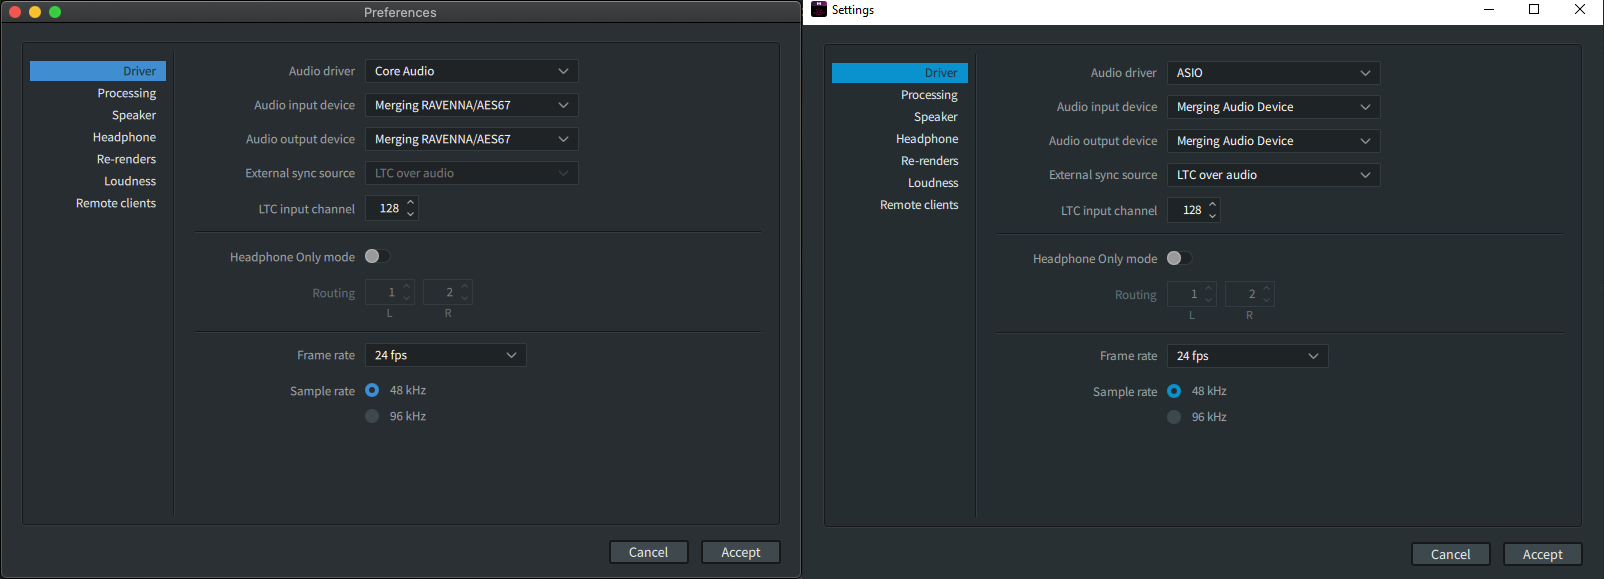
Configure Merging+Anubis - Monitoring Mission
The Anubis Monitoring mission lets you easily control your Dolby Atmos Monitors, with its unique Downmix and Bass management features.
For more details on the Anubis Monitoring mission capabilities, please consult the Anubis User Manual.
You may also connect a Hapi MKII directly to the Dolby Atmos Renderers outputs, but you will need an external Monitoring control device.
- Create a Dolby Atmos Source
Go in the settings > Sources, and create a new Source.
Select it to edit its properties, and set its Type to Dolby Atmos (7.1.4 in this example).
You may name the Source accordingly (named "Dolby Atmos" in our example)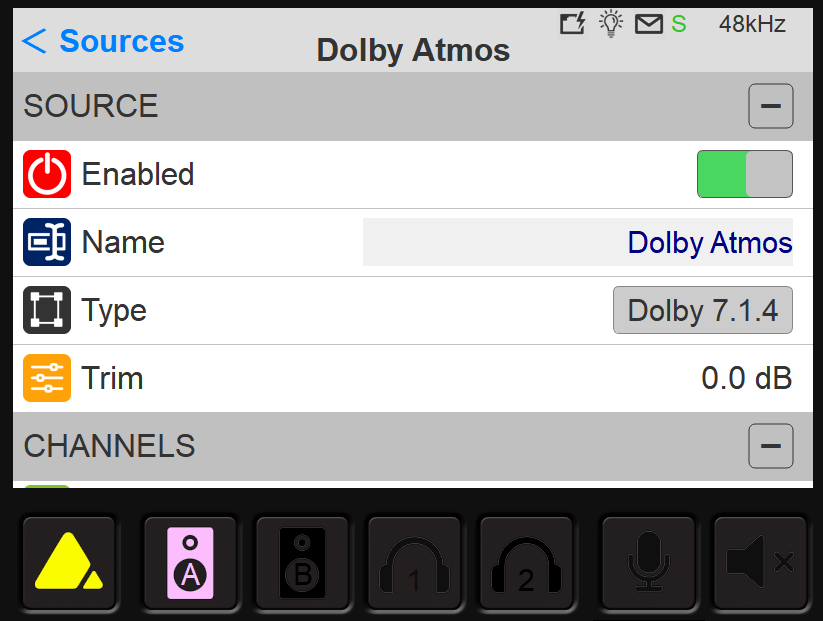
- Create a Stereo Source (Binaural)
Go in the settings > Sources, and create a new Source.
Select it to edit its properties, and set its Type to Stereo.
You may name the Source accordingly (named "Binaural" in our example)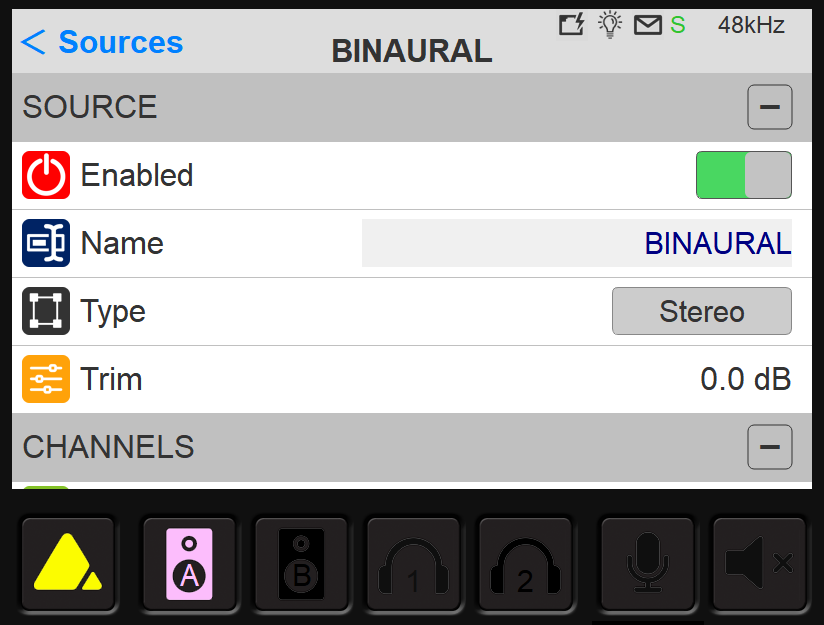
- Create a Dolby Atmos Monitor
Go in the settings > Monitors, and create a new Monitor.
Select it to edit its properties, and set its Type to Dolby Atmos (7.1.4 in this example).
You may name the Monitor accordingly (named "7.1.4" in our example)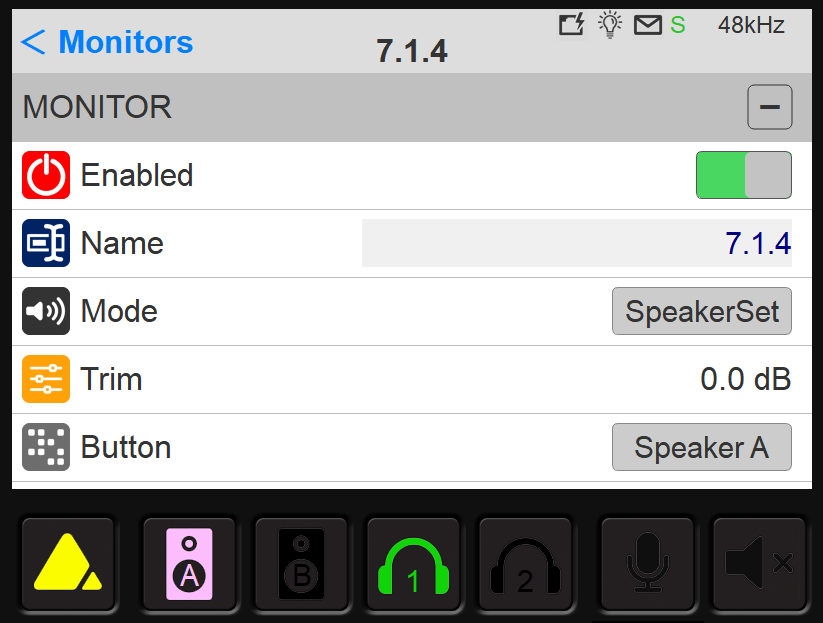
- Create a Binaural Monitor
Go in the settings > Monitors, and create a new Monitor (alternatively, you may also configure Phone 1 or 2)
Select it to edit its properties, and set its Type to Stereo.
Set its Mode to Cue.
You may name the Monitor accordingly (named "Phone" in our example)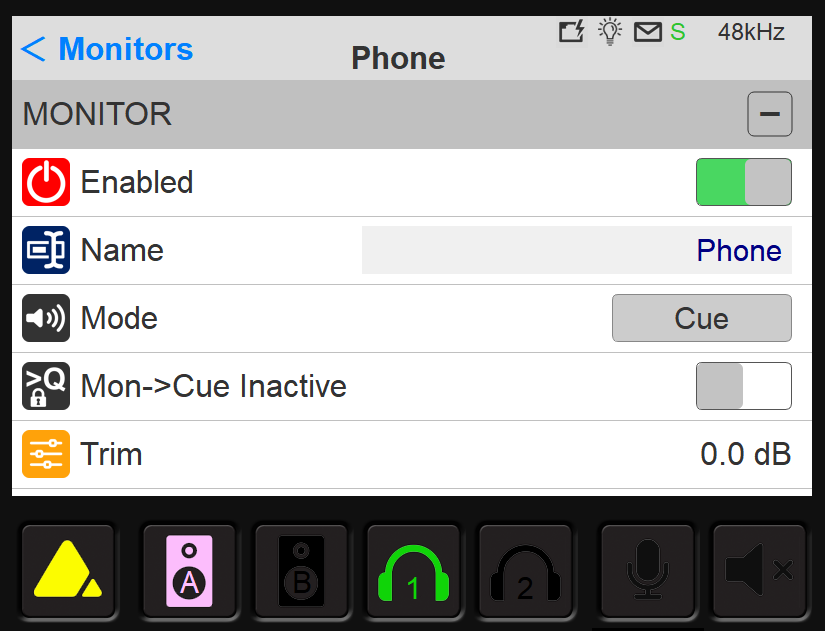
More details on how to create sources and monitors can be found in the Anubis - Monitoring mission tutorials.
To be able to listen to the Multi-channel outputs (12 outputs -7.1.4 - in our example), you will need a Hapi MKII device connected on the network.
Connect the audio inputs and outputs with Aneman
Please start Aneman.
- Create a Sample Rate Zone (if you don't already have one)
Drag and drop Pyramix ASIO on the top of the zone (inside the crown icon).
Drag and drop Anubis and the additional device(s) in the zone.
Drag and drop the CoreAudio (Dolby Atmos Renderer on a Mac computer) or ASIO (Dolby Atmos Renderer on a Windows computer) in the zone.
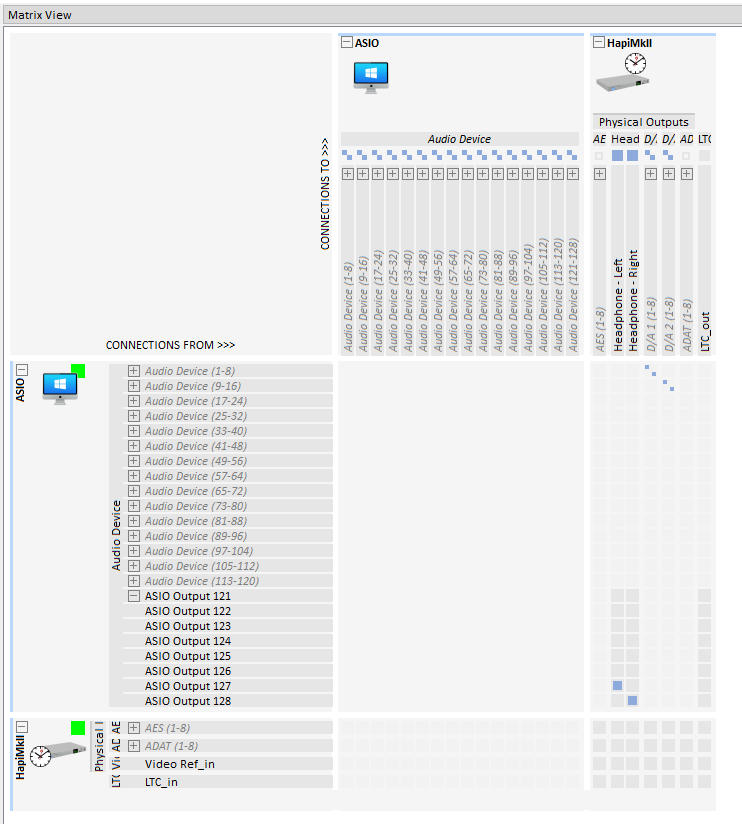
Connecting Pyramix ASIO to the Dolby Atmos Renderer
- In the World view (left pane), select both the Pyramix ASIO and CoreAudio (Mac) or ASIO (Windows).
- In the Matrix (right pane), connect the relevant Pyramix ASIO outputs to CoreAudio or ASIO inputs.
Note : the number channels to connect should be set in accordance with the driver and the Dolby Atmos Renderer configuration.
E.g. If you have set the LTC Input to channel 128 in the Dolby Atmos Renderer, obviously you have to connect the corresponding Pyramix ASIO output 128.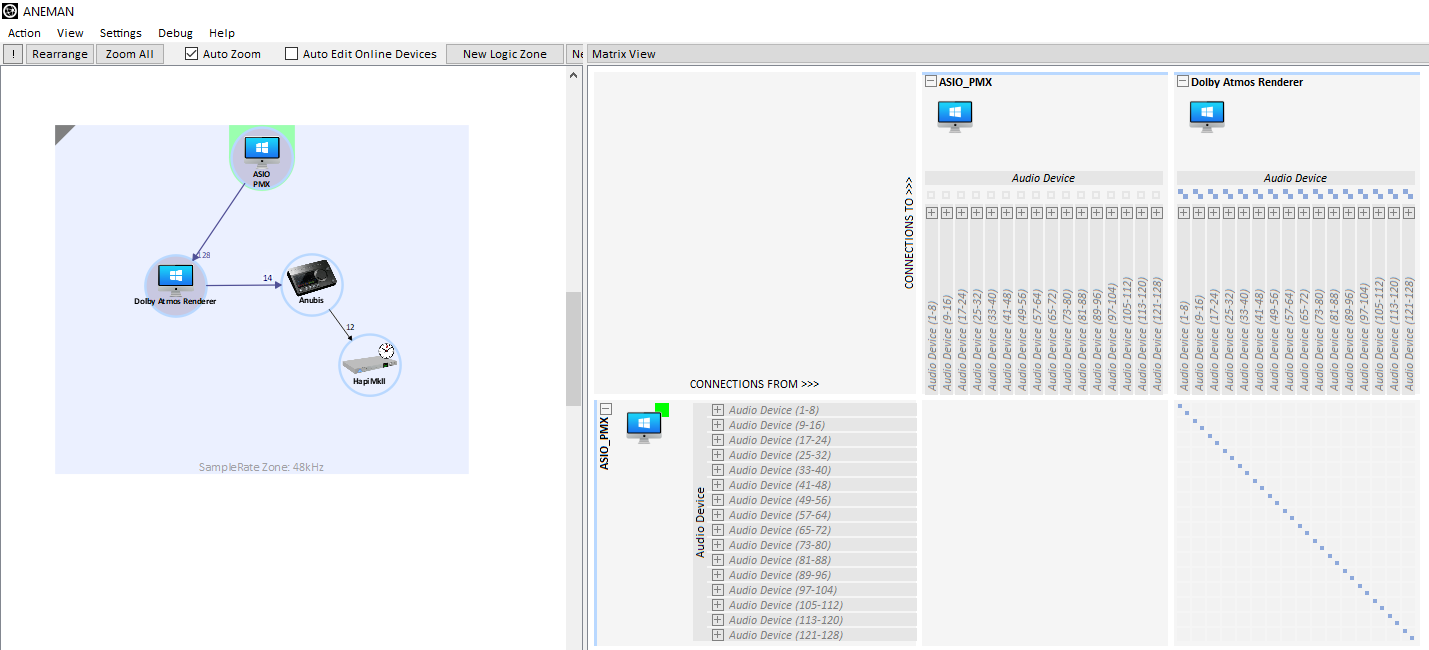
- If you plan to use Live Re-renders, please also connect the relevant CoreAudio or ASIO outputs on Pyramix ASIO inputs.
The Live Re-enders channels number is set in the Dolby Atmos Renderer - Windows - Room Setup - Routing Tab.
E.g. If Re-renders channels is set from 25 to 88 , connect the CoreAudio or ASIO outputs 25 to 88 (if you need 64 channels for Re-renders)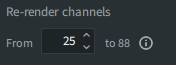
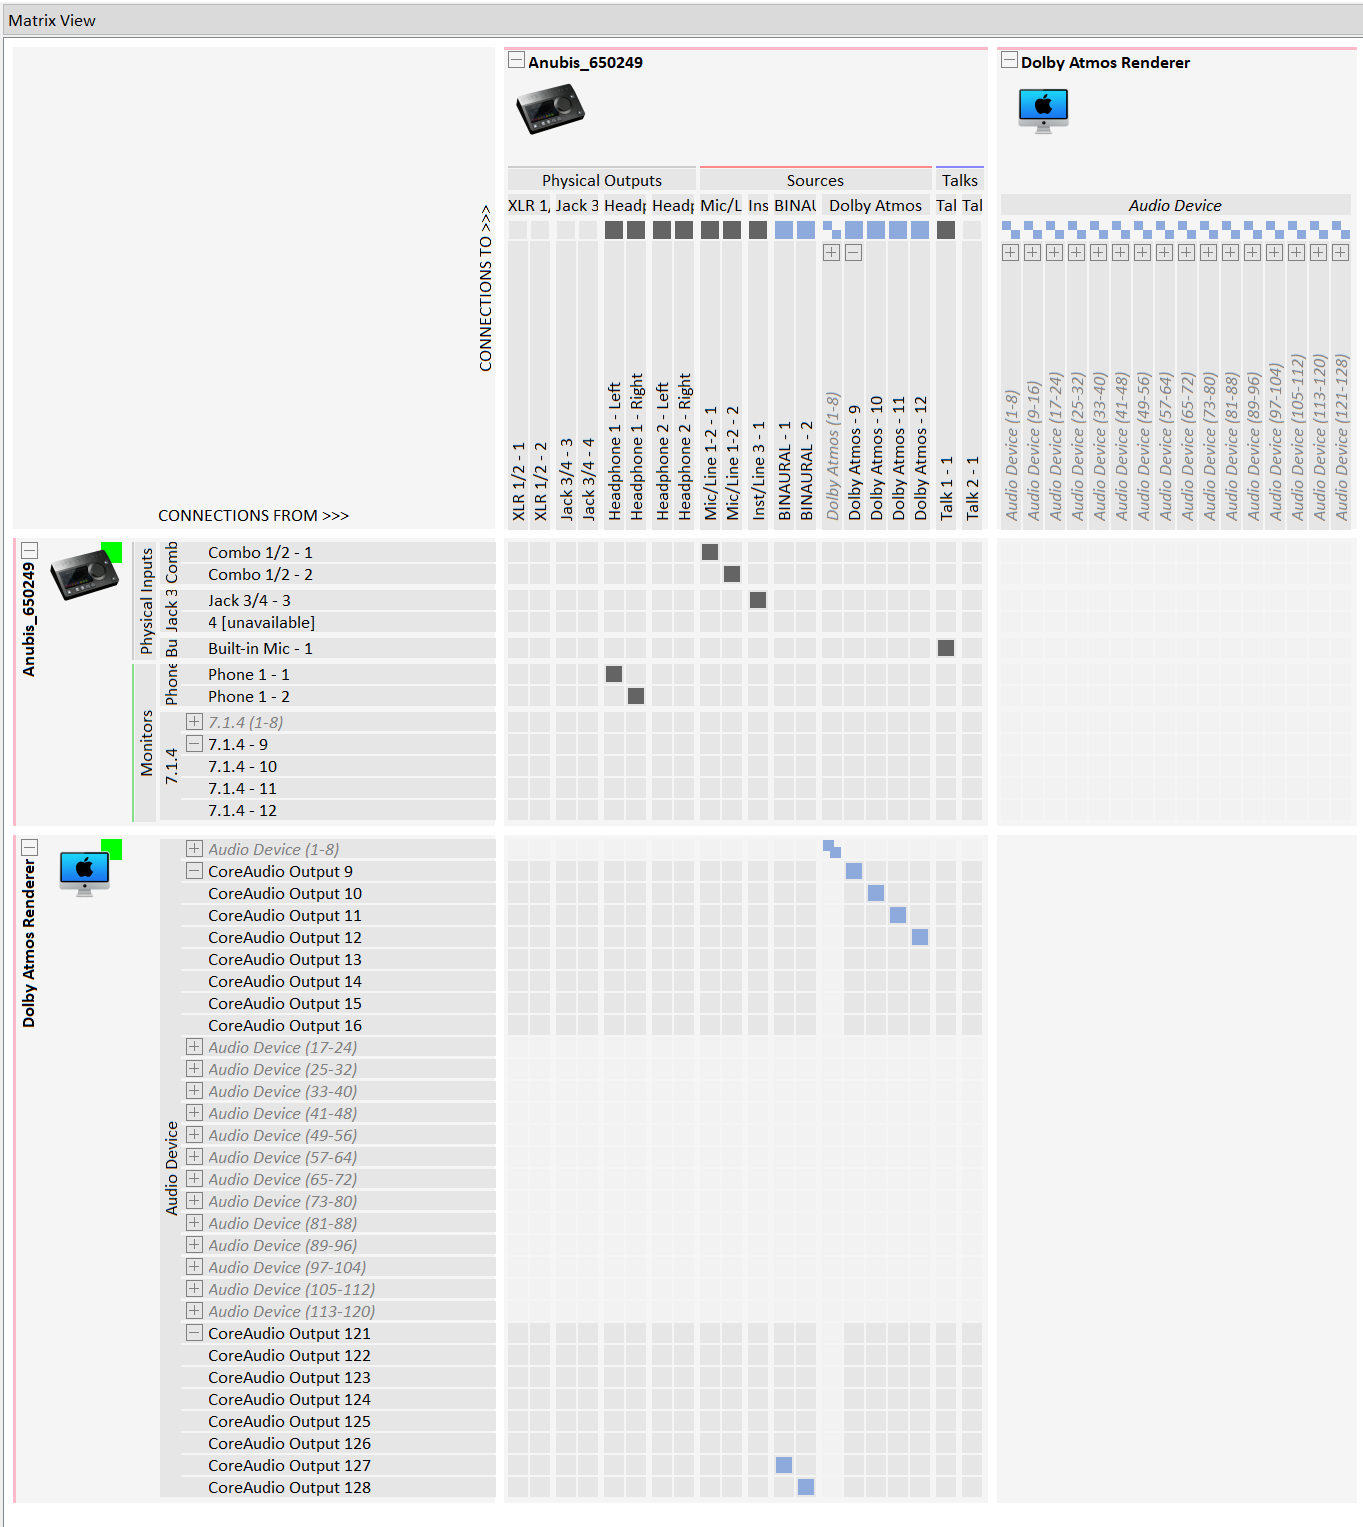
Connecting the Dolby Atmos Renderer to Merging Anubis
- In the World view (left pane), select both CoreAudio (Mac) or ASIO (Windows) and your Anubis.
- In the Matrix (right pane), connect the relevant CoreAudio / ASIO outputs to your Anubis Sources.
Note : the number of channels to connect should be set in accordance with the driver and the Dolby Atmos Renderer output routing. - In this example, the CoreAudio / ASIO 7.1.4 outputs are connected to the Anubis Source called Dolby Atmos (outputs 1 to 12 in the Dolby Atmos Renderer - Room Setup - Routing page)
The CoreAudio / ASIO Headphones are connected to the Anubis Source called Binaural ; outputs 127-128, as set in the Dolby Atmos Renderer - Room Setup - Routing page.
If you need to reduce the number of output channels from CoreAudio / ASIO, please change the Headphone routing in the Dolby Atmos Renderer, and connect the corresponding outputs.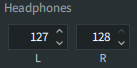
Connecting Merging Anubis to Hapi MKII
- In the World view (left pane), select both Anubis and your Hapi MKII.
- In the Matrix (right pane), connect the relevant Anubis Monitor to the Hapi MKII.
Note: Make sure you first select the Monitor set on the Anubis itself in order to see it listed for connectivity in ANEMAN - The Binaural Source can be listened to by selecting the Stereo Monitor (named "Phone" in our example), then the Stereo Source (named "Binaural" in our example), directly on the Anubis.
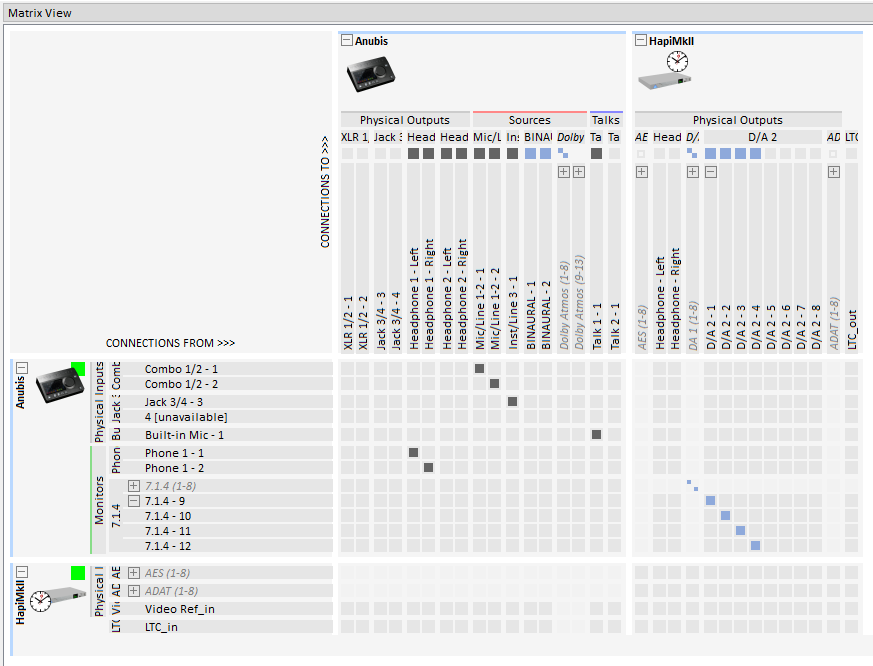
Connecting the Dolby Atmos Renderer to Hapi MKII (without Anubis)
- In the World view (left pane), select both CoreAudio (Mac) or ASIO (Windows) and your Hapi MKII.
- In the Matrix (right pane), connect the relevant CoreAudio / ASIO outputs to the Hapi MKII
Note : the number of channels to connect should be set in accordance with the driver and the Dolby Atmos Renderer output routing. - In this example, the CoreAudio / ASIO 7.1.4 outputs are connected to the Hapi MKII DAs (outputs 1 to 12 in the Dolby Atmos Renderer - Room Setup - Routing page)
- The CoreAudio / ASIO Headphones are connected to the Hapi MKII Headphones ; outputs 127-128, as set in the Dolby Atmos Renderer - Room Setup - Routing page.
If you need to reduce the number of output channels from CoreAudio / ASIO, please change the Headphone routing in the Dolby Atmos Renderer, and connect the corresponding outputs.
Pyramix DAW Configuration
- Please start Pyramix.
- Create a Dolby Atmos compatible project, or Open an existing one, or Import a Dolby Atmos ADM Master.
Open the Pyramix mixer, and click on the Dolby Atmos button on the top right corner.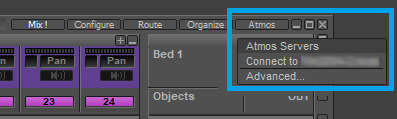
Select the detected Dolby Atmos Server, Pyramix is now connected to the Dolby Atmos Renderer - the Mixer Dolby Atmos button will turn green.
Note : If the Dolby Atmos Server is not automatically detected, enter the Advanced menu. You may then enter the Dolby Atmos Server IP adress in the Server field.
This IP address can be found in the Dolby Atmos Renderer Settings (Windows) / Preferences (Mac) > Remote clients.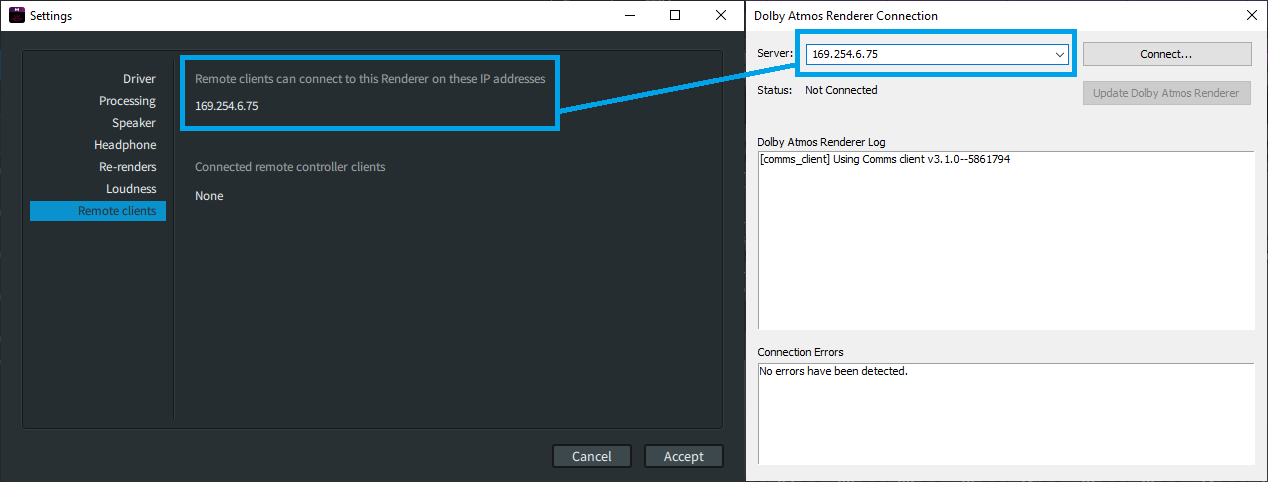
Timecode
- As the LTC audio channel will use 1 channel, do not exceed 127 bus outputs (Beds + Objects)
- Go in the Mixer Configure page, add a Mono strip, and activate its DirectOut (DO)
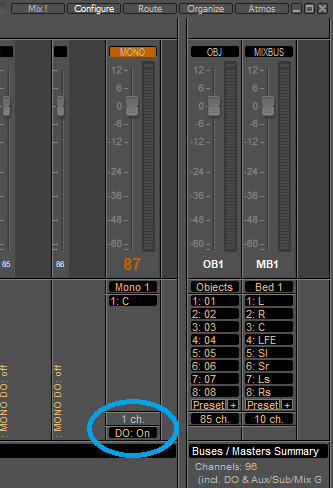
- Back in the Main mixer page, add the VS3 Effect > Generator on the strip.
Open the Generator plugin, and set it to TimeCode, ) and set the output level (-10 should be adequate) (set Mute if Stopped according to your needs) - Set the Strip Direct Out to 128.
You may also set the Direct Out to Pre (Pre fader)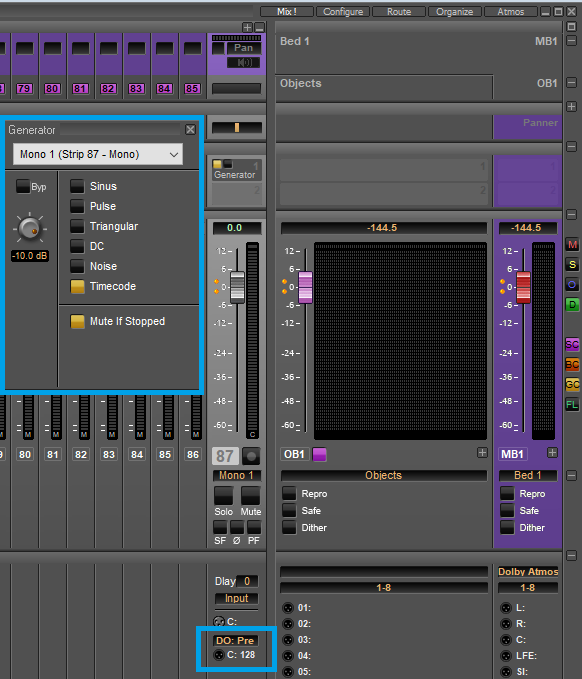
- Alternatively, you can create an additional Stereo bus to route the LTC, and set it to Routing Safe in the Project > Edit Dolby Atmos Master Configuration page.
- Now, to connect the audio and the Dolby Atmos Configuration from Pyramix to the Dolby Atmos Renderer, please go in Project > Edit Dolby Atmos Master Configuration.
Configure the Dolby Atmos channels as required, then click on Update Dolby Atmos Renderer.
Pyramix will send the Dolby Atmos configuration to the Dolby Atmos Renderer, and also automatically route the Mixer bus channels accordingly.
Close the window once finished (for more details on the Dolby Atmos Master import, export and configuration, please see Pyramix User Manual). - Note on the Automatic Routing
When using the Update Dolby Atmos Renderer, all the bus channels that doesn't have an Atmos mapping will have their routing removed; the additional busses won't be routed anymore.
You may prevent the automatic routing to modify additional busses outputs by activating the Routing Safe option in the Edit Dolby Atmos Master Configuration page.
Notes
- Dolby® Dolby Atmos, and the double-D symbol are registered trademarks of Dolby Laboratories
Licensing Corporation. Confidential unpublished works. Copyright 2021 Dolby Laboratories. All
rights reserved. - The computer running the Dolby Atmos Renderer application should also be properly configured for real-time audio applications.
Please consult our configuration guides for Windows computers or Mac computers. - Apple Mac M1 users : as of today (Dolby Atmos Renderer v3.7.3), the Dolby Atmos Renderer is compatible with, but not fully qualified on, M1 Macs, as the Renderer runs as an Intel process (see Activity Monitor under the “Kind” column) via the Rosetta 2 translation layer, which may cause performance issues.