Using Dolby Atmos® Renderer with Merging Audio Device on the same computer.
Important Note : as of today, this solution is not yet fully validated by Dolby Laboratories.
Please check your final Dolby ADM Master file with one of the official Dolby Atmos solution.
Prerequisites
- The Merging Audio Device driver version 2.1 (or above) must be installed
Follow the installation procedure described in this page. - A Merging RAVENNA/AES67 device must be connected to the computer.
- Dolby Atmos Renderer version 3.7 (or above) must be installed and authorized.
- Pyramix 14 must be installed and authorized with Premium key for Dolby Atmos features.
- Pyramix 14 must be configured in Native mode, to run on the Merging Audio Device driver (VS3 Control Panel)
This configuration is currently not possible when running in MassCore mode.
Please follow this guide carefully, as a wrong routing may produce feedback !!!
Scope
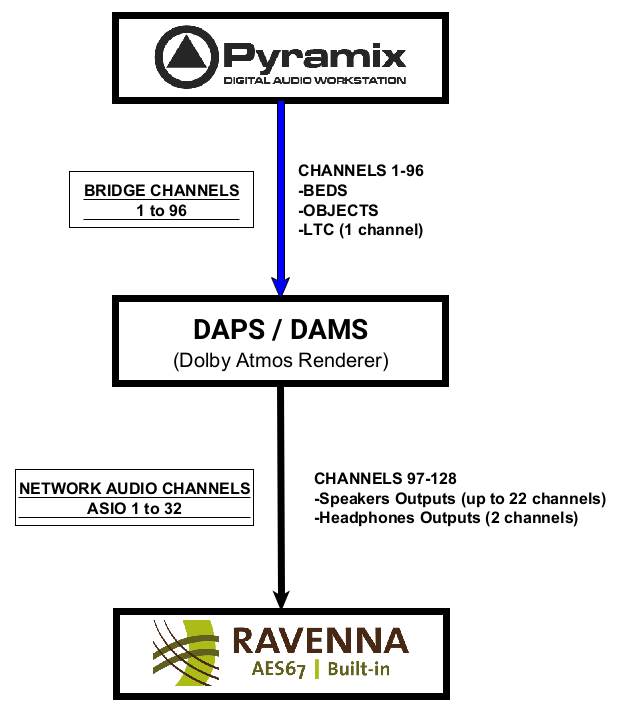
In this configuration, up to 96 channels can be sent from Pyramix Native in the Dolby Atmos Renderer, using the Bridge channels (virtual), and up to 32 outputs can be routed from the Dolby Atmos Renderer to RAVENNA Audio Devices (ASIO).
- As of today and as per Dolby Atmos Renderer specifications, live rerenders are not supported on the same machine. Offline Re-renders can of course be exported from the Dolby Atmos Renderer application.
- Timecode is required for real-time Loudness measurement in the Dolby Atmos Renderer.
The Dolby Atmos Renderer requires MAD to be configured with a buffer size of 512 samples. Therefore, it cannot be used in AES67 mode (for connectivity with DANTE devices, i.e.) since AES67 requires MAD to be set with buffers sizes which are multiples of 48 (48, 96, 192 or 384 samples).
Running the Dolby Atmos Renderer on the same machine as Pyramix using MAD bridge channels is possible in two recommended options:
A. 96 channels for beds and objects + up to 22 channels of speaker and headphones outputs from the Dolby Atmos Renderer. For example 9.1.6 + headphones, as in the procedure described below.
B. 112 channels for beds and objects + up to 16 channels of speaker outputs from the Dolby Atmos Renderer. For example sets up to 7.1.4 + headphones, in such case please adapt the procedure below accordingly.
Configure the MAD Panel for the Dolby Atmos Renderer
The Dolby Atmos Renderer requires specific settings to communicate with Merging RAVENNA/AES67 devices.
Please open the MAD Panel, and click on Advanced settings :
- Set MAD in RAV/AES67 mode
- Set the Latency to 16/32/64
- Set Merging Audio Device as Master ASIO Host
- Set the sampling rate to 48000
- Set the Buffer size to 512
- Set the Sample type to 32bit integer
Set the required Number of Inputs and outputs. Merging recommends you set 32 inputs, outputs and 96 Bridge channels.
To summarize the channel numbering :Applications Channels Network Channels Dolby Atmos Renderer
Channels InputsDolby Atmos Renderer
Channels OutputsRAVENNA
Channels1 - 96 Bridge channels (from PMX) Not used Not used (Virtual Bridge channels) Not used 97 - 128 Monitoring ASIO 1 - 32 Tick the List bridge channels before I/O's option.
This means that channels 1 to 96 will be the Bridge channels (virtual). The rest of the inputs / outputs will be RAVENNA.- Merging recommends you disable the MAD - WDM, or do not set the WDM outputs to any Bridge channels, to avoid having the WDM channels routed into the Dolby Atmos Renderer.
- Click on Apply
You may set the Dolby Atmos Renderer App as Master ASIO hosts, this will prevent other DAW to change the sampling rate while the Dolby Atmos Renderer is running.
Note that you must run the Dolby Atmos Renderer application once with the Merging Audio Device before it's available in the ASIO Hosts list.
Click on Apply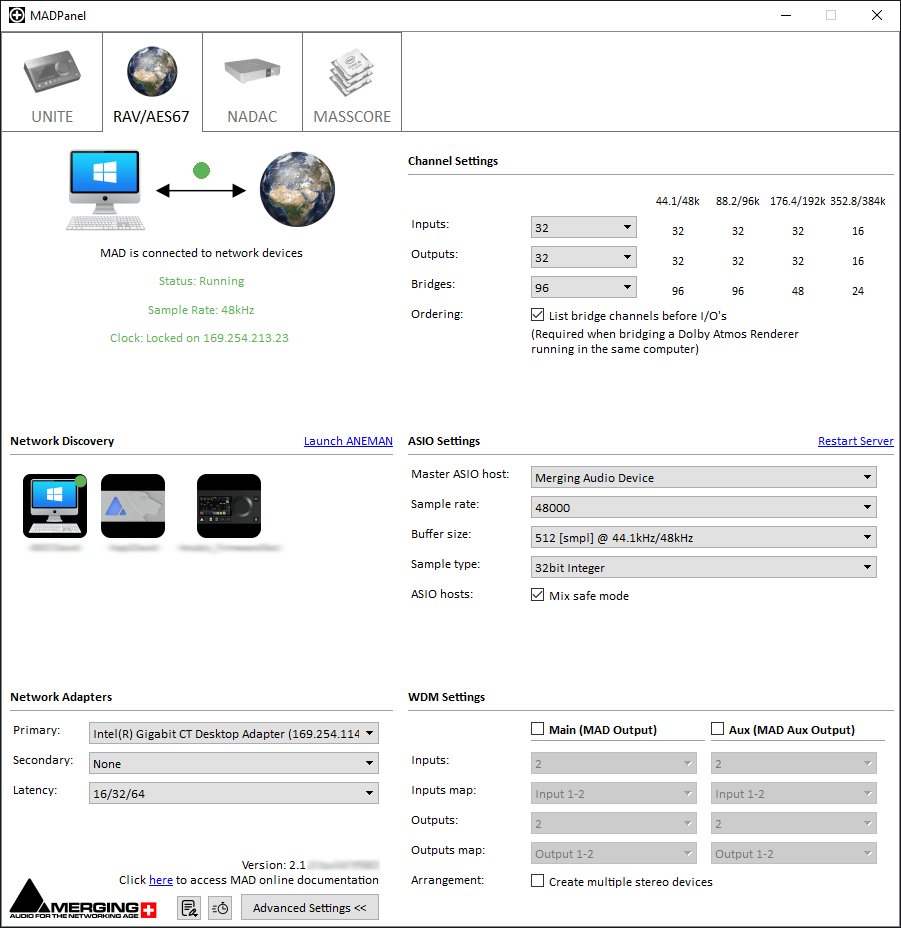
Configure the Dolby Atmos Renderer audio
Start the Dolby Atmos Renderer.
- Go in File > Settings
In the Driver Settings, set Audio Driver to ASIO, then both Audio input and output device to Merging Audio Device. - Set the External sync source to LTC over Audio
Set the LTC input channel to 96
Set the required Frame rate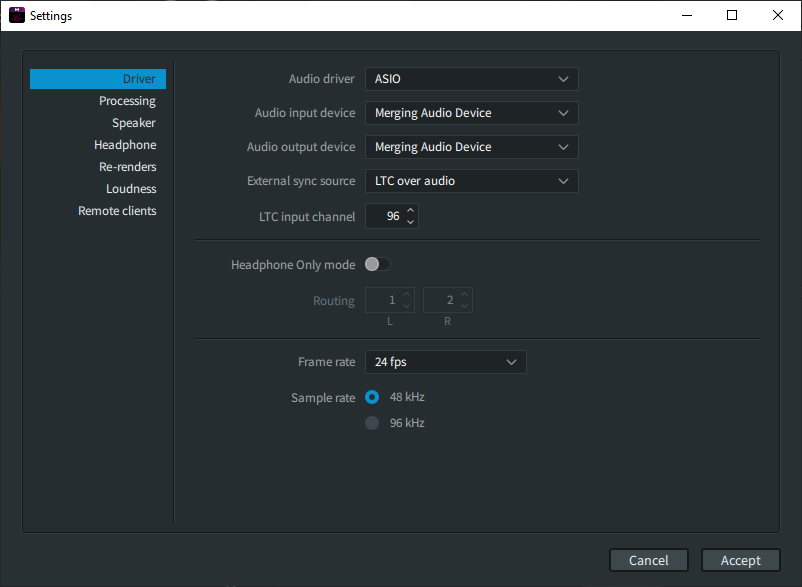
- Browse to Re-renders and disable re-render processing.
This is to avoid feedback from the re-renders, as this feature is not supported when the Dolby Atmos Renderer and the DAW are on the same computer.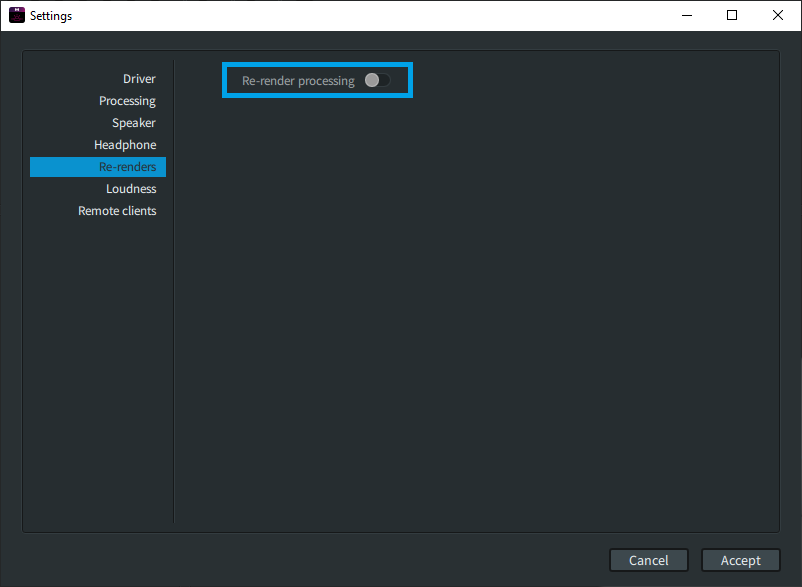
- Click on Accept.
The Dolby Atmos Renderer will then initialize and verify that the driver is compatible, this may take some time.
Once the initialization is finished, the Dolby Atmos Renderer is ready to run with the Merging driver. - As the Bridge channels are listed before the RAVENNA channels (1 to 96), the Dolby Atmos Renderer outputs must be routed in the RAVENNA channels to be monitored (and avoid feedback).
Go in Window > Room Setup : Routing tab.
Adjust the channel routing depending on the number of bridge channels you have set.
In this example, as we have set 96 bridge channels, the RAVENNA channels begins at 97.
Please only route to non-bridged channels, to avoid feedback !
You can also set the Headphone outputs (Default 127-128) for Binaural monitoring
Click on Accept when finished.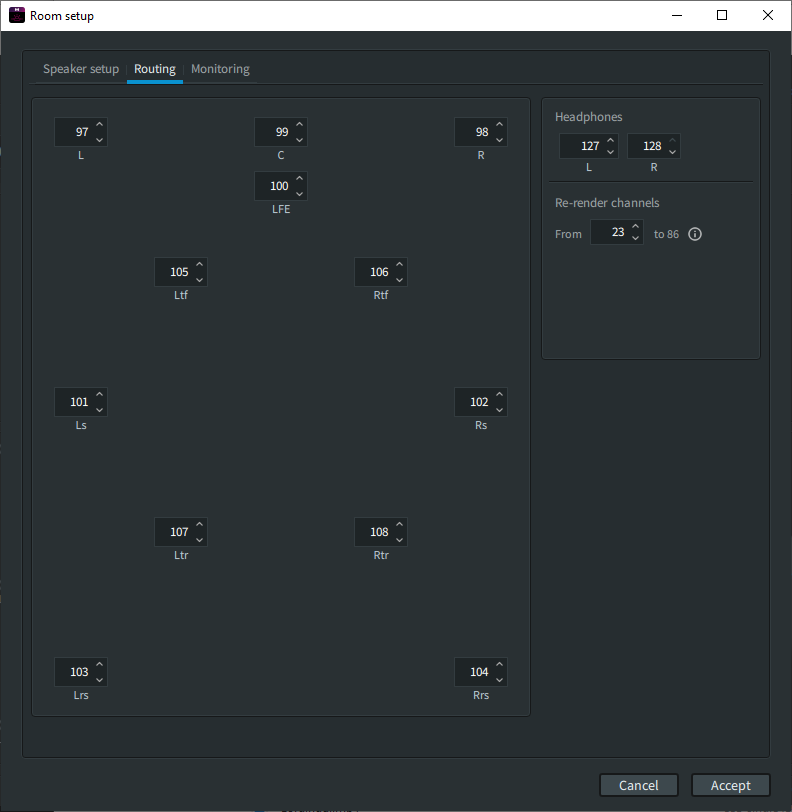
Pyramix DAW Configuration
- Start Pyramix
- Create a Dolby Atmos compatible project, or Open an existing one, or Import a Dolby Atmos ADM Master.
Don't exceed 96 channels (Beds and Objects) - 95 if you need Timecode (required for Dolby Atmos Renderer loudness measurement) - Open the Pyramix mixer, and click on the Dolby Atmos button on the top right corner.
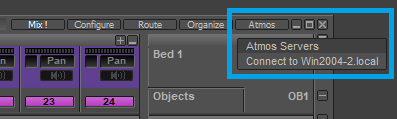
Select the detected Dolby Atmos server, Pyramix is now connected to the Dolby Atmos Renderer - the Mixer Dolby Atmos button will turn green.Timecode
- Go in the Mixer Configure page, add a Mono strip, and activate its DirectOut (DO)
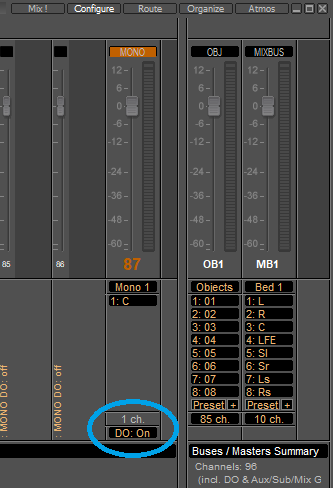
- Back in the Main mixer page, add the VS3 Effect > Generator on the strip.
Open the Generator plugin, and set it to TimeCode, activate Mute if Stopped (optional) and set the output level (-10 should be adequate) - Set the Strip Direct Out to 96 (MAD Bridge 96).
You may also set the Direct Out to Pre (Pre fader)
- Now, to connect the audio and the Dolby Atmos Configuration from Pyramix to the Dolby Atmos Renderer, please go in Project > Edit Dolby Atmos Master Configuration.
Configure the Dolby Atmos channels as required, then click on Update Dolby Atmos Renderer.
Pyramix will send the Dolby Atmos configuration to the Dolby Atmos Renderer, and also route the Mixer bus channels accordingly.
Close the window once finished (for more details on the Dolby Atmos Master import, export and configuration, please see Pyramix User Manual). - Note on the Number of bus channels connected to the Atmos Renderer input setting.
When using the Update Dolby Atmos Renderer, all the bus channels that doesn't have an Atmos mapping will have their routing removed; the additional busses won't be routed anymore.
Therefore, if you need to route Pyramix outputs directly to Ravenna, please set this value above the number of bridge channels.
This will avoid the Update Dolby Atmos Renderer automatic routing to disconnect those outputs.
If you are using Timecode, please set this value to 95 (otherwise the DirectOut Routing will be removed.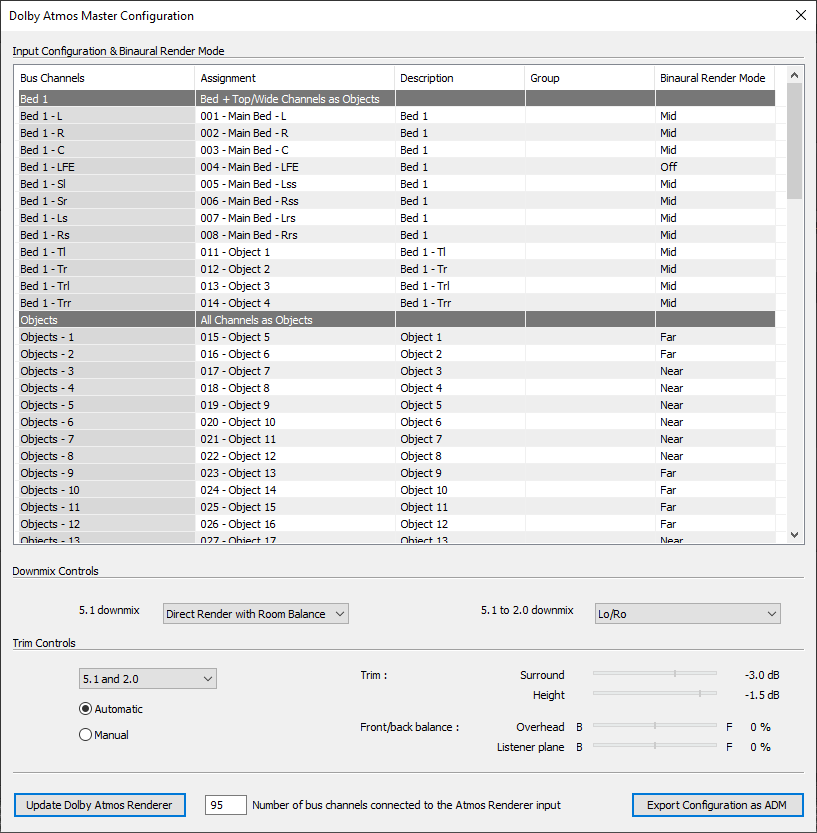
Configure Anubis - Monitoring Mission
- Create a Dolby Atmos Source
Go in the settings > Sources, and create a new Source.
Select it to edit its properties, and set its Type to Dolby Atmos (7.1.4 in this example).
You may name the Source accordingly (7.1.4 in our example) - Create a Stereo Source (Binaural)
Go in the settings > Sources, and create a new Source.
Select it to edit its properties, and set its Type to Stereo.
You may name the Source accordingly (Binaural in our example) - Create a Dolby Atmos Monitor
Go in the settings > Monitors, and create a new Monitor.
Select it to edit its properties, and set its Type to Dolby Atmos (7.1.4 in this example).
You may name the Source accordingly (Dolby Atmos in our example)
More details on how to create sources and monitors can be found in the Anubis - Monitoring mission tutorials.
To be able to listen to the Multi-channel outputs (12 outputs -7.1.4 - in our example), you will need a Horus, Hapi or Hapi MKII device connected.
If you have an Anubis SPS, you may directly connect the additional device on the Anubis SPS Secondary network port, and use the Peering feature.
See Anubis SPS - Extending your Inputs / Outputs with a secondary Merging device.
Otherwise you will have to use a configured AES67/RAVENNA network switch to connect the devices.
Please refer to Network considerations when using RAVENNA page, and our list of validated network switches on this page.
Connect the RAVENNA outputs with Aneman
Please start Aneman
- Create a Sample Rate Zone (if you don't already have one)
Drag and drop Anubis and the additional device in the zone.
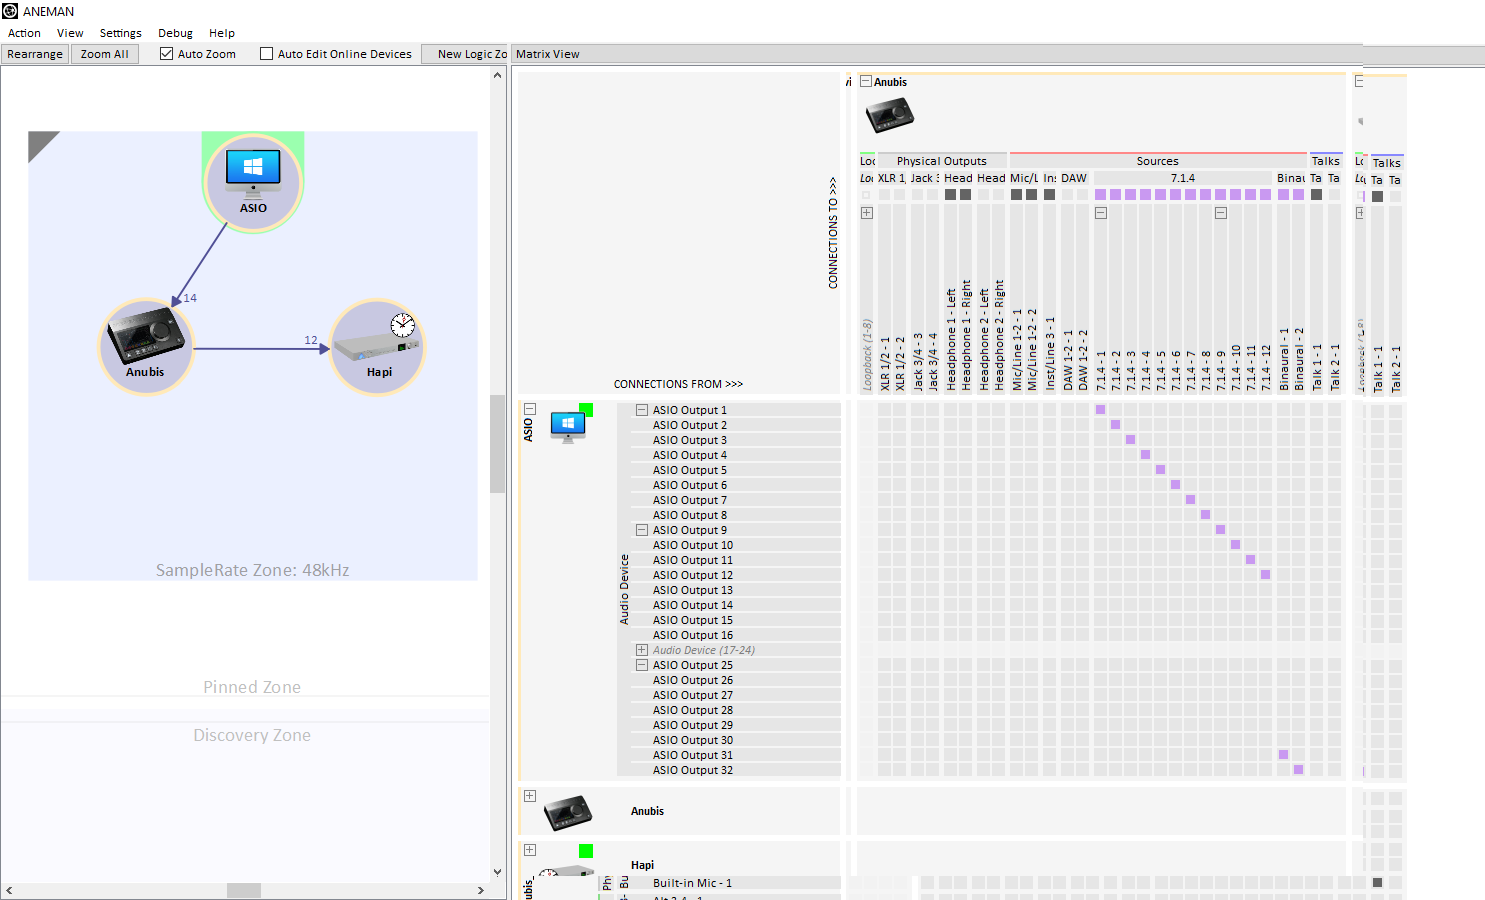
Drag and drop ASIO on the top of the zone (crown icon). - In the World view (left pane), select both ASIO and your Anubis device.
- In the Matrix (right pane), connect the relevant ASIO outputs (ASIO outputs 1 to 12 in our example, for 7.1.4) to the Anubis 7.1.4 Source.
Connect the relevant ASIO outputs (ASIO outputs 31-32, if the Dolby Atmos Renderer Headphones is set to 127-128) to the Anubis Stereo Source (Binaural).
- The Binaural output may be used by selecting the Headphone 1 or 2 Monitor, then the Binaural Source.
- If you are using Anubis Peering, make sure you have connected the required channels on the Anubis Monitor, in Anubis Settings > Monitors > your Multi-Channel monitor (named Dolby Atmos in our example) > Patches.
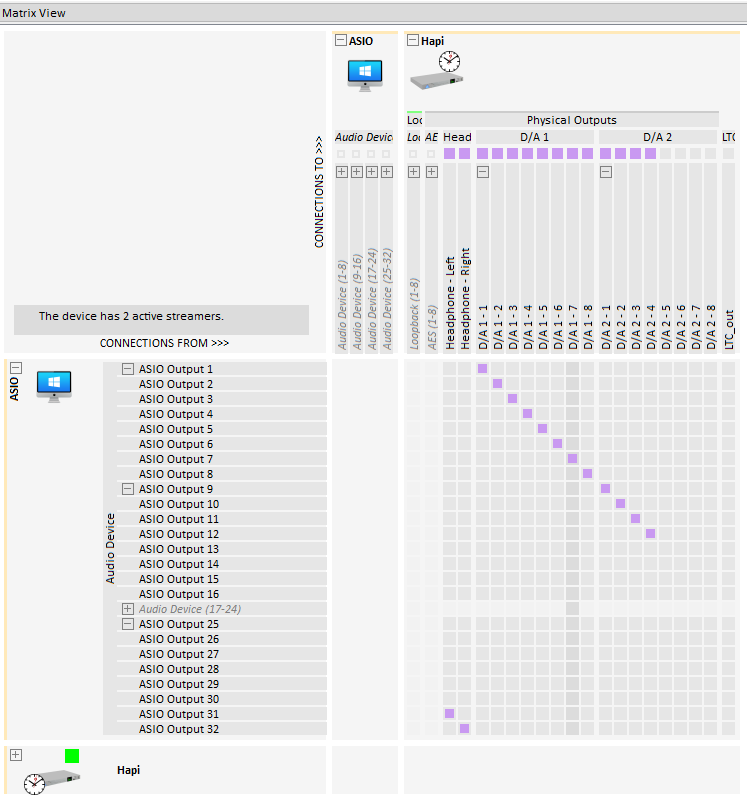
- If you are using a network switch, please select the Anubis and your Horus / Hapi / Hapi MKII device, and connect the Anubis Multi-Channel Monitor (named Dolby Atmos in our example) to the Horus/Hapi/HapiMKII physical outputs.
(if you don't see the Anubis Monitor in the Matrix, make sure you select it on the Anubis device).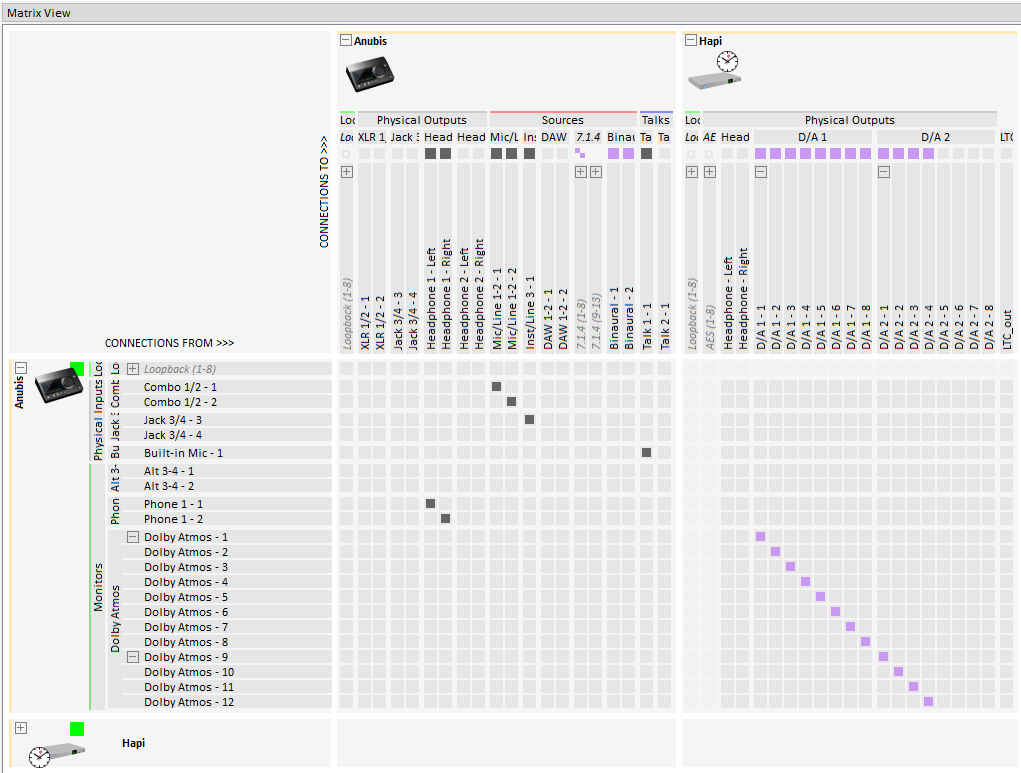
- If you don't have an Anubis, you may also connect directly to a Horus / Hapi / Hapi MKII device.
Notes
- Dolby® Dolby Atmos, and the double-D symbol are registered trademarks of Dolby Laboratories
Licensing Corporation. Confidential unpublished works. Copyright 2021 Dolby Laboratories. All
rights reserved.