ASROCK Z390M PRO4 Install guide
- David Jacques
First assemble the computer parts.
For ease of use during Windows installation, Merging recommends that you install security dongles, NET-MSC GBEX1, MT-USBSync board and Pyramix-Ovation keyboard after the Windows Installation.
Please make sure your Windows and Pyramix-Ovation-VCube versions are compatible, see this page for details.
Merging highly recommends you "defer feature updates" in Windows 10.
1.BIOS
Validated BIOS version : 4.10 - Please consult support@merging.com for other BIOS support.
First update BIOS if required.
When updating the BIOS, all settings are lost or not set correctly, you have to enter all the parameters again manually.
Merging recommends you unplug all drives before updating BIOS.
Merging Technologies will not be hold responsible for any trouble or error during a BIOS update.
!Merging Technologies does not guarantee any issue or instability if any overclocking is enabled!
Sealevel GPIO 8206 & 8206FX are NOT compatible with this motherboard, because of their incompatibility with Intel USB chipsets.
Other SeaLevel GPIO are compatible, see our supported controllers table for details on supported models.
BIOS first opens in the EZ mode page, a summary of the system information.
You may adjust date and time.
Please switch to Advance Mode (F6)
1.1. Main page
System information only.
1.2. OC Tweaker
Load Opimized CPU OC Setting: Disabled (only displayed if your CPU supports this feature)
1.2.1 CPU Configuration
Multi Core Enhancement: Enabled (only displayed if your CPU supports this feature)
CPU Ratio: Auto (only displayed if your CPU supports this feature)
CPU Cache Ratio : Auto (only displayed if your CPU supports this feature)
Minimum CPU Cache Ratio: Auto (only displayed if your CPU supports this feature)
BCLK Frequency: 100.0
BCLK Spread Spectrum: Disabled (only displayed if your CPU supports this feature)
Boot Performance Mode: Max non-Turbo Performance
FCLK Frequency: 800Mhz
AVX Ratio Offset: Auto (only displayed if your CPU supports this feature)
BCLK Aware Adaptive Voltage: Enabled (only displayed if your CPU supports this feature)
Ring to Core Ratio Offset: Disabled (only displayed if your CPU supports this feature)
TVB Ratio Clipping: Disabled (only displayed if your CPU supports this feature)
TVB Volatge Optimizations: Disabled (only displayed if your CPU supports this feature)
Intel Speed Step Technology: Disabled
Intel Turbo Boost Technology: Disabled
Intel Speed Shift Technology: Disabled
Long Duration Power Limit: Auto
Long Duration Maintained: Auto
Short Duration Power Limit: Auto
CPU Core Current Limit: Auto
1.2.2 DRAM Configuration
DRAM Tweaker: No settings to change. Leave default values.
Load XMP Setting: Auto
DRAM Frequency: Auto
Primary Timing: No settings to change. Leave default values.
Secondary Timing: No settings to change. Leave default values.
Thrid Timing: No settings to change. Leave default values.
Fourth Timing: No settings to change. Leave default values.
Advanced Setting: No settings to change. Leave default values.
1.2.3 Voltage Configuration
CPU Core/Cache Voltage: Auto
CPU Load-Line Calibration: Auto
DRAM Voltage: Auto
DRAM Activating Power Supply: Auto
PCH +1.0 Voltage: Auto
VCCIO Voltage: Auto
VCCST Voltage: Auto
VCCSA Voltage: Auto
1.3. Advanced
1.3.1 CPU Configuration
Intel Hyper Threading Technology: Enabled (only displayed if your CPU supports this feature)
Active Processor Cores: All
CPU C States Support: Disabled
CPU Thermal Throttling: Disabled
Intel Virtualization Technology: Enabled
Hardware Prefetecher: Enabled
Adjacent Cache Lime Prefetch: Enabled
Software Guard extension (SGX): Disabled
1.3.2 Chipset Configuration
Primary Graphics Adapter: Onboard or PCI Express if you use a separate graphic card (recommended)
Above 4G Decoding: Disabled
VT-d: Enabled
PCIE1 to PCIE5 Link Speed: Auto
PCI Express Native Control: Disabled
PCIE ASPM Support: Disabled
PCH PCIE ASPM Support: Disabled
DMI ASPM Support: Disabled
PCH DMI ASPM Support: Disabled
Share Memory: Memory allowed to the onboard graphics. Set to 1024M if you use onboard graphics and Auto for dedicated graphic card.
IGPU Multi-Monitor: Disabled
Intel(R) Ethernet Connection I219-V: Enabled
Onboard HD Audio: Auto
Front Panel HD: HD
Onboard WAN Device: Disabled
Deep Sleep: Disabled
Restore on AC/Power Loss: set it to Power On if you want the system to restart after a power failure.
1.3.3 Storage Configuration
SATA Controller: Enabled
SATA Mode Selection: AHCI / Intel RST Premium (RAID)
If you plan to use RAID array, you should install Windows with this setting set to Intel RST Premium (RAID)
WARNING: Since PMX V11/ Ovation V7, MassCore users running a RAID configuration must use a dedicated RTX dongle (SSK-HUD-RTX) to authorize MassCore.
This issue only affects the system (Windows ) RAID drives, if you have RAID Data drives, a dedicated dongle is not required.
ROM Mode : Enabled (only display when SATA mode is set to RAID)
Use RST Legacy OROM: Enabled (only displayed if SATA mode is set to Intel RST Premium)
SATA Aggressive Link Power Management: Disabled
Hard Disk S.M.A.R.T.: Enabled
SATA_0 to 5:
External SATA: enable if the drive uses eSATA (External Drives for example).
Hot plug: enable if you need Hot-Plug capability (Drive trays for example).
SATA device type: set to Solid State Drive or Hard Disk Drive
1.3.4 Super I/O Configuration
Serial Port: Enabled
Serial Port Address: 3F8h/IRQ4
1.3.5 ACPI Configuration
Suspend to RAM: Disabled
ACPI HPET Table: Enabled
PS/2 Keyboard Power On: Disabled
PCIE/PCI DevicesPower On: Disabled
I219 LAN Power On: Disabled
Ring-In Power On: Disabled
RTC Alarm Power On: By OS
USB Keyboard / Remote Power On: Disabled
USB Mouse Power On: Disabled
1.3.6 USB Configuration
Legacy USB Support: Enabled (if set to disable, no USB Support until OS is booted)
XHCI Hand-off: Disabled
USB Single port Control: all should be set to Enabled
1.3.7 Trusted Computing
Security Device Support: Disable
1.3.8 UEFI Configuration
UEFI Setup Style: Advanced Mode
Active Page on Entry: Main
Full HD UEFI: Auto
1.4. Tools
1.4.1 UEFI Tech Service
ASRock support contact
1.4.2 Easy RAID Installer
Help to copy the RAID Driver (F6) on a USB drive to install OS in RAID mode
1.4.3 UEFI Update Utility
Instant Flash: BIOS update
Instant Flash DHCP: allows to update BIOS through Internet Connection. Use at your own risk.
Network Configuration: allows to configure network connection for BIOS update through internet.
1.5. H/W Monitor
Allows to fine tune each fan on the computer.
Merging recommends to set CPU Fan1 to Standard mode or higher (Performance or Full Speed)
1.6. Security
Supervisor / User Password: set according to your needs
Secure Boot option: Disabled (not applicable to Windows 7 – not compatible with MassCore for both Windows 7 and Windows 10)
Intel® Platform Trust Technology: Disabled
1.7 Boot
Boot Options #: You should first set the optical drive as your first boot device, then the system drive.
Do not use Windows Boot Manager or use UEFI, unless you are sure you want to run in EFI mode.
CD/DVD Rom Drive Priorities / Network device BBS Priorities / Hard Drive Priorities
If you have several device, you can decide for each type the devices priority.
Network devices can be disabled.
USB Devices Priorities option will only be displayed when a USB device is plugged when starting the computer.
Fast Boot: Disabled. If this setting is enabled, Windows will boot much faster, but you will not have access anymore to BIOS, RAID configuration page and Windows Boot menu.
Boot from onboard LAN: Disabled
Setup Prompt Timeout: set according to your needs (usually 1 second is enough)
Bootup NumLock: Enabled
Boot Beep: Disabled
Full Screen Logo: enables or disables splash screen when starting the computer.
AddOn ROM Display: Enabled
Boot Failure Guard Message:
This setting restores all BIOS setting to default after several BIOS boot failure, meaning you will lose all your BIOS setting in that case. Merging recommends to set it to Disabled. Use with caution if you enable it.
CSM (Compatibility Support Module) :
CSM: Enabled
Launch PXE OpROM Policy: Do not launch
Launch Storage OpROM Policy: Legacy only
Other PCI device ROM Priority: UEFI only
1.8 Saving your BIOS/UEFI settings
You can save your BIOS settings in the OC Tweaker page, into the motherboard ROM or on a USB drive (must be formatted as FAT32)
After a BIOS update, those settings might be lost or incompatible with the updated BIOS version.
2.WINDOWS INSTALLATION
Windows 10 users may install from Windows 10 CD or USB bootable drive.
3.WINDOWS CONFIGURATION
Merging recommends to download the latest drivers from
http://www.asrock.com/support/download.asp
Merging recommends to install WHQL (Driver certified by Microsoft) .
Install the drivers ONLY, do not install the utilities it can cause much trouble.
Do not install Intel® Control Center.
Do not install Intel® Wireless Lan driver.
Do not install the AppCharger, ASRock 3TB+ Unlocker Utility, ASRock A-Tuning utility, App Shop!
For MassCore users : do not install Intel® Advanced Network Services included in Intel® LAN driver, it may slow down the whole system, only install the Device driver.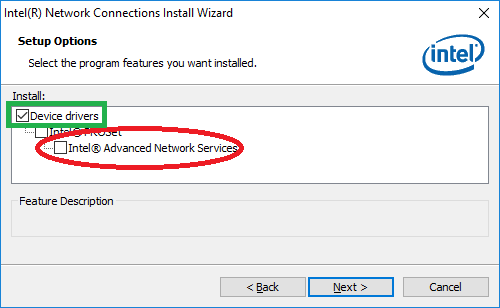
If you have installed a PCIe graphic card, you should now install its driver.
See the Graphic cards recommendations and Graphic cards recommended settings.
Now you can follow our Windows configuration guides
4.SOFTWARE INSTALLATION
4.1 INSTALL PYRAMIX / OVATION / VCUBE
After the installation plug Security dongles, NET-MSC-GBEX1 and other Merging hardware.
(not the Ovation-Pyramix Keyboard!)
See dedicated install guide / user manual for further details.
The NET-MSC-GBEX1 card can be fitted in PCIe1x.
RTX64 dongle (SSK-HUD-RTX) users : driver included in MassCore Runtime installation, please plug the dongle when installing MassCore.
Black Magic Decklink Studio/Decklink Studio 4K should be placed in PCIe slot 4.
Black Magic Mini-Monitor can be placed in any PCIe slot.
Black Magic driver has to be installed separately; it is not included in Merging installers.
4.1.1 Authorization Keys
Insert the authorization keys in MT Security Settings.
MassCore users can go now in MT Security MassCore tab and click on Install MassCore Runtime.
Restart the computer after MassCore installation.
Windows must be activated to be able to install MassCore.
See the MT Security Troubleshooting in case of issues.
4.2 THIRD PARTY SOFTWARE
Install Google Chrome
https://www.google.com/chrome
If there are several users on the computer, you need to use the alternate Chrome installer for all users : http://www.google.com/chrome/eula.html?system=true&standalone=1
Set merging.com as start page !
You may also install additional VST Plugins now.
If you have controllers, you can install the required software (Eucon, NetSmart, GPIO,....)
Networked controllers cannot use the same IP addresses range as the RAVENNA Network.
See this page for further details.