/
MAD: How to use the different MAD Bridges.
MAD: How to use the different MAD Bridges.
- David Jacques
Owned by David Jacques
Last updated: Feb 24, 2022
SetUp
You want to route your audio between different ASIO or WDM applications
Prerequisites
The Merging Audio Device Driver installed and configured (as described in the MAD Installation page)
A Merging RAVENNA/AES67 device connected to your computer.
MAD Bridge channels between ASIO applications
- Set bridge channels in the MAD panel
Open the Merging Audio Device panel, and set the required number of Bridge channels (sampling rate dependent).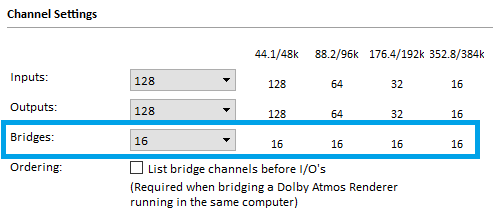
Please note that even if you don't use all the bridge channels you have set, it will use some CPU processing.
Therefore it is recommended to only set the number of channels you need.
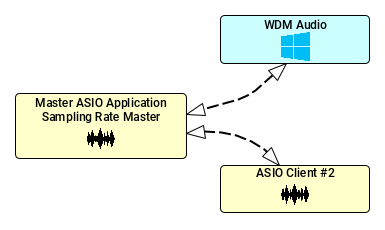
Note on Master ASIO Host : you may also set now a Master ASIO host, that will be the sampling rate master.
If you rather want to set the sampling rate from the MAD panel, set the Master ASIO Host to Merging Audio Device. - ASIO DAW setups
In this example we will route audio from Reaper into Pyramix, but the same procedure applies to any ASIO DAW.
Start your primary ASIO DAW (Pyramix) and create / open a project.
Add strip(s), depending on how many channels you need from the secondary ASIO host.
Select the required MAD Bridge inputs (and set the "bridged" strips to Rec Ready / Input to monitor it)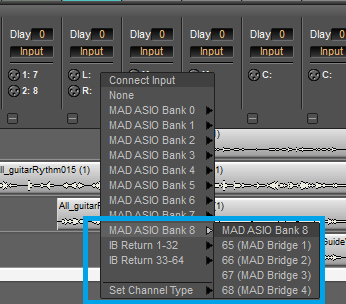
Now start your secondary ASIO DAW
Configure it to have its output routed into MAD Bridge outputs.
See the example with Reaper.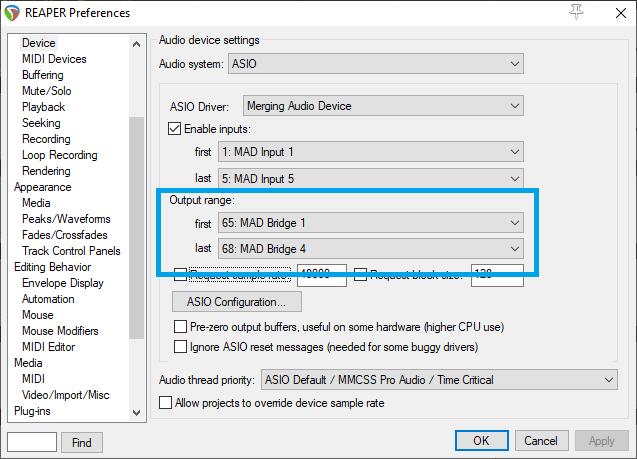
You can also send the audio from the primary ASIO DAW into the secondary one, but please take care about the routing to avoid feedback.
MAD Bridge channels between ASIO and WDM applications
- Open the Merging Audio Device panel, and set the required number of Bridge channels (sampling rate dependent). See Step 1 above.
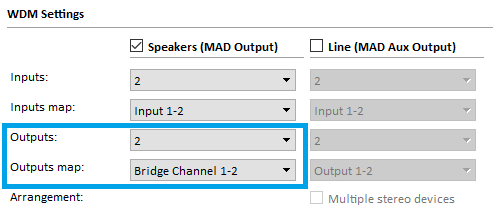
- In the WDM Settings section, set the outputs map to Bridge Channel (1-2 in our example)
- Start your primary ASIO DAW (Pyramix in our example) and create / open a project.
Add strip(s), depending on how many channels you need from the secondary ASIO host.
Select the required MAD Bridge inputs (and set the "bridged" strips to Rec Ready / Input to monitor it) - Start your WDM application, the audio is routed into your ASIO DAW, assuming Merging Audio Device is set as your Windows default sound device.
(WDM audio applications can also be independently configured to use the Merging Audio Device WDM, see this page for details)
Notes :
- Take extra care when routing both MAD Bridge inputs and outputs channels between applications to avoid loop feedback !
- Remember that for higher sampling rates, the number of channels is reduced (see the number of channels per sampling rate in the MAD Panel - Channel Settings section).
- WDM Audio is currently not available for DSD sampling rates
- Some Windows Audio applications can't run higher than 192 Khz or may not be compatible with multi-channels outputs above stereo.
See this page for details
Related content
ASIO - MAD Infrastructure pack.
ASIO - MAD Infrastructure pack.
More like this
RAV/AES67 Mode - MAD (PC) and VAD (Mac) Guide.
RAV/AES67 Mode - MAD (PC) and VAD (Mac) Guide.
Read with this
MAD: How to run multiple applications using Muti-ASIO clients and as well monitor your system sound.
MAD: How to run multiple applications using Muti-ASIO clients and as well monitor your system sound.
Read with this
MAD: How to Monitor or Record back your Windows WDM applications in your DAW.
MAD: How to Monitor or Record back your Windows WDM applications in your DAW.
Read with this
Merging Audio Device Use Cases.
Merging Audio Device Use Cases.
Read with this
Merging Audio Device.
Merging Audio Device.
More like this