RECORDING SETUP (Monitoring Mission).
SetUp
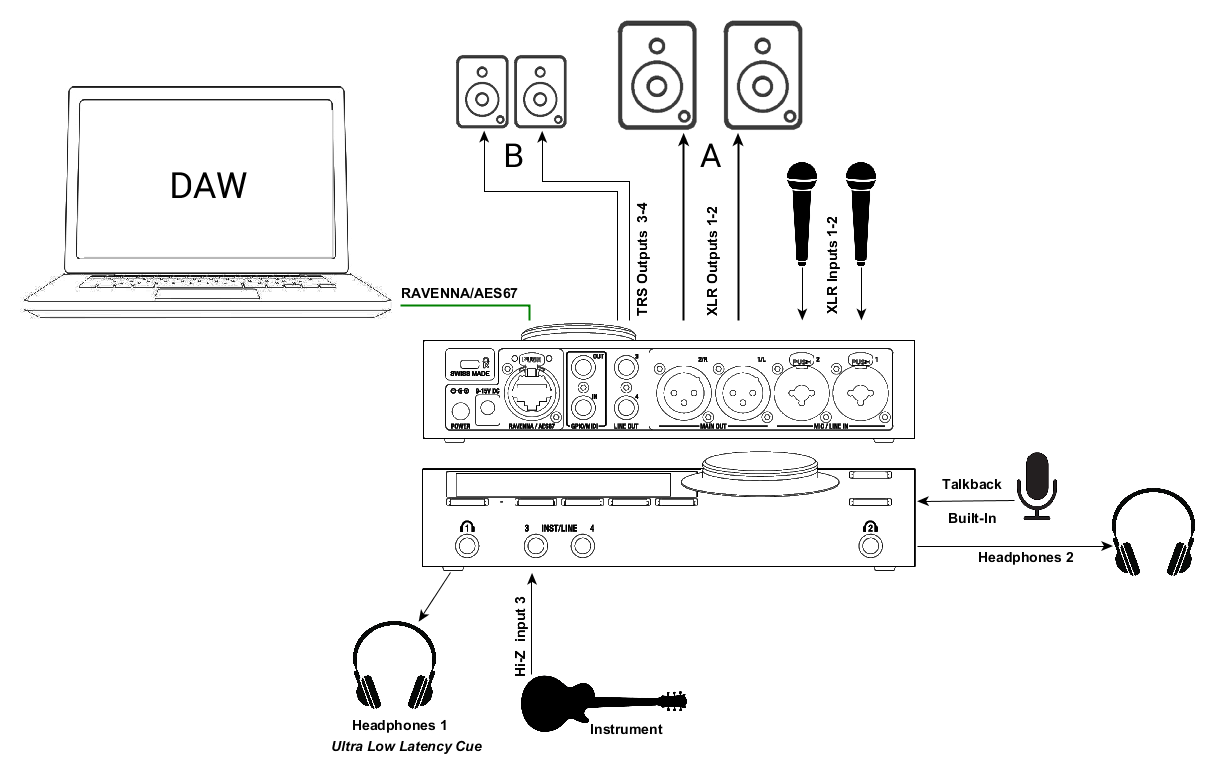
Adding Microphones and Instruments for recording while monitoring your DAW Main outputs along with an ultra-low monitoring Cue routed to the Headphones 1.
Prerequisites
Make sure you have first followed the Drivers Installation page and have correctly connected and powered up your Anubis.
Connect your microphones to the XLR combo inputs 1-2 located at the back of the Anubis, your Guitar or Bass can be directly connected to the Hi-Z instrument input at the front Input 3. Stereo inputs 3-4 can be used, but in this case under Settings>Sources>Inst/Line the source mode has to be changed to Stereo mode, and patched to Jack 3 and Jack 4.
Note: Using Input 4 will override the built-in Talkback microphone as both share the same circuitry.
Procedure
- Your DAW playback and Monitoring should already be setup and wired, as detailed in the Basic monitoring use case.
- In order to monitor your Microphones and Instrument input, the operator can use the already available default sources.
The Anubis default factory settings come with a MIC/Line 1-2 Source and Inst/Line 3 Source.
If those sources are not available or if you wish to use different sources, please refer to the Settings>Sources User Manual section.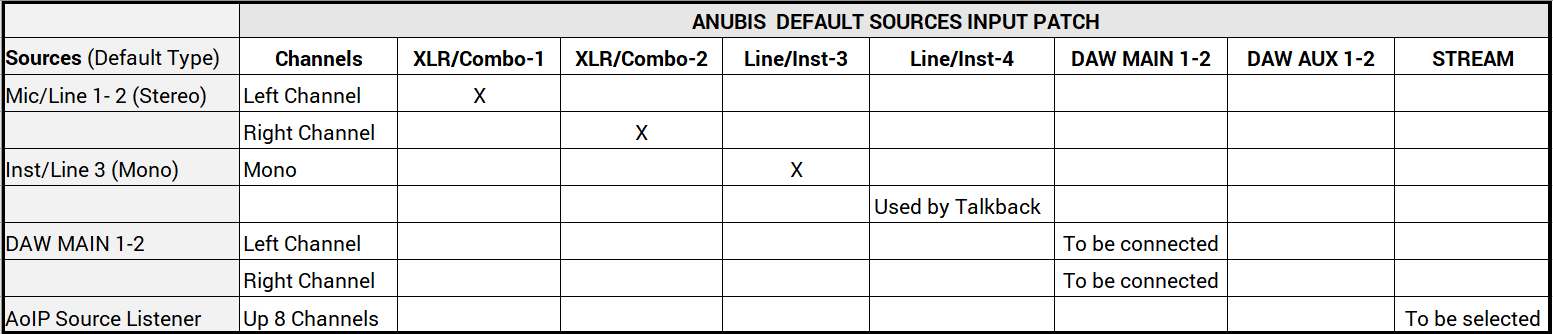
Default patching under the respective Sources and Monitors settings.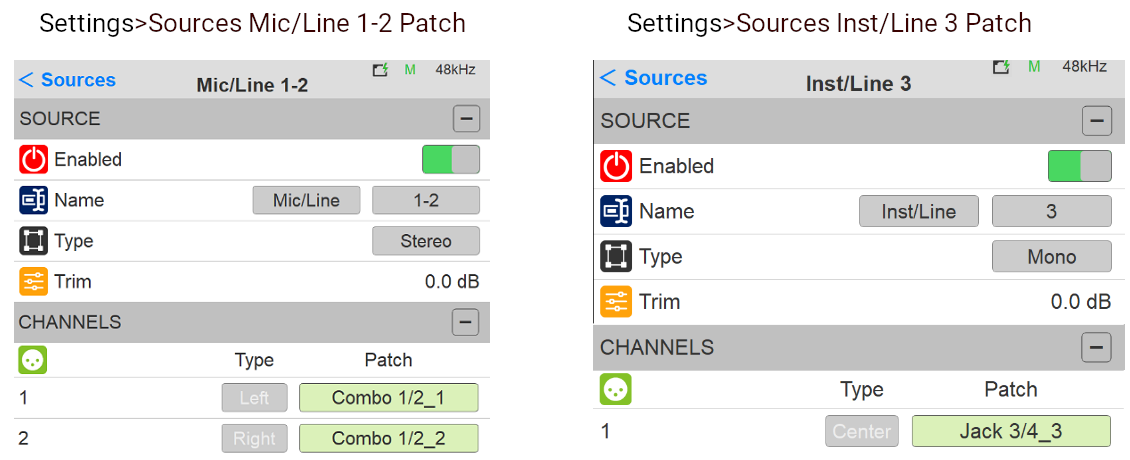
Note: Connecting only one input to a Stereo Source will hard pan this source monitoring to either the left or right channel depending of the input used.
It is recommended to change the source type to Mono if you are using only one input in order to have this source monitored to the center. - Launch your DAW making sure it is loading Merging’s Driver (or MassCore For Pyramix users) and then open ANEMAN (refer to the separate ANEMAN User Manual for operation details).
- Within ANEMAN select in the World view both the Anubis and RAVENNA ASIO Driver (or VAD).
Connect the Driver ASIO Output 1-2 (or VAD Outs 1-2) to the DAW Source 1-2 that was at first available or created from the Anubis Settings.
Users can choose and apply either a Multicast or a Unicast connection.
ANEMAN adding Mics/Line 1-2, Inst/Line 3 connections while having DAW Source 1-2 already connected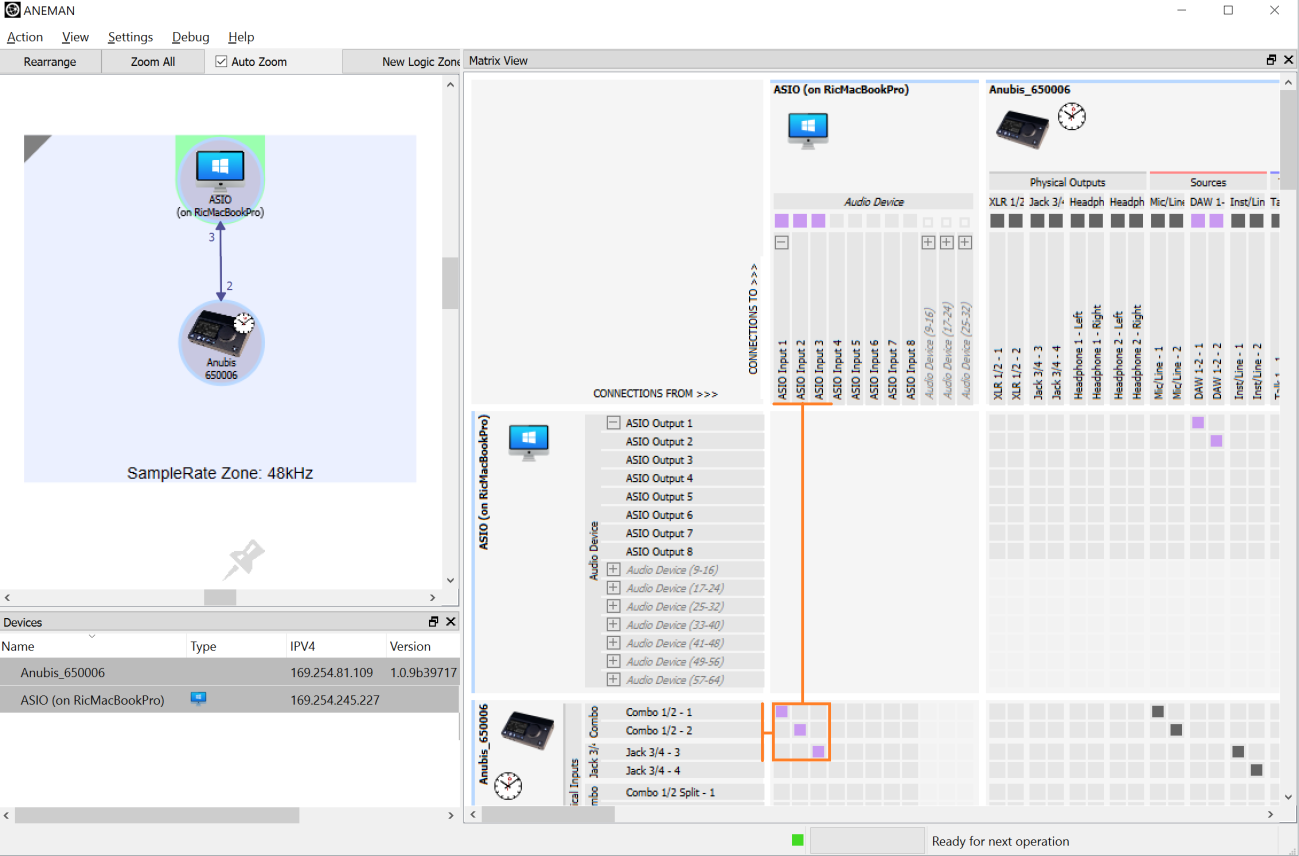
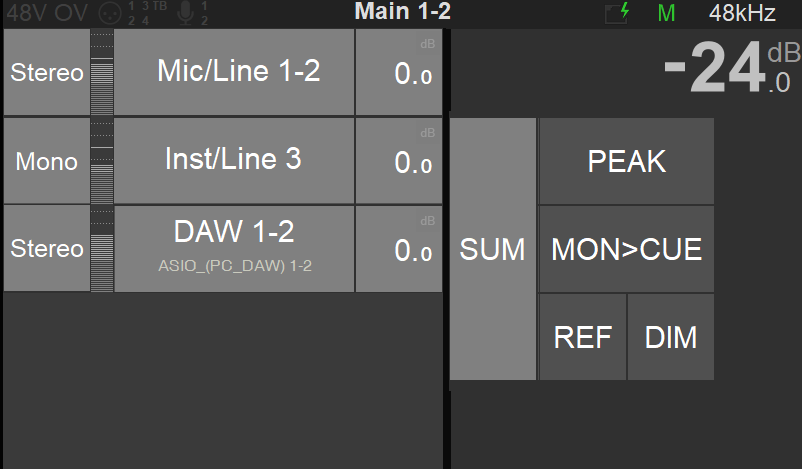
- Return to the main Anubis Source page in order to select a source to monitor. Enable the SUM option and select multiple sources to monitor those.
- Access the Preamps control page. Now that you can Monitor your inputs, open the Preamps page by pressing the Anubis Home button for a second.
This will open the Home page where you can select the Mic Pre page.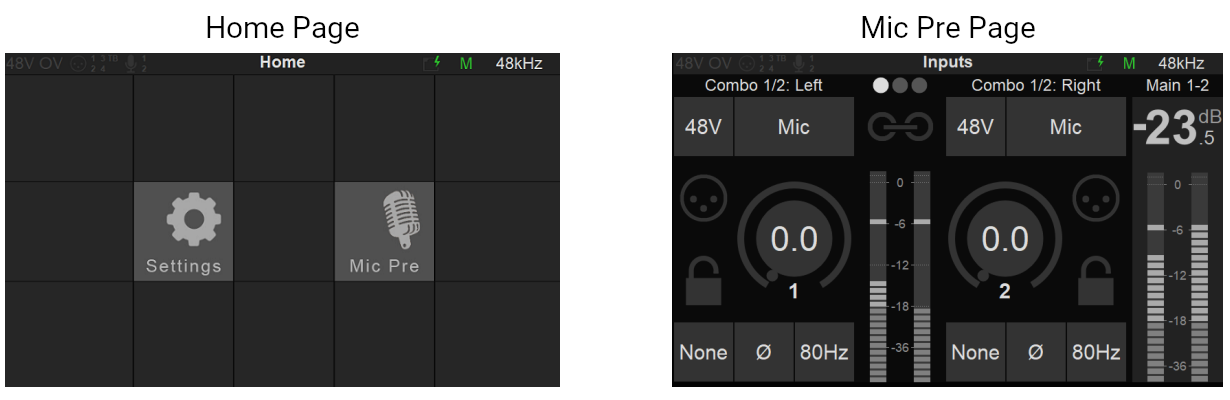
Refer to the User Manual Preamps chapter for all details on the Preamps controls. Creating an Ultra-Low Latency Cue
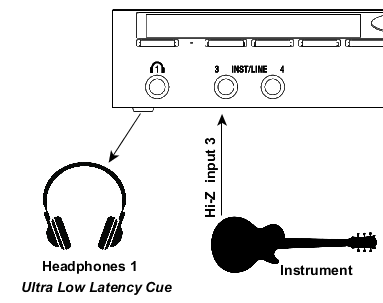
In this example we will setup a Cue for the performer foldback on the Headphones 1 Monitor set.
Note: Cues can monitor a different set of Sources than a Speaker Set or Headphone set, it can be used so that a chosen Monitor set listens to a different sum of Sources, that is then exclusive to the Cue.
- Creating a Cue Monitor.
First enter the Settings>Monitor page and create a new Monitor Set.
Tap this new entry to enter the monitor setting.
Note: Users can edit existing Monitor sets and change their mode to Cue.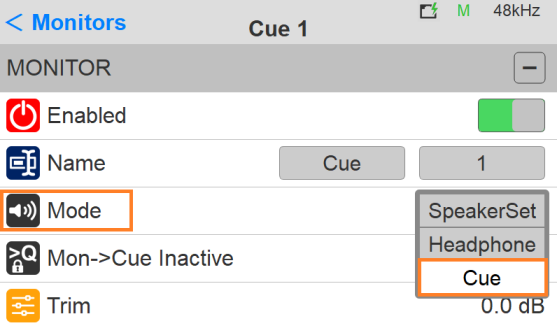
- Under Monitor Mode, select Cue
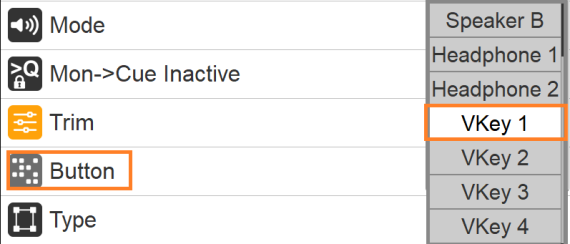
- Assign this Cue to the button of your choice. Here we will assign the Cue to the VirtualKey 1.
Make sure that the cue is properly patched in the lower Channel section of the Monitor set.
Here we are patching the Cue to the Headphones 1 (left and Right Channels)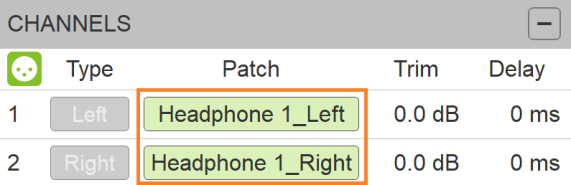
Warning: Patching already patched channels will disconnect if those are used within another Monitor set, as a designated output can only be patched once within all Monitor Sets.
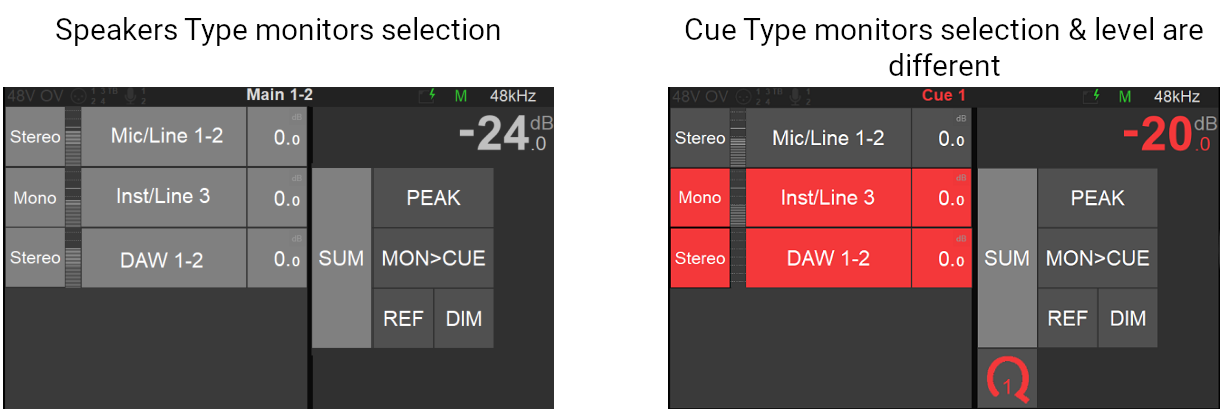
This rule does not apply to Sources and Inputs.- Return to the Source Page where you will now find a Q1 (Cue) Monitor available on the VirtualKey 1.
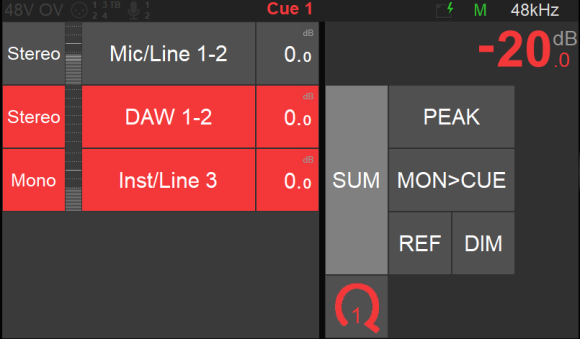
- By selecting the Q monitor set the operator can then select a Source or sum multiple sources, those will be monitored exclusively on this Cue (Q) Monitor set.
Cues are recommended when needing to monitor a different selection of sources for a designated Monitor set (e.g. If you want headphones to monitor something different than the Speaker set, use a Cue).
Cues can also be used when recording to produce a low-latency Cue mix for the performer foldback.
Note: To configure the Built-in Talkback for the performer's headphones, refer to the Talkback use case.
You are ready to start recording with Anubis and have a Musician using an Ultra-Low Latency Cue (Q) Monitor set.