Apple MacBookPro 13inch Iris late 2016 Install guide
Windows has been designed for a wide variety of applications. Unfortunately that means that, out-of-the-box, it works correctly for office or entertainment applications, but for DAW applications, several settings and features have to be fine-tuned.
This model has been validated for the Pyramix Native Standard and Ovation Native Gold packs.
MacBookPro 13 inch I5-6267U 2.9 GHZ late 2016 Tech specs
Merging highly recommends you "defer feature updates" in Windows 10, see Updates section below.
IMPORTANT RECOMMENDATIONS !
- Avoid active internet connection while running Pyramix.
- Avoid connecting audio interfaces to USB or Firewire hubs, plug it directly into your computer.
- Especially during recordings and high track count projects
Disable the WIFI and BlueTooth (switch to Airplane Mode)
Avoid using battery power for critical operations, rather have your power cable connected.
Note : Disabling the battery driver will remove the battery level indicator from Windows, but the battery is still fully functional. - Avoid using Fixed cursor on high track count / high sampling rate projects
- Make sure all unnecessary programs are closed. They can tie up useful resources.
- Avoid switching between applications while running Pyramix (ALT+TAB).
- Laptop users should set their ASIO interface to Topmost Priority in VS3 Control Panel :
COMPUTER CONFIGURATION
First install Windows 10 Pro, using BootCamp.
Please follow the instructions from Apple website https://support.apple.com/boot-camp
During Windows installation, on “Get Going fast”, do not use Express settings, select Customize.
On the first page, set all options to have off.
On the second page, set all options to have off.
On the third, you can leave Smart Screen option on, set the other options to off.
If you don’t have a Microsoft account, you can click on “skip this step” at the bottom of the page when Windows prompt you for your Microsoft account.
Merging recommends you don’t activate Cortana now, but configure it later once the OS is installed.
A note on drag & drop and Run as Administrator in Windows 10.
In Windows 10, when you run a program by forcing it in “administrator mode” / “Run as administrator”, drag & drop to and from this application will be disabled.
WINDOWS CONTROL PANEL
To access Windows 10 Anniversary (1607) Control Panel, right click on Windows Start and select Control Panel.
To access Windows 10 Creator Update (1703) Control Panel, type "control panel" in Windows Search box.
You can right click on the control panel icon from the search result and pin it to the Start menu or Taskbar.
For ease of use, it is recommended to set the Control Panel to Small Icons.
Disable Windows User Account Control (UAC)
User Accounts > Change User Account Control settings > set it to Never notify. > OK.
View hidden files, folders and drives and show file extensions in Windows Explorer
File Explorer Options > View tab :
Hidden files and folders : set it to Show hidden files, folders or drives
Hide empty drives : disable
Hide extensions for known file types : disable
Leave Hide protected operating system files (recommended) active
Power Options
First disable the "Fast Boot feature", which indeed put the computer to sleep when you select shut down (and which is sometimes not supported by external devices)
Click on "Choose what the power buttons do” on the left hand side of Power options page.
Then click on "Change Settings that are currently unavailable" and uncheck the "Turn on fast startup" option. Click on Save Changes.
This feature is also not supported by the Ovation / Pyramix ADR keyboard.
Please also configure what happens when you close the lid (Recommended : Do nothing)
In the main Power options page :
Set the power scheme to High Performance
Then Change plan settings
Screen Saver (Turn off the display) is usually set to Never. If you are recording, you surely don’t want the display to turn off after several minutes!
Put the computer to sleep must be set to Never
Access Change advanced power settings and make sure that:
Hard Disk > Turn off Hard disk after: Never
Desktop background settings > Slide show: Paused
Sleep > Sleep after: Never / Allow hybrid sleep: off / Hibernate after: Never / Allow wake timers: Disable.
USB Settings > USB selective suspend setting: Disabled
Intel(R) Graphics Settings : Maximum Performance
PCI Express > Link State Power Management: Off
Processor power management > System Cooling policy : Active
Minimum and Maximum processor state: 100%
ADDITONAL CONFIGURATION
Laptops usually have very few BIOS options to prevent CPU power management issues.
But several settings are accessible in Windows, but are hidden.
Download this zip file and double click on the extracted reg file.
Two new options will be displayed in Processor power management.
Set Allow Throttle States to Off and Processor performance boost mode to Disabled.
Sound
Windows can notify the user of some vents by playing a sound.
If your ASIO device is also used by Windows to play its sounds, it may cause audio drops as it will access the device.
In that case it is recommended to access the Sounds tab and set the Sound Scheme to No Sounds.
System > Advanced System Settings
Advanced tab > Performance
Click on the Settings button in the Performance section.
Visual Effects tab
Those settings have to be disabled to prevent system peaks:
Animate Windows when minimizing and maximizing : disable
Animations in the taskbar and Start Menu : disable
Enable Peek : disable
Fade or slide menus / ToolTips into view : disable
Save taskbar thumbnail previews : disable
Show translucent selection rectangle: disable
Show window content while dragging: disable
Slide open Combo boxes: disable
Advanced tab
Processor Scheduling should be set to Background Services.
Data Execution Prevention tab
Turn on DEP for essential Windows programs and services only.
System Protection tab
Back in the main System windows, switch to System Protection tab:
Make sure protection is turned on for your system drive.
Select the system drive and click on Configure.
Select Turn on system protection, and set a value for Disk Space Usage (usually 8-10% max).
Disable the system protection on the Media drive(s), as this feature only works on system files and programs.
Hardware tab
Back in the main System windows, switch to Hardware tab:
Click on Device Installation Settings and select the “No, let me choose what to do" option.
This will prevent Windows update service to automatically change the system drivers.
Windows Firewall
By default, Merging applications are authorized to communicate through the Windows Firewall.
In case of issue, RAVENNA Users can disable the Windows Firewall (for Public Networks).
If you use another firewall, authorize the required applications or disable it on your RAVENNA network.
Windows Defender and antivirus
Tools page > Options: adjust Automatically scan my computer to your needs.
Full Virus Scanning should NEVER run at the same time as Merging software.
If you plan to install an Antivirus software, Windows Defender will be disabled.
You should also disable scanning of the Pyramix files (pmx, pmf, pml, pad, pmw) but also media files (wav, aif, flac, mp3,...), because each time the DAW have to access such file, your antivirus may scan it.
AVAST has already caused a lot of problems with several Merging programs, it is therefore not recommended.
See this page for help on configuring your antivirus exceptions.
Windows Defender users can download and run a script to include the required rules in Windows Defender.
MTWin10Optims.zip
WINDOWS SETTINGS
Settings page can be accessed through Windows Start > Settings icon (and + i)
System
In Apps and features, uninstall all unnecessary applications.
Some applications cannot be uninstalled (Mail and Calendar for example), uninstall button will be disabled.
Bonjour is required for Merging products, do not uninstall it.
In Default apps, Merging recommends you set Google Chrome as your default web browser (RAVENNA users).
Click on Web Browser to select Google Chrome (it must be installed before changing this setting).
In Notifications & actions, you can configure which quick action tile and notification will be displayed.
Merging recommends to only have “All settings” & “Network” tiles active.
In the Notifications section, you can configure how and which application can send Notifications.
Merging recommends to disable the “Get tips, tricks, and suggestions as you use Windows” for better performance.
Tablet mode
Set "When I sign in" option to "Use desktop mode".
MultiTasking
Merging recommends to set all Snap options to off, especially for computers not using dedicated graphic cards.
Switching between Virtual desktops is not recommended during real time operation.
Personalization
Windows transparency can cause issues, especially on systems with low graphic resources.
Go in Settings > Personalization > Colors.
Turn "Make Start, taskbar, and action center transparent" to Off.
Start menu, Taskbar and notification area can be configured in Settings > Personalization > Start and Taskbar.
Merging recommends to disable the “Occasionally show suggestions in start” option for the Start menu (Windows may download apps without notifications)
In the Taskbar section, disable the "Use Peek to preview the desktop ...." and enable "Automatically hide the taskbar in desktop mode".
Privacy
In Account info, it is recommended to set "Let apps use my advertising ID ...." to off, to reduce the OS internet traffic.
In Background Apps, Merging recommends you only enable the required apps for better performance.
Gaming (Creator Update)
In Game Bar, set "Record game clips, screenshots..." to off, and disable "Open Game bar ..." and "Show Game bar when I play ..."
In Game DVR, set both "Background recording" and "Recorded Audio" to off.
In Game Mode, set "Use Game Mode" to off.
ADDITIONAL CONFIGURATIONS
Cortana configuration
Merging recommends you disable Cortana, for better performance.
Download this zip file MTWin10Optims.zip
Double click on the Disable Cortana.reg file.
Restart your computer for this change to take effect.
You can re-enable Cortana with the Enable Cortana.reg file.
Apps auto-update
Merging recommends you disable the auto updates on Windows Apps, for better performance.
Open Windows Store, and click on the profile icon on the top right corner and select settings.
Set “Update apps automatically” to off.
OneDrive configuration / uninstall
If you use OneDrive, you should configure it to not interfere in the network traffic.
Right click on the OneDrive icon in the notification area and select Settings.
Remove "Start OneDrive Automatically when I sign to Windows" and "Display notifications when people share with me or edit my shared files".
In the Network tab, set both Upload and Download rates to Limit to : 125 KB/s (or lower).
If you don't use OneDrive, you may uninstall it in Windows Settings > System > Apps and features.
System Recovery
To be able to use the Windows System Restore feature, you first need to configure it, in Windows Control Panel > Recovery : Configure System Restore.
You should only enable the protection on the system drive : select the system drive then click on Configure.
Set "Turn on system protection", then configure the Disk Space usage (usually around 10% is sufficient).
WinSAT
In Windows 10, Windows System Assessment Tool (WinSAT) is scheduled to run too often compared to previous Windows version, and this tool is not very useful. Its main purpose is to calculate the system rating displayed in Windows Control panel > System page, but it can also re-activate some setting without noticing the user.
Therefore Merging recommends you disable it.
Go in Windows Control Panel > Administrative Tools > Task Scheduler.
Browse the Task scheduler library to Microsoft > Windows > Maintenance.
Right click on the WinSAT task and select Disable.
Battery saver
Merging recommends you disable the ACPI battery driver (AKA Microsoft AC Adapter and Microsoft ACPI-Compliant Control Method Battery) for optimized performance, especially for high track count / high sampling rate projects and critical real time operations.
See the Important recommendations section for further details.
Windows 10 introduces a new battery saver feature that conserves your PC's battery by limiting background activity and adjusting hardware settings. This feature can cause serious performance issues.
Merging recommends you disable the Battery Saver during recordings and critical real time operations.
Go in Windows Settings, and select System > Battery.
Set Battery saver is currently to Off.
This setting will be grayed out if the PC is currently plugged in to AC.
You may still set the Battery saver on if your battery falls below a specified %.
Activate the “Turn battery saver on automatically if my battery falls below” and set a value (Merging recommends 10 %).
Laptops usually have small graphical resources, Merging recommends you pay extra caution when using the Fixed Cursor option.
WINDOWS DEVICE MANAGER
Universal Serial Bus controllers
Check each USB Root Hub & eXtensible Host Controller to disable power management if any, by right clicking on it and accessing its properties.(Power Management tab)
Network Adapters
Right click on your network adapter and access its properties to disable the power management features:
If you use a Realtek USB GbE Family Controller, in the advanced tab:
Disable Energy Efficient Ethernet, Wake on Link change, Wake on Magic Packet and Wake on pattern match.
Set WOL & Shutdown link speed to Not Speed Down.
In the Power Management tab, disable all Power management features
For better performance, RAVENNA ASIO users should use a dedicated RAVENNA network adapter.
Find more details on this page.
MEDIA DRIVES
Merging recommends you record on an external drive, in USB3 or TB3.
By default; Windows will index the content of all drives, which allows Windows Search to work faster.
But this indexing task takes CPU power and can result in performance issue when recording.
To disable the Windows indexing, open My Computer, right click on the Media Drive(s) and select Properties: disable Allow files on this drive to have contents indexed in addition to file properties checkbox.
NEVER USE “Compress this drive to save disk space”.
External drives: access your external drive properties through Windows Device Manager and set it to optimize for performance.
Format block size: if you only use audio files, the best size is 64 Kb when formatting the drive.
But if you also need to use video files, 64Kb is not the optimal size, in that case keep the Default Allocation size (128Kb).
The best way is to use separate drives for video and audio, if possible.
SYSTEM CONFIGURATION (MSCONFIG)
Many installed programs have associated background services, which usually can then start faster, or get updates automatically. But this uses memory and CPU power, so you should only run useful programs.
!!!Be careful, if you remove an essential program or service, Windows may not start anymore !!!
Windows Control Panel > Administrative Tools > System Configuration:
The boot menu timeout can be changed in the Boot tab (min 3 seconds).
Services Tab
Check the box Hide all Microsoft services, those are critical for Windows.
Service Bonjour is critical for RAVENNA networks and Virtual Transport.
Do not disable your ASIO card driver or service.
Do not disable the Apple OS Switch Manager service.
Common services that can be disabled are: printer services, Skype, QuickTime updaters ...
Startup
Open the link to Task Manager to access the list.
Do not disable Microsoft Windows Operating System or any other critical driver – program for your system.
Common programs that can be disabled are Adobe Reader, Java updater, Skype, QuickTime...
Those programs will be still be installed and accessible, but will not be loaded during Windows startup.
WINDOWS UPDATE
One of the main issue with Windows 10 is that Microsoft wants the OS to always be up to date.
That means, by default, you do not have control anymore if you want to apply updates or not.
As in previous versions, sometimes an update can go wrong, and Windows can become unusable.
Hopefully it is still possible to get control under the hood.
Please note that it will only works on Pro or Enterprise versions, not on Home editions.
Automatic Updates configuration
If you want to follow the Microsoft update policy, you should at least defer the Windows updates.
Merging highly recommends you defer updates in Windows 10, as major Windows updates can make your system unusable.
This allows such updates to be further tested and approved by Microsoft, and Merging.
Updates can be configured on Pro, Educational or Enterprise editions of Windows, not on home versions!
You may also rather Pause the updates for 30 days, follow this page for detailed instructions.
Pyramix 11.0.6 / Ovation 7.0.6 / VCube 7.0.6 / AMR 7.0.6 required for Windows 10 1709.
Pyramix 11.1.4 / Ovation 7.1.4 / VCube 7.1.4 / AMR 11.1.4 required for Windows 10 1803.
Pyramix 11.1.6 / Ovation 7.1.6 / VCube 7.1.6 / AMR 11.1.6 required for Windows 10 1809.
Pyramix 12.0.5 / Ovation 8.0.5 / VCube 8.0.5 / AMR 12.0.5 required for Windows 10 1903 and 1909.
Pyramix 25th / Ovation 9.0.3 / VCube 9.0.3 /AMR 13.0.3 compatible with Windows 10 November 2019 Update 1909
Pyramix 25th Hotfix 3 / Ovation 9.0.6 / VCube 9.0.6 /AMR 13.0.6 (or above) compatible with Windows 10 2004
Pyramix 25th Hotfix 3 / Ovation 9.0.6 / VCube 9.0.6 /AMR 13.0.6 (or above) compatible with Windows 10 20H2
Pyramix 25th Hotfix 3 / Ovation 9.0.6 / VCube 9.0.6 /AMR 13.0.6 (or above) compatible with Windows 10 21H1
Pyramix 25th Hotfix 3 / Ovation 9.0.6 / VCube 9.0.6 /AMR 13.0.6 (or above) compatible with Windows 10 21H2
Pyramix 25th Hotfix 3 / Ovation 9.0.6 / VCube 9.0.6 /AMR 13.0.6 (or above) compatible with Windows 10 22H2
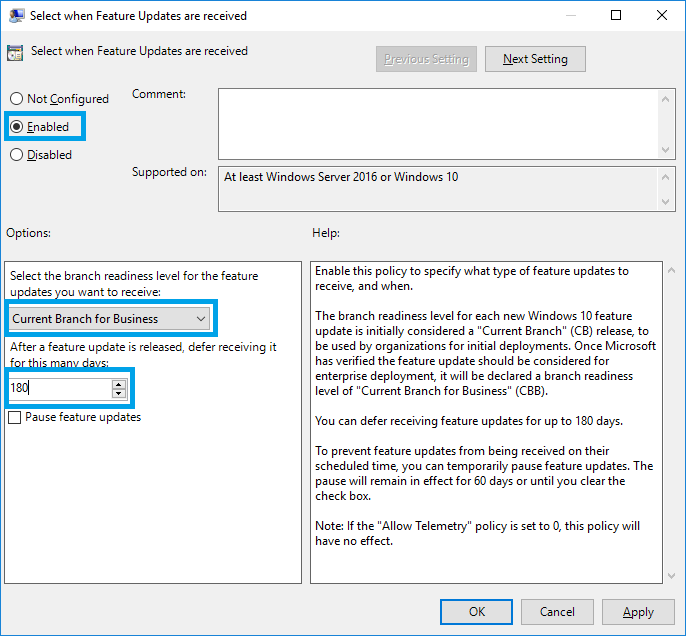
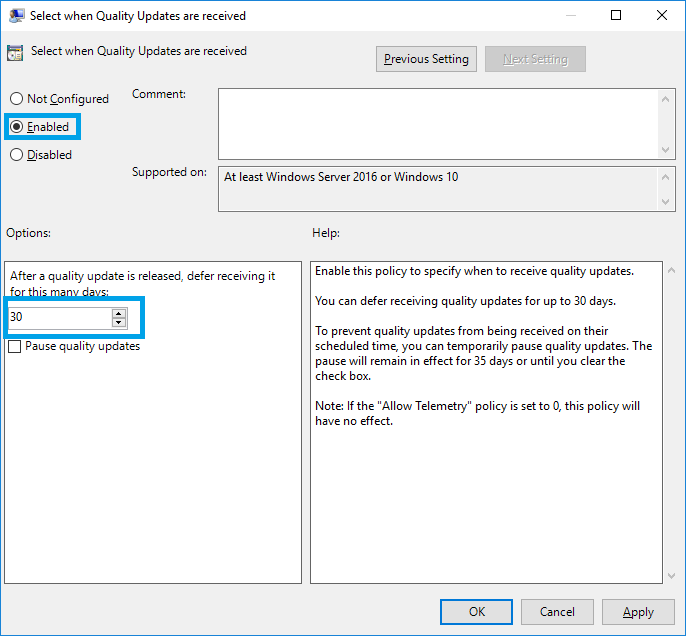
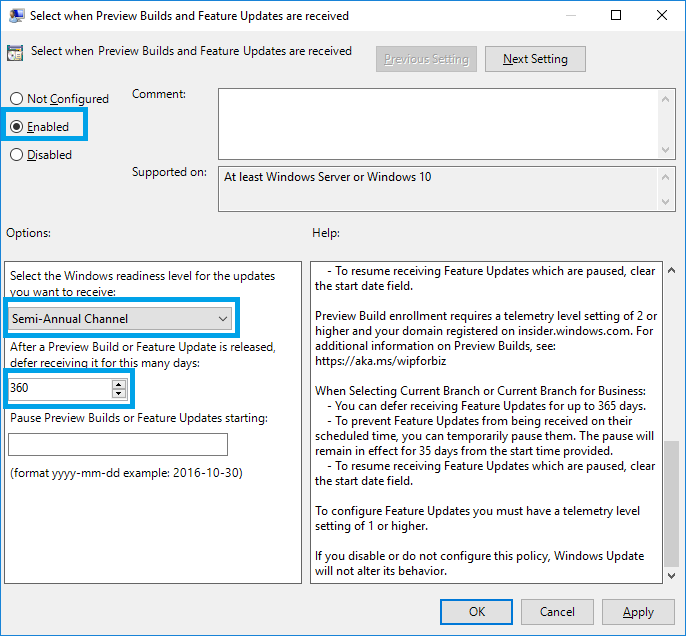
Configure updates using Group Policy Editor
Windows Anniversary (1607), Creator (1703), Fall Creator (1709), Spring Creator (1803) October 2018 Update (1809) May 2019 Update (1903) November 2019 Update (1909) May 2020 (2004) Fall 2020 (20H2) May 2021 (21H1), November 2021 (21H2)
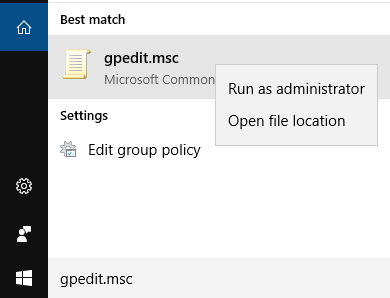
In Windows Search field, type GPEDIT.MSC
Right click on the gpedit.msc and select Run as Administrator
Prevent Windows 10 update to new Major version
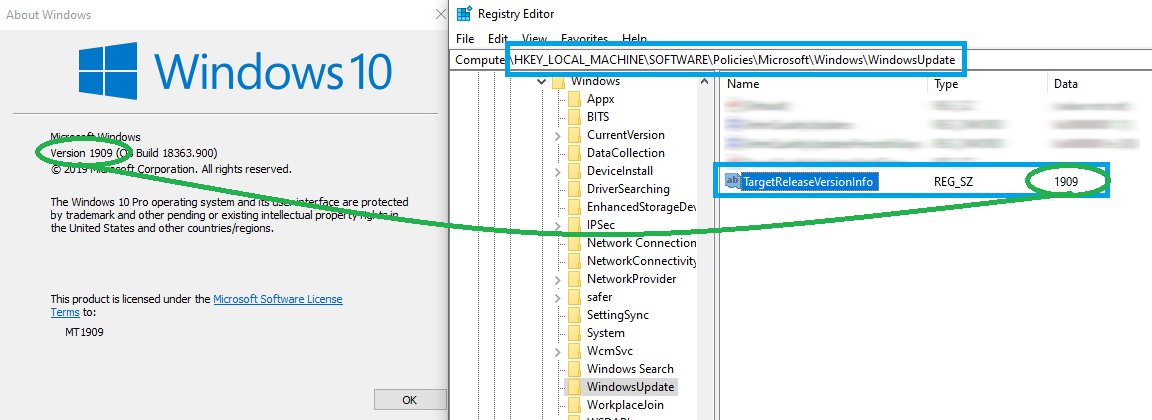
Since Windows 1803, it is possible to prevent Windows 10 to upgrade to a new major version.
Such update will not be automatically downloaded and installed on your computer, but it is still possible to update manually, with Microsoft Update Assistant.
(MassCore users should first make sure that the MassCore engine is compatible before upgrading to a new Windows version - see this page).
Please note that Merging can't guarantee that this setting will continue to work with new Windows 10 versions.
According to Microsoft "it will work until the policy is changed to a newer Windows 10 feature update.”
- Download and extract the following zip file
- Double click on the WindowsTargetReleaseVersionInfo.reg file to add it to your Windows registry
- Open Windows Registry Editor (Regedit.exe) and browse to HKEY_LOCAL_MACHINE\SOFTWARE\Policies\Microsoft\Windows\WindowsUpdate
- Double click on WindowsTargetReleaseVersionInfo and enter your current Windows version.
You can easily get your current Windows version by typing winver in Windows search field or Run command.
Note for MassCore users above 22H1
MassCore users with the latest Windows 10 versions will still have a warning message upon opening Pyramix.
This is due to a no longer present registry key checked at Pyramix's launch. To remedy this :
- Download the "Branch Readiness Level" key : https://download.merging.com/beta/SupportTools/MTBranchReadiness.zip
- Extract the zip
- From Windows search, open "regedit" as administrator
- Click "File>Import>Select the unzipped key"
- Hit ok
Feature vs Quality updates ?
Quality Update provides fixes but no new functionality while the Feature Update provides new features.
You can also configure Windows to restart outside of active hours :
Go in Windows Start > Settings > Update and security > Windows update.
In Update settings, click on Change active hours and set it according to your needs.
This prevents Windows to restart the computer, but it still downloads the updates.
Go now in Advanced Options, and check the "Defer feature updates" : this will defer updates, allowing only widely tested updates to be applied on your computer.
Click on the "Learn more" button for further details.
Defer Updates is highly recommended, as several big feature updates can make your system unusable.
Additional configuration
In both case, Merging recommends you disable updates from other computers (your computer can receive, but also send updates directly to other computers, costing computer resources and network bandwidth) .
Go in Windows Settings > Update & Security > Windows Update > Advanced options > Choose how updates are delivered.
“Updates from more than one place” should be set to off. The second option will be automatically disabled.
Disable Windows update
You can also completely turn off the Windows Updates engine.
/wiki/spaces/DSI/pages/1999244
DPC LATENCY CHECK
To handle real time application, the CPU gets a defined amount of time to perform the required tasks.
If those tasks are delayed, the result is usually drop-outs in the signal.
A common tool to verify if your computer is able to handle real-time audio was DPC Latency Checker, but the reported values are false in Windows 8 and 10.
The alternative solution is tp use the LatencyMon tool,
Download the tool and install it on your computer.
You can start the test by clicking on the Play icon on the top left corner.
To get useful results, the tool should run for quite some time (10 minutes minimum).
The driver or process using the highest DPC or ISR is clearly stated in the main window.
If you have too high values, you can get more detailed information in the Processes or Drivers tab.
Don't pay too much attention to the hard pagefault resolution time (last indicator)
If you have higher values, you will have to search for the driver/ device that is causing the issue by disabling them one by one.
Remember that some devices cannot be disabled, proceed with caution.
Wi-Fi, LAN, specific (usually ndis.sys),USB devices, on-board audio, PCI / PCIe devices are the common culprits.
On laptops, the ACPI battery driver is also a common problem (ACPI.sys), you can try to disable (do not uninstall!) the "Microsoft ACPI Compliant Control Method Battery" and "Microsoft AC Adapter" listed under Batteries in Windows Device Manager (but pay attention to not disable any other ACPI device listed under System devices, your computer may not start anymore !)


