/
Merging RAVENNA ASIO / Merging Audio Device : ST2022-7 Setup.
Merging RAVENNA ASIO / Merging Audio Device : ST2022-7 Setup.
- David Jacques
Owned by David Jacques
Last updated: Jul 06, 2022

SetUp
We will configure the Merging RAVENNA ASIO driver or Merging Audio Driver to work with a compatible ST2022-7 network device (Ravenna or AES67)
Prerequisites
- Merging RAVENNA ASIO Driver (V13 or above) or Merging Audio Device driver installed (Windows). Follow the instructions on this page for details.
- AES67/Ravenna compatible device for ST2022-7 (in any case a Merging device is required on the network to provide the ASIO clocking to the driver)
Anubis firmware V1.1.8b44345 or above required. Hapi MKII firmware V1.2.1b47023 or above required. - AES67/Ravenna compatible network switch, properly configured, is mandatory between the device(s) and the computer(s). See this page for details
- Authorization key for the ASIO ST2022-7 mode. Please contact keys@merging.com and your Merging Sales partner if you don't have this key.
Procedure
- Enter the authorization key
Open the MT Security Settings panel and import your key, depending on your licensing method, dongle or cloud licensing.
After importing your key, you should see the ASIO ST2022-7 option active in the authorizations list. - Configure the IP addresses on the device
Anubis SPS
Long press the Merging logo button and access the settings.
Browse to the General > Network section.
Make sure the ST2022-7 mode option is active.
Configure the IP addresses on both Interface 1 and 2.
Note : The IP addresses range should be in different IP range to avoid IP conflicts.
Please see this page if you need help and details on IP addresses conflicts
Once finished, press on Apply & Reboot.
Hapi MKII
Access Hapi MKII advanced pages (with MT Discovery or Aneman)
In the General Settings tab, Network section, activate the Multi-Interface mode option and press on the Apply button
Reboot your Hapi MKII
Go back in the advanced pages and configure the IP addresses on both Interface 1 and 2.
Note : The IP addresses range should be in different IP range to avoid IP conflicts.
Please see this page if you need help and details on IP addresses conflicts
Once finished, press on Apply and reboot your Hapi MKII. - Configure the IP addresses on the computer
In this example, we will assume you have 2 Network adapters on your computer and one Anubis SPS device, but the same procedure applies if you run with 2 devices.
Go in Windows Control Panel > Network and Sharing Center, then click on Change Adapter settings (left)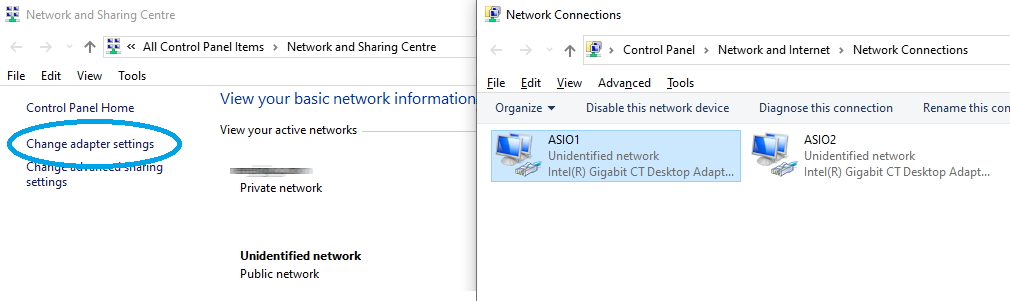
Right click on the adapter that you have to configure and select Properties.
Select the Internet Protocol Version 4 (TCP/IP), then click on the Properties button.
Set it to "Use the following IP addresses", then enter the IP address.
It must be in the same range as the Interface 1 set on the Anubis SPS device, for example : adapter IP is 172.168.0.10 and Anubis Interface 1 is 172.168.0.20
The Subnet mask is mandatory; Windows can set it automatically, simply click in the Subnet mask field.
You may need to also change the attached network device(s) IP address, consult their documentation for details.
The IP address 127.0.0.0 should NEVER be used.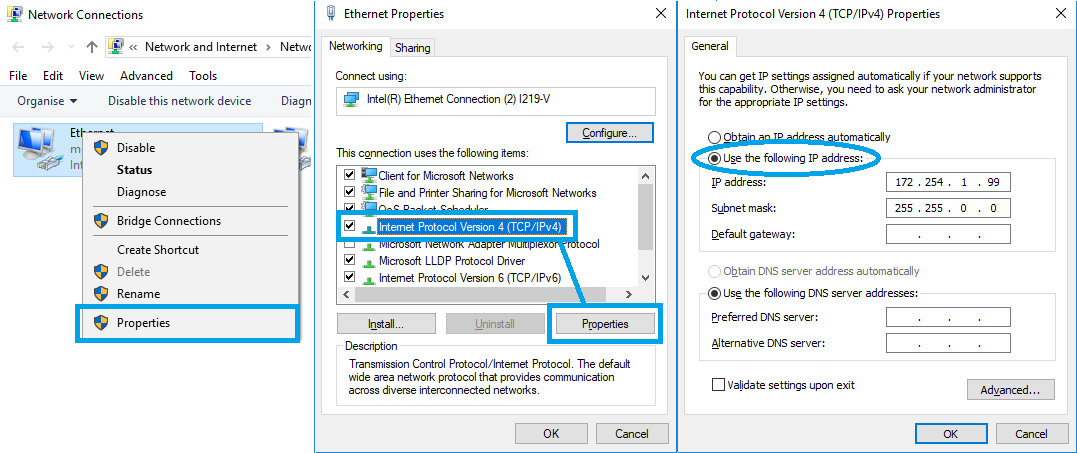
Repeat the same operation on the second network adapter, this time in the same IP range as the Interface 2 set on the Anubis SPS device, for example adapter IP is 169.254.65.10 and Anubis Interface 2 is 169.254.65.20
Once finished, please reboot your computer. - Configure the Merging RAVENNA ASIO / Merging Audio Device driver
Open the Merging RAVENNA ASIO panel / Merging Audio Device panel
In the RAVENNA / AES67 Settings section, simply select the network adapter that was configured for Interface 1 as Primary adapter.
Then select the network adapter that was configured for Interface 2 as Secondary adapter.
Press Apply
(The other Merging Audio Device settings are described on this page) - Make the audio connections in the Advanced pages
Open MT Discovery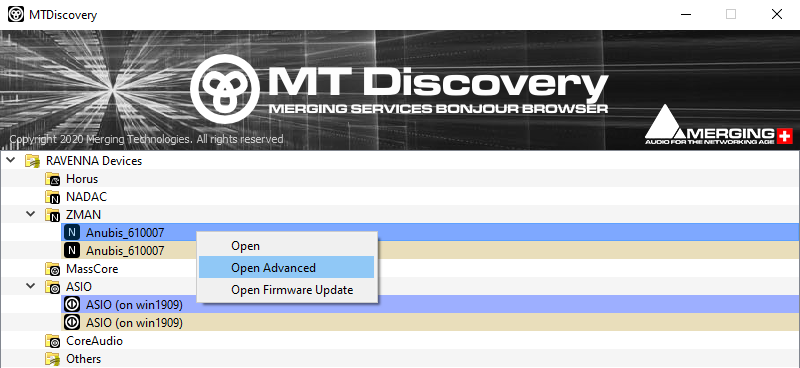
Right click on one of the Anubis or Hapi MKII device and select Open Advanced
In the General Settings page, Multi-Interface / ST2022-7 mode should be active, and both Interface should be Up.
Go in the Session Sources page and create a new Source.
Set the Output Interface(s) to Interface 1&2 (ST2022-7)
The other parameters should be configured the usual way (channel count, inputs,....)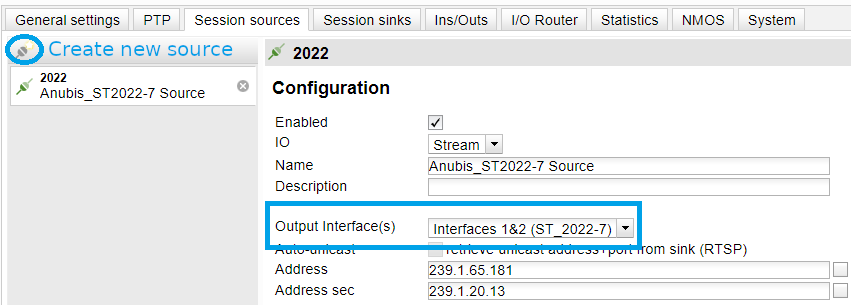
Open now the Advanced pages on the ASIO device.
In the General Settings page, ST2022-7 mode should be active, and both Interface should be Up as well.
Go in the Session Sinks page and create a new Sink.
In the Source drop down menu, select the required Source (the system will detect that source is ST2022-7)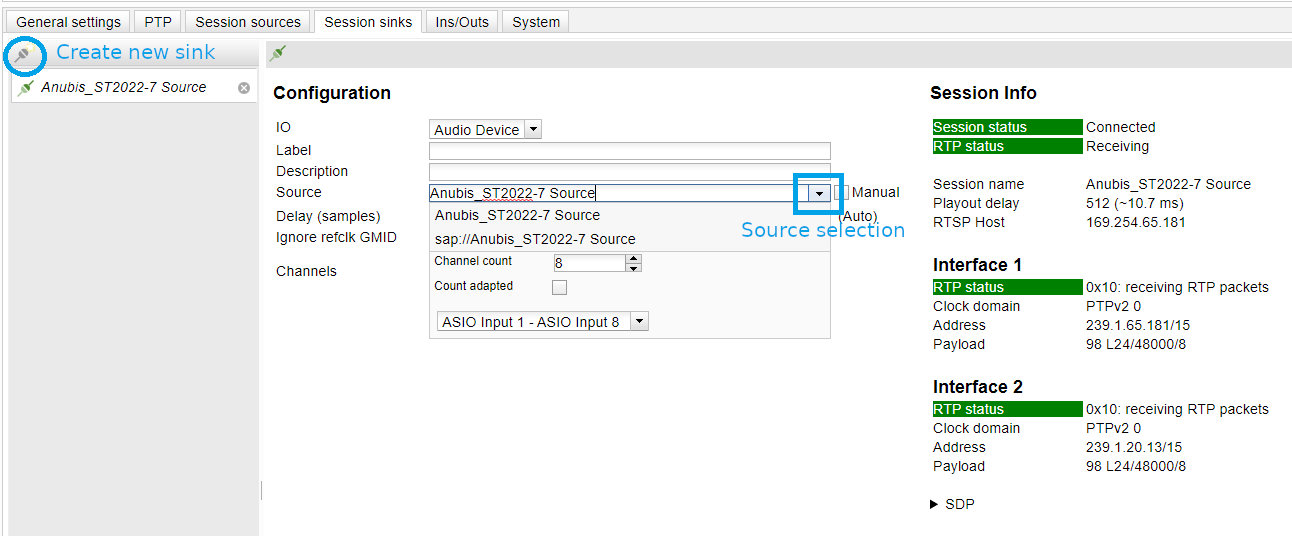
The Anubis / Hapi MKII source is now connected to the ASIO in ST2022-7. The connection status for both interface is displayed on the left hand pane.
Repeat the operation on the ASIO Session Sources - Anubis / Hapi MKII Session Sinks to connect audio from ASIO to Anubis / Hapi MKII.
, multiple selections available,
Related content
Merging Audio Device.
Merging Audio Device.
More like this
Merging Audio Device driver Troubleshooting.
Merging Audio Device driver Troubleshooting.
More like this
Merging Audio Device - WDM notes.
Merging Audio Device - WDM notes.
Read with this
RAVENNA ASIO Troubleshooting
RAVENNA ASIO Troubleshooting
Read with this
Merging Audio Devices Performances Debug.
Merging Audio Devices Performances Debug.
Read with this
Merging RAVENNA Advanced Pages User Guide.
Merging RAVENNA Advanced Pages User Guide.
More like this