Ovation redundancy - Mirrored commands
- David Jacques
To achieve redundancy with a backup Ovation running an identical show in mission critical situations, it is possible to use the Controller > Mirror all Commands to Remote Ovation Sequencers feature.
However, this does not ensure sample accurate sync. If sample accurate backup is required some key Cues in both systems can be set as Master/Slave.
Typically identical Shows will be running in the Main and Backup machine and any Cues which are to be manually triggered during the show are set as Master in the Main Ovation and as Slave in the Backup.
All other Cues which are triggered via rules or timed events do not required to be Master/Slaved, they will be triggered automatically in both systems at the same time by the sequencer engines.
However, you can ensure that Cues triggered manually will be synced in the Backup machine by this using the Multi-Sequencer Synchronization feature.
If there is a problem with the Main machine and it is necessary to switch to the Backup machine, the audio outputs are simply switched manually to the Backup machine.
Subsequent manual control of Cues is done on this machine. It will be in the exact same state as the Master.
Note: The Master Show should be stopped after changeover to the Backup in order to avoid contradictory commands.
1.Configuring Windows network
To communicate the commands between the 2 Ovation computers, some settings have to be applied on Windows network.
You may need Administrator rights to modify those settings.
Check that Windows Network Discovery is activated.
Go in Windows Control Panel> Network and Sharing Center > Change advanced sharing settings
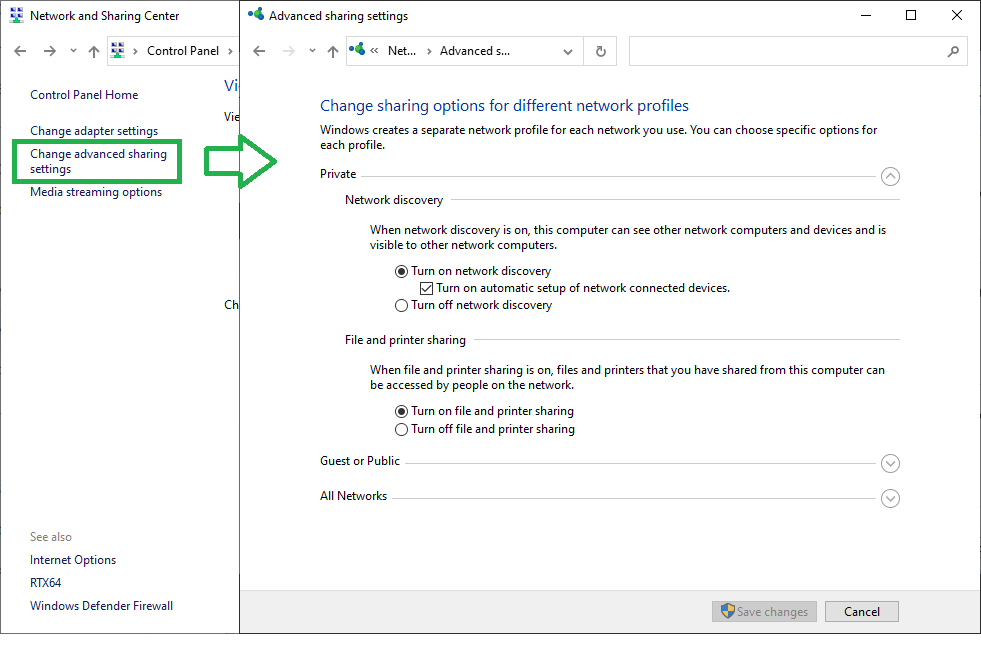
Make sure that Network Discovery is active. File and Printer sharing is optional.
This setting can be defined for each Network type, Home/ Work, Public or Domain, so please set accordingly to your Network type.
The Network type can be identified in the main Network and Sharing Center window.
Go Windows Control Panel > Network Connections > Select your Windows Network LAN card > Properties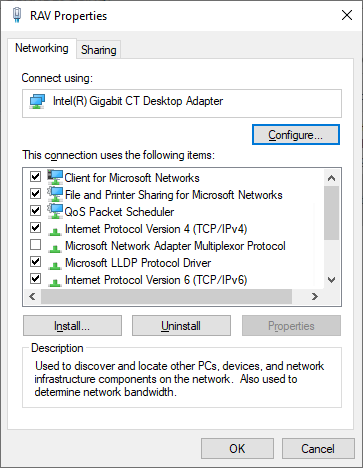
Client for Microsoft Networks,File and Printer Sharing for Microsoft Networks, and Internet Protocol Version 6/ Version 4 must be active.Configure the IP adresses
When you have several networks connected to your computer, the operating system uses the IP addresses to sort the network datas and send it to the correct network.
If two (or more) networks are connected to one computer, the root of the IP addresses have to be different, otherwise the computer will not be able to determine where to send the network datas.
Each computer must have a unique IP address per netwrok.
Examples with a RAVENNA network:
Ovation commands network IP is 192.168.0.10 and RAVENNA is 169.254.25.20 OK
Ovation commands network IP is 10.0.25.20 and RAVENNA is 169.254.25.20 OK
Ovation commands network IP is 169.254.15.10 and RAVENNA is 169.254.25.20 NOT OK
Ovation commands network IP is 192.168.0.10 and RAVENNA is 192.168.10.20 NOT OKThe computers IP addresses can be verified Windows Control Panel > Network Connections > Select the required LAN card > Status > Details.
Depending on your network configuration, the computers will receive their IP addresses automatically (DHCP), or you will have to set it manually (direct connection / non DHCP).
To manually set an IP address, Go Windows Control Panel > Network Connections > Select the required LAN card > Properties.
Select Internet Protocol Version 4 (TCP/IPv4) (or Version 6 (TCP/IPv6) depending on your network) and click on Properties button.
Set it to "Use the following IP address" and enter the IP address.
Once you have entered your IP address, click in the Subnet Mask field. Windows will automatically set the correct Subnet Mask.
Default gateway and DNS server can be left blank.
Click on OK and Close to validate those settings.
Now you need to restart the computer for changes to apply.
Note : The IP address 127.0.0.0 should NEVER be used.
Computers on a domain
Computers connected under the same domain can directly jump to section 3, as the security access is managed by your domain server.
Please see with your IT Manager for further details.Computers in a WorkGroup
Make sure both computers are in the same workgroup.Go in Windows Control Panel > System, the required information is in the Computer name, domain and workgroup settings section.
If you need to change the workgroup, click on Change Settings in the Computer name, domain and workgroup settings section and enter your changes.
You must restart the computer for changes to take effect !
Checking access through Windows
On the Ovation Master, make sure in Windows explorer that you can access the remote Ovation:
Open Windows explorer and access the remote computer, using the “Network” part in the left pane, or by typing the computer name in the address bar;
for example \\OvationB, if the remote Ovation is a on a computer called OvationB.
If that does not work, it will not be possible to remote control the second Ovation.
Tip : adding a password on both computer may help if you can't get access.
Please consult Windows documentation about Workgroups for further details.
A note on credentials (password)
Remember that you have to enter a user name and its password for a user account on the machine that you want to have access to.
In the screenshot below, we’re connecting from a machine that is called OVATION A on a machine that is called OVATIONB. The user account on OvationB computer is Lucas.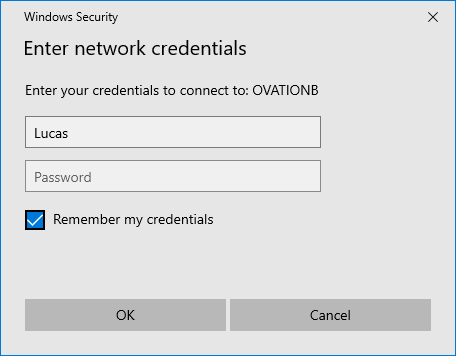
You do not need to share any folder.
Check the box “Remember my credentials”, otherwise you will have to enter the user name and password each time you restart the computers.Windows login issue: if you did rename your user account, Windows will not be able to log from another computer, it only works locally.
You will continuously get wrong user name and password error.
In that case, create new user accounts, and log remotely with those new credentials.
2.Configuring Ovation
- On the Master Ovation, go in Settings > Application Settings > Controller > Remote Controlled Ovations.
Make sure Local Ovation Sequencer is ticked.
In the Remote Ovation Sequencers list, type exactly the remote computer name, in our example OvationB.
Using an IP address instead of the computer name will NOT work.
Tick the box "Mirror All Commands to Remote Ovation Sequencers listed above".
Click OK to close the settings.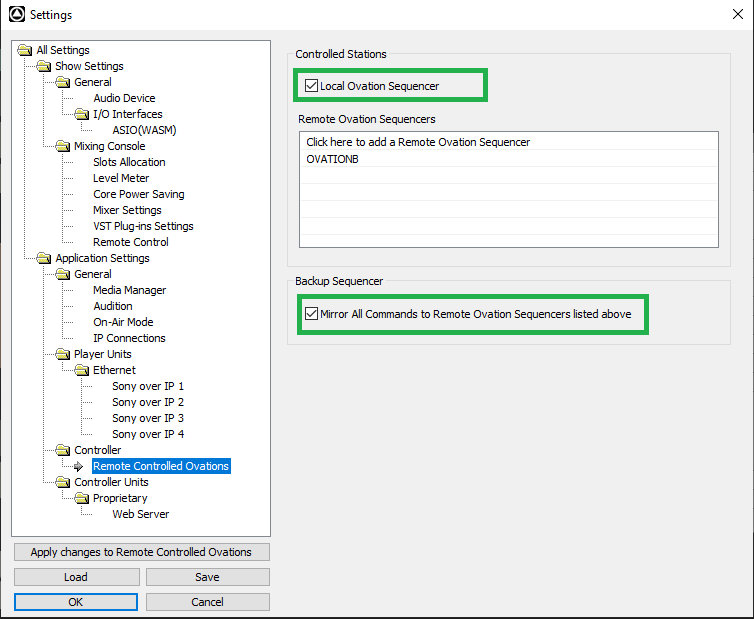
- When you Init the Show, ovation will initiate the communication with the remote Ovation computer.
The mirrored Ovation application on the remote Ovation computer has to be to be launched.
- It is recommended to Pack the show (Show > Package Show), and move a copy of it onto the mirrored Ovation PC.
File and Printer sharing option can be useful in that case, allowing to copy into shared folders between the 2 computers.
.
“Failed to send Mirror commands” error message
The Ovation Master was not able to communicate with the remote Ovation.
Please check the following :
- In Windows Explorer, you can access the remote computer from the master computer.
- The remote computer name is correct in Settings > Application Settings > Controller > Remote Controlled Ovations.
- The Ovation application is started on the remote computer