Ovation redundancy - MultiSequencer Synchronization
To achieve redundancy with a backup Ovation running an identical show in mission critical situations, it is possible to use the MultiSequencer Synchronization.
Synchronization is sample accurate if Master and Slave TIME are in sync. Through I.e. TimeCode Chase.
A pre-roll of up to two seconds is required before output begins from a slave Ovation.
If this is critical in your application add two seconds of silence to Cues which start at the very beginning of the Show.
One method of achieving Time synchronization across several Ovations is to use a GPS source.
Note: The Show should be started
1.Configuring Windows network
To communicate the commands between the 2 Ovation computers, some settings have to be applied on Windows network.
You may need Administrator rights to modify those settings.
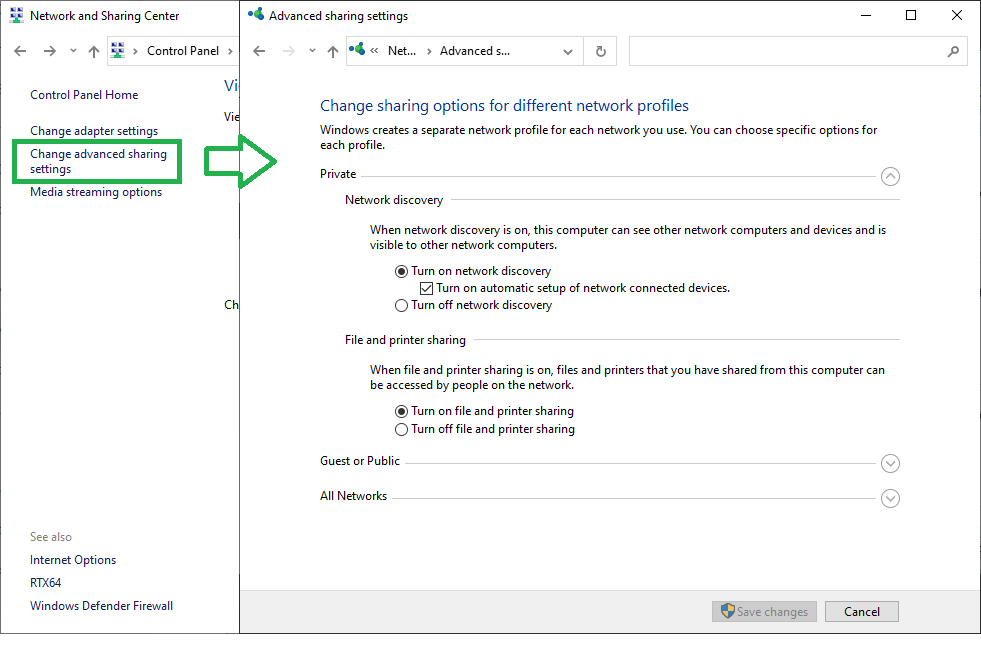
Check that Windows Network Discovery is activated.
Go in Windows Control Panel> Network and Sharing Center > Change advanced sharing settings
Make sure that Network Discovery is active. File and Printer sharing is optional.
This setting can be defined for each Network type, Home/ Work, Public or Domain, so please set accordingly to your Network type.
The Network type can be identified in the main Network and Sharing Center window.
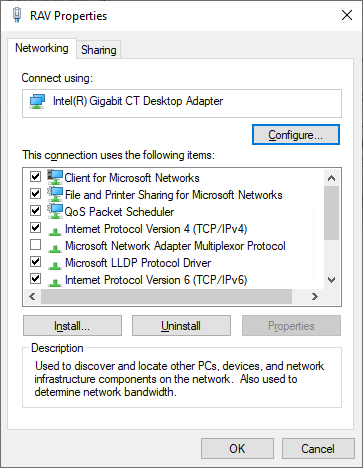
Go Windows Control Panel > Network Connections > Select your Windows Network LAN card > Properties
Client for Microsoft Networks,File and Printer Sharing for Microsoft Networks, and Internet Protocol Version 6/ Version 4 must be active.Configure the IP adresses
When you have several networks connected to your computer, the operating system uses the IP addresses to sort the network datas and send it to the correct network.
If two (or more) networks are connected to one computer, the root of the IP addresses have to be different, otherwise the computer will not be able to determine where to send the network datas.
Each computer must have a unique IP address per netwrok.
Examples with a RAVENNA network:
Ovation commands network IP is 192.168.0.10 and RAVENNA is 169.254.25.20 OK
Ovation commands network IP is 10.0.25.20 and RAVENNA is 169.254.25.20 OK
Ovation commands network IP is 169.254.15.10 and RAVENNA is 169.254.25.20 NOT OK
Ovation commands network IP is 192.168.0.10 and RAVENNA is 192.168.10.20 NOT OKThe computers IP addresses can be verified Windows Control Panel > Network Connections > Select the required LAN card > Status > Details.
Depending on your network configuration, the computers will receive their IP addresses automatically (DHCP), or you will have to set it manually (direct connection / non DHCP).
To manually set an IP address, Go Windows Control Panel > Network Connections > Select the required LAN card > Properties.
Select Internet Protocol Version 4 (TCP/IPv4) (or Version 6 (TCP/IPv6) depending on your network) and click on Properties button.
Set it to "Use the following IP address" and enter the IP address.
Once you have entered your IP address, click in the Subnet Mask field. Windows will automatically set the correct Subnet Mask.
Default gateway and DNS server can be left blank.
Click on OK and Close to validate those settings.
Now you need to restart the computer for changes to apply.
Note : The IP address 127.0.0.0 should NEVER be used.
Computers on a domain
Computers connected under the same domain can directly jump to section 3, as the security access is managed by your domain server.
Please see with your IT Manager for further details.Computers in a WorkGroup
Make sure both computers are in the same workgroup.Go in Windows Control Panel > System, the required information is in the Computer name, domain and workgroup settings section.
If you need to change the workgroup, click on Change Settings in the Computer name, domain and workgroup settings section and enter your changes.
You must restart the computer for changes to take effect !
Checking access through Windows
On the Ovation Master, make sure in Windows explorer that you can access the remote Ovation:
Open Windows explorer and access the remote computer, using the “Network” part in the left pane, or by typing the computer name in the address bar;
for example \\OvationB, if the remote Ovation is a on a computer called OvationB.
If that does not work, it will not be possible to remote control the second Ovation.
Tip : adding a password on both computer may help if you can't get access.
Please consult Windows documentation about Workgroups for further details.
A note on credentials (password)
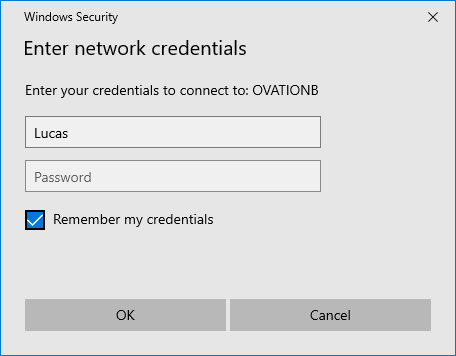
Remember that you have to enter a user name and its password for a user account on the machine that you want to have access to.
In the screenshot below, we’re connecting from a machine that is called OVATION A on a machine that is called OVATIONB. The user account on OvationB computer is Lucas.
You do not need to share any folder, but it might be convenient to share the show between the Ovation computers.
Check the box “Remember my credentials”, otherwise you will have to enter the user name and password each time you restart the computers.Windows login issue: if you did rename your user account, Windows will not be able to log from another computer, it only works locally.
You will continuously get wrong user name and password error.
In that case, create new user accounts, and log remotely with those new credentials.
2.Configuring Ovation
Ovation Settings
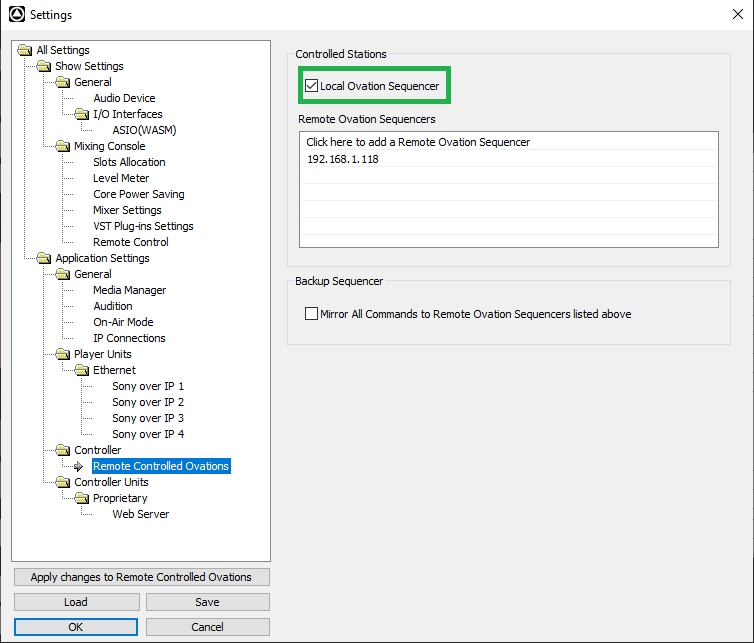
On the Master Ovation, go in Settings > Application Settings > Controller > Remote Controlled Ovations.
Make sure Local Ovation Sequencer is ticked.
In the Remote Ovation Sequencers list, type exactly the remote computer IP ADDRESS, in our example 10.0.0.58
Using the computer name instead of the IP Address will NOT work.
"Mirror All Command... " checkbox should NOT be ticked.- Make sure the Show is the same between the Ovation computers, as the synchronization will use the Cue List names and Cue Names.
You may package your show to get exact copy of your show.
Show configuration
- On the Master computer, go in the Show properties > Multi-Sequencer Synchronization Section and set the Synchronization Mode to Master.
On the Slave computer, go in the Show properties > Multi-Sequencer Synchronization Section and set the Synchronization Mode to Slave.
On the Slave computer, configure the re-synchronization settings according to your needs :
Resynchronize Drifts/Jumps : Determines whether or not re-synchronization will take place when a sync drift or jump is detected.
Resynchronize Difference threshold : Determines how far out of sync a sequencer must be before re-synchronization takes place. Type the desired threshold in the field. Default is 1.0[s]. (Min value is 100 ms)
Cue Configuration
- Now the Cues have to be configured.
On the Master computer, go in the Cue properties > REMOTE CONTROL: Multi-Sequencer Synchronization Section and set the Synchronization Mode to Master.
On the Slave computer, go in the Cue properties > REMOTE CONTROL: Multi-Sequencer Synchronization Section and set the Synchronization Mode to Slave.
On the Slave computer, configure the re-synchronization settings according to your needs :
Resynchronize Drifts/Jumps : Determines whether or not re-synchronization will take place when a sync drift or jump is detected. The Difference threshold is the same as the one set in the Show Properties.
Synchronize Pause: When set to Yes if the Master Cue is Paused the Slave Cue also Pauses.
Synchronize Stop: When set to Yes if the Master Cue is Stopped the Slave Cue also Stops.
Important note : The cue on both the Master and Slave(s) must contain audio.
Synchronization Tokens
Ovation generates the Synchronization Token automatically from the Cue Name and CueList Name.
Therefore Master and Slave Tokens MUST match. (case sensitive).
Note: If for some reason automatic Token generation is unsuitable. E.g. because the Cue on the Master Ovation is named Bach and the Cue on the Slave is named Bach back then a Token value may be typed in the field. The same Token Value MUST be used on Master and Slave Ovations.
3.Time Synchronization
- To synchronize the Master and Slave show, their show time have to be the same.
It is therefore recommended to use an incoming timecode. You have to set the Show Time Mode in the Show Properties to TimeCode Chase in that case, on all Ovation Computers. - For sample accurate sync, you must also use a video reference, and run in MassCore Mode.
- Connect all the Ovation computers to the same TC source.
In ANEMAN / RAVENNA Easy Connect, connect all Ovation MassCore to the same Horus/Hapi LTC.
For your convenience, you may also display the TimeCode Reader and set it to show your LTC source. - A pre-roll of up to two seconds is required before output begins from a slave Ovation.


